
Chapter 1 – The Technique Of The Snatch And The Clean And Jerk

Chapter 1 – The Technique Of The Snatch And The Clean And Jerk
Why begin a book about weightlifting with a chapter on weightlifting technique? After all, weightlifting is first and foremost a sport designed to test strength and power. Why not begin, then, with a discussion of those subjects? The reason is that you cannot participate in an activity until you understand how it is performed, and you cannot properly measure your strength or train to increase it until you know how to execute the basic movements of weightlifting. Only when you understand what good technique is (i.e., the correct means of executing the two competitive lifts) can you begin to fully appreciate the sport of weightlifting.
In this chapter we will focus on understanding weightlifting technique, first on a very basic and then on a more advanced level. In the next chapter we will focus on how to learn and teach weightlifting technique. We will begin our discussion of technique by examining three major controversies that surround the subject. In the process of that examination, we will develop a framework within which it will be easier to understand various principles of sound weightlifting technique.
Some Controversies And Concepts Of Modern Weightlifting Technique
The Technique Versus Strength Controversy
Whenever weightlifters and their coaches get together, there is bound to be a discussion about the importance of technique. Some coaches see technique as virtually all important. Members of this school judge a weightlifter almost completely on his or her technical ability. They view technique as not only very necessary to be a good weightlifter but also as sufficient. To these coaches and athletes, the amount lifted is secondary to how beautifully and efficiently a lift is performed. These extremists show little respect for the champion who has serious technical flaws in his or her lifting performance. Top athletes who make errors in technique are seen by the technique purists as reprehensible “freaks” who were blessed with strength but never took the time to learn how to lift properly and therefore are wasting their gift. These purists overlook several obvious facts.
First, the sport of weightlifting was devised as a test of strength. Techniques for performing the snatch and C&J have evolved over the years as part of the constant effort to improve performance. It is certainly true that the lifter who fails to master technique will perform at a lower level, in a less consistent way and at greater risk of injury than the athlete who has excellent technique. Nevertheless, the athlete who exhibits great strength is to be admired for that single capacity that weightlifting is fundamentally about.
Second, the athlete who fails to develop good technique should not be any less well regarded than an athlete who fails to put in the hard and consistent training that is necessary in order to develop his or her enormous strength potential. Developing strength is at least as hard as developing technique, and even harder in certain ways. The strong lifter should be given his or her due for all of the hard work that was required to develop that strength. I have met many people who have told me that “it’s easy to get strong,” but none of these individuals has actually achieved the strength of a top international weightlifter. Anyone who has acquired truly great strength understands the enormous effort required too well to take his or her strength for granted.
Third, the athlete with poor technique may have lacked the proper coaching at the outset. He or she may have worked very diligently on technique during his or her formative years. However, for a variety of reasons, the requisite skills may not have been developed. One should not immediately assume that the poor technician is guilty of sheer sloth or stupidity. Rather, one should at least consider the possibility (unless it is proven otherwise) that the athlete in question is trying just as hard as any technique specialist to fulfill his or her potential.
Unfortunately, the technique fanatics sometimes use their technical skills to protect their delicate egos. They have mastered technique. Of their mastery there can be no doubt. It is easy enough to claim a genetic deficiency with respect to the ability to develop strength and then to say: “If I had Jack’s strength, I’d lift twice as much as him.” Such lifters ignore the fact that the challenge of developing strength is as least as great as that of developing technique and is more fundamentally linked to the reason behind the sport of weightlifting. For such people the frustration caused by failing to develop strength is like that felt by the strong lifter who is unsuccessful in developing technique. It is no more or less painful.
At the other extreme are the advocates of pure strength. They seem to hate technique, almost to wish it had never been invented. They view good technique as an intrusion into the purity of a sport that was devised to test strength. They long for the “old days” when technique was a secondary consideration in lifting big weights. There is nothing that pleases these lifters more than to be told: “You are so strong, you are not using even half of your great strength. If you would just develop proper technique, you would lift twice as much.” What could be more gratifying? In reality, if that lifter were to develop perfect technique, he or she would not lift twice as much, probably not fifty percent more, and perhaps not even twenty-five percent more. Why then would a person with unrealistically “optimistic” appraisals of his or her strength develop proper technique, only to discover that the accolades that were once received are no longer as grand?
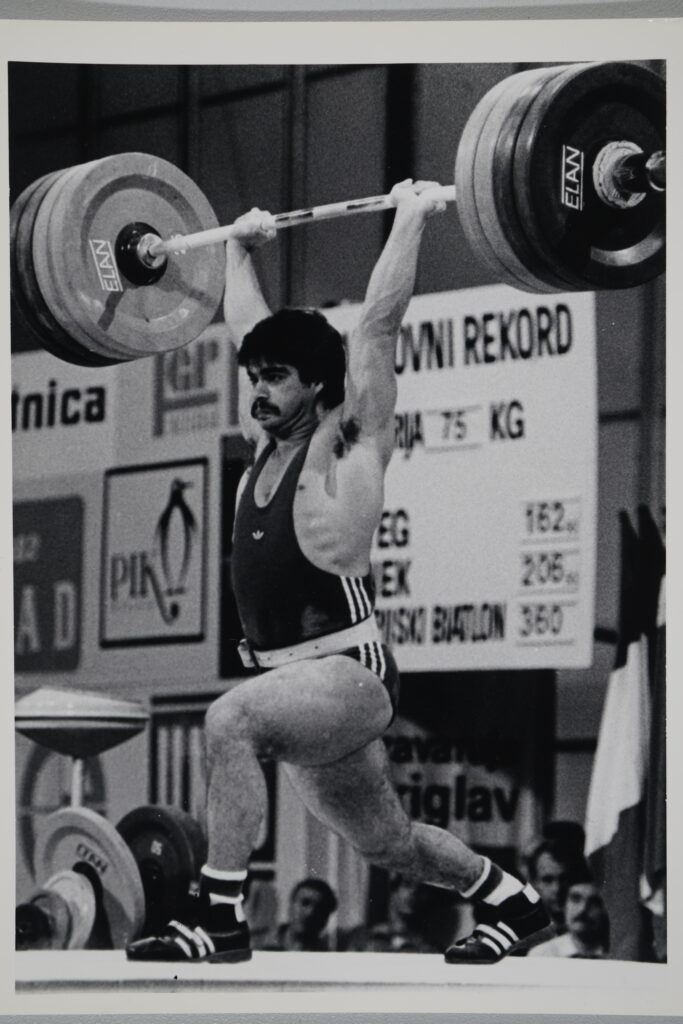
Today many strength purists gravitate toward powerlifting, a wonderful sport. I think, however, that many of the powerlifters of today would prefer the sport of weightlifting if they could just see how to do it. I have yet to meet one powerlifter who has mastered Olympic-style lifting, and whose body can withstand the rigors of training on the Olympic lifts, who does not prefer it. A great deal of satisfaction comes from being amazingly strong and at the same time capable of producing extremely powerful and efficient motion. There is a unique thrill that comes from controlling the motion of a very heavy object and in the end holding it aloft in celebration of a “victory” over gravity.
In conclusion, strength may be more fundamental to the sport of weightlifting than technique, but in order for an athlete to fulfill his or her maximum potential, it is absolutely essential to develop both qualities to their highest potential. Obviously, maximum efficiency is needed to maximize performance. But there are two more subtle and perhaps more important reasons for perfecting technique. One reason is that correct technique is generally safer. An athlete who lifts correctly greatly reduces the risk of injury. A second reason to master technique (perhaps the most important of all) is to minimize frustration. All weightlifters miss lifts from time to time, and beginners will miss fairly often, but unskilled lifters and those who have serious flaws in technique will miss again and again unnecessarily. They will miss in training and in competition far more than is necessary, and their joy in lifting will suffer greatly as a result. More careers in weightlifting have ended due to frustration than any other cause. Don’t let technique flaws frustrate you; learn to lift properly from the outset, no matter how long it takes.
Is There Only One “Best” Weightlifting Technique?
A second major controversy with respect to weightlifting involves two groups that I will call the absolutists and the relativists. In their purest version, the absolutists maintain that: 1) there is only one proper technique for lifting weights; and 2) they know what it is. Absolutists are easy to spot at a competition; they are the ones who contort their faces and snort in disgust whenever someone fails to perform a lift in accord with their own model. They simply “know” that their method is best and that everyone not using it is wasting their potential. How they have come to know this is not always clear, often not even to them.
In contrast, the relativists, in their most extreme version, maintain that proper technique merely involves “doing what comes naturally.” They maintain that the body has its own most efficient and “natural” way to perform the lifts and that each person has merely to search his or her soul for guidance and then do whatever the subconscious seems to say. There is a second school of relativists who accept the notion of proper technique but who maintain that a lifter can only do what is natural, even if another technique is preferable. You can spot relativists because they exhibit a perpetual grin of resignation while observing virtually any lift, a grin that grows even wider when an obvious fault occurs, as if they are affirming the irony that the harder you try, the more likely it is that nature and whatever it holds in store will emerge.
As is normally the case in such controversies, both sides have some valid basis for their claims, but both sides are also dead wrong in a number of important ways. The absolutists fail to recognize that each human body is unique. Bodies are different with respect to the size and shape of the bones that are the levers and the joints that are the fulcrums in the mechanics of human movement. The muscle-tendon units that move the skeleton vary in their structure and capacity as well. Moreover, even if the infinite variety in humankind were not present, even if everyone were built in the same way, there would be a variety of ways in which the human body could develop a given force, each with its own advantages and disadvantages. This is not to say that there are not a significant number of absolutes with respect to technique that we can state; there surely are, and we will identify them in this chapter. But absolutes are far harder to come by, and the variety that is possible while still achieving good technique is far richer than the absolutists would have us believe.
Perhaps an even greater weakness in the argument of the absolutists is that they know what the optimal technique is. (How they come to know is often not clear, even to them, but when it is, the reason(s) given rarely stand up to serious analysis.) While we know a great deal about human movement in general and the scientific principles of weightlifting technique in particular, there is also a great deal that we have been unable to measure, analyze or understand. It is very likely that at least some, and perhaps a great deal, of what we believe to good technique today may be abandoned and replaced with something better in the future. The fact that the champions of today do something deserves our attention. However, their utilization of a particular technique is not proof that it is “the” optimal one, any more than the technique of the great champions of yesteryear has always withstood the test of time (although much can be learned from the old champions).
The relativists are not safe from criticism either. They are often unwilling to work with their lifters to develop proper technique or to confess their own lack of understanding of what is known today. They recognize the importance of biological individuality. Instead of using it as a basis for further study and learning, however, they use it as an excuse for whatever their athletes do. Clearly humankind was not born with proper weightlifting technique etched deeply within the recesses of the brain. The mechanics of weightlifting technique are not intuitive in nature. When you are doing a snatch or a clean and jerk, you are not moving in the way that most people think. Many lifters cannot explain the mechanics involved in weightlifting, even after observing and practicing it for many years. Therefore, the intuitive approach has great shortcomings. Correct technique needs to be taught by the coach and learned by the athlete.
As you might conclude from the preceding discussion, the development of technique is a process based on firm principles applied within the context of the individual characteristics of the athlete being trained. It is a difficult process at best, yet virtually everyone can develop a technique that is suitable for them with a well planned, consistent and flexible effort.
Oversimplification Versus Unnecessary Complexity
A third major controversy with respect to technique stems from the tendency of those who analyze and teach it either to oversimplify, or to add artificially to the complexity of, the sport of weightlifting.
The oversimplifiers revel in offering some simple fact as justification for a given technique, while appearing to be shocked that no one else sees how simple it all is. An example would be the person who says that you should always lift a bar straight up because “the shortest distance between two points is a straight line.” While no one can argue with the accuracy of this statement, its application to the sport of weightlifting is not as straightforward as the advocate of such a point would have you believe.
For instance, in order to perform the snatch, the first lift in weightlifting competitions, the bar needs to be raised from the floor past the shins and knees (which are in the way of the vertical path of the bar when the lifter bends down to lift the bar from the floor). The bar’s motion must be accelerated so that it picks up enough speed to carry it to a sufficient height for the lifter to “catch” the bar overhead, and this must take place while the lifter’s center of gravity is shifting first in a rearward and then in a forward direction as the bar is being lifted. In addition, although the bar begins the lift at a point in front of the lifter, it must reach a point above and to the rear the lifter’s head. This kind of relative motion on the part of the bar and the athlete suggests that a straight line, while undoubtedly the shortest distance for the bar to travel, will not necessarily be the best path to meet all of the requirements of performing an efficient lift.
While it is clear that oversimplification is a mistake, so is making lifting unnecessarily complex. Teaching and analysis only need to be complex enough to impart understanding. Unfortunately some coaches seem to think that pointing out each of the manifold elements that go into the lifting process demonstrates their level of expertise. This may be true, but it also can hinder the learning process if the complexity is introduced before it is appropriate.
For example, one popular book on weightlifting devotes an entire section to the concept of the combined center of gravity of the lifter and bar. The first problem with the way the writer handles the issue is that the concept of the center of gravity is not well explained before the concept of the combined center of gravity of the lifter and bar is introduced. As a result, the subject becomes quite confusing. Nevertheless, the concept of combined center of is presented, and an example of its application to the lifting process is given (an example which does not offer any illumination regarding the importance of the concept). After the reader has struggled to grasp the concept (probably with only limited success), the writer goes on to explain weightlifting technique at length across several short chapters. During that explanation, the concept of the combined center of gravity is mentioned only twice, and both of those times the author only repeats the initial example. No further use of the concept is ever made. Why did the writer bother to explain the concept if no important application of it is ever used thereafter? This is unnecessary complexity at its worst. (In this chapter we will explain the concept of a center of gravity, but then we will use it as well.)
A Proper Context for the Study of Weightlifting Technique
On the basis of the preceding discussion, we can identify several key concepts regarding weightlifting technique. First, in order to reach his or her potential in the sport of weightlifting, an athlete must master technique, but technique alone is not sufficient to become a high level performer.
Second, there are definite principles of good lifting technique, but there is also more than one narrow way to perform the two Olympic lifts effectively.
Third, weightlifting is a learned activity performed by athletes who have individual differences, and no amount of pure introspection or a priori reasoning will lead to the best technique for all athletes in all respects. Proper principles must be applied within the context of the characteristics of a given athlete in order to optimize technique.
Fourth, weightlifting technique is neither absurdly simple nor so complex as to defy the understanding of those who do not have a graduate degree in biomechanics.
Finally, perfecting technique is an absolute necessity. It makes weightlifting safer, more pleasurable to participate in and more aesthetically pleasing to behold. The purpose of the balance of this chapter is to provide you with an understanding of proper technique, a crucial first step on the road to becoming a weightlifter’s weightlifter.
The Basics of the Technique of the Snatch and the Clean and Jerk
We will begin our analysis of weightlifting technique with an explanation of what the athlete is doing when he or she performs two Olympic lifts, the snatch and the clean and jerk (C&J). These are the lifts performed in weightlifting competitions (the winner being the athlete who lifts the most weight in both lifts combined). The snatch is a one stage lift and the C&J a two stage lift in which greater amounts can be added.
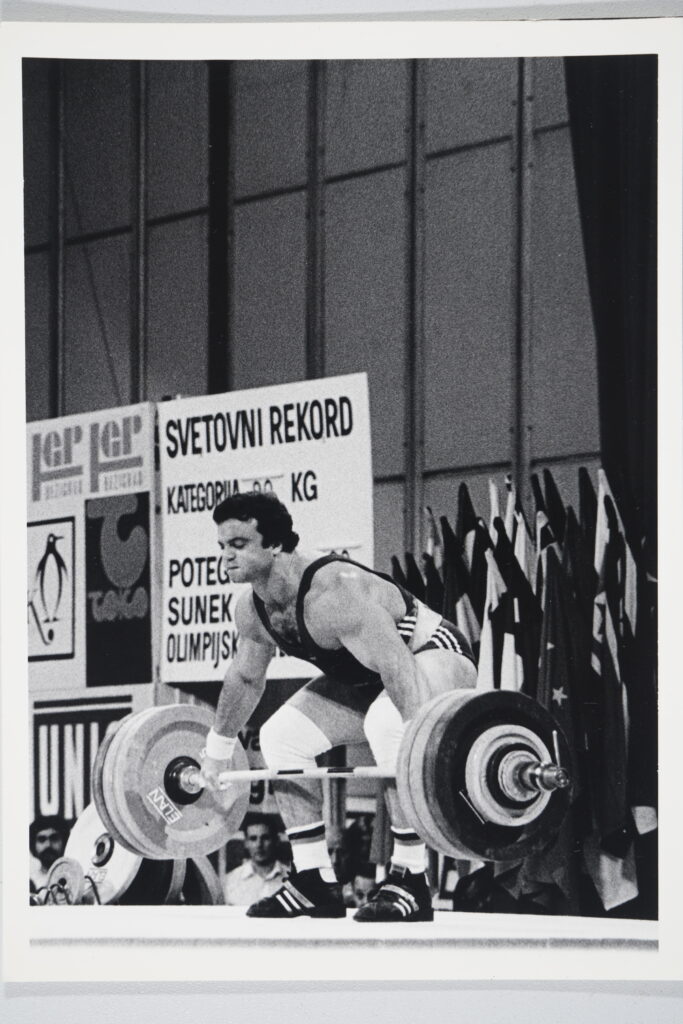
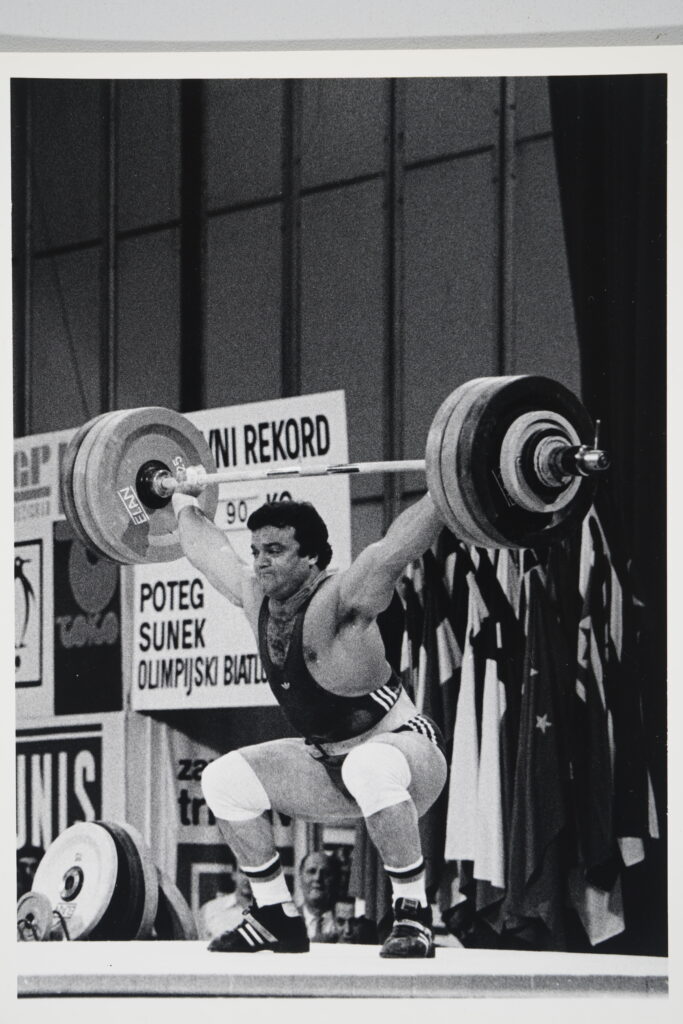
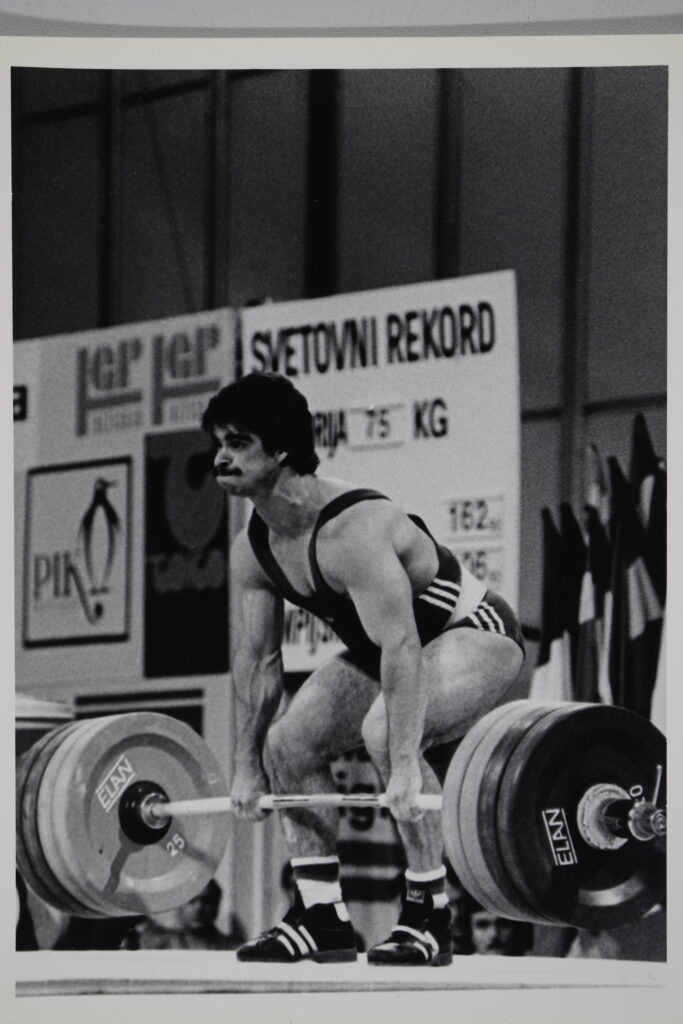
This overview will be more easily understood if you examine the sequence photographs that appear in Fig. 3 and Fig. 4 before reading further and then refer to them freely as you read descriptions of the lifts. (Fig. 4 omits the starting position from the floor and the “recovery” from the split position in which the athlete takes one step back with the front foot and then a step forward with the rear foot to bring the feet in line with one another and complete the lift).
As can be seen in the first photo of the snatch sequence, the lifter begins by gripping the bar with the hands significantly wider than the shoulders. From this position the lifter uses the muscles of the legs to lift the bar from the floor and then uses the muscles of the legs, hips and back in an extremely powerful (i.e., explosive) fashion to accelerate the upward motion of the bar. When the bar has been lifted to a level approximately at the height of the lifter’s hips (at which point the lifter has generally extended his or her legs and risen somewhat on the balls of his or her feet.) the lifter begins to descend under the bar while the bar continues to rise, primarily as a result of the explosive force that the lifter has applied to the bar before the descent commenced. The lifter then “catches” the bar at arm’s length and allows the legs to continue to bend after the catch to absorb the downward force exerted by the bar in much the same way a fielder in baseball “gives” with his or her glove as a ball is received. Finally the lifter stands up from the low squat position that was assumed in order to catch the bar. (Catching the bar in a low position means that it does not have to be lifted as high and that more weight can therefore be lifted.)
Methods similar to those used in the snatch are used to lift the bar in the clean and jerk. The lifter initially raises the bar through the use of the leg muscles; then, as the bar rises to the level of the knees, the lifters uses the muscles of the legs, hips and back to straighten the body in an explosive fashion, accelerating the upward motion of the bar.
Once the bar is approximately at hip level, the lifter begins to descend under the bar in order to catch it when it reaches its highest point. (The bar continues to rise because of the explosive effort the lifter made with the legs, hips and back.) The lifter permits the legs to bend further after catching the bar in order to absorb the force of the downward descent of the bar. The lifter then stands up and prepares for the jerk.
In order to propel the bar overhead during the jerk portion of the lift, the athlete bends his or her legs into a position similar to one that would be used to jump vertically. The legs are then very forcefully extended in order to thrust the bar upward.


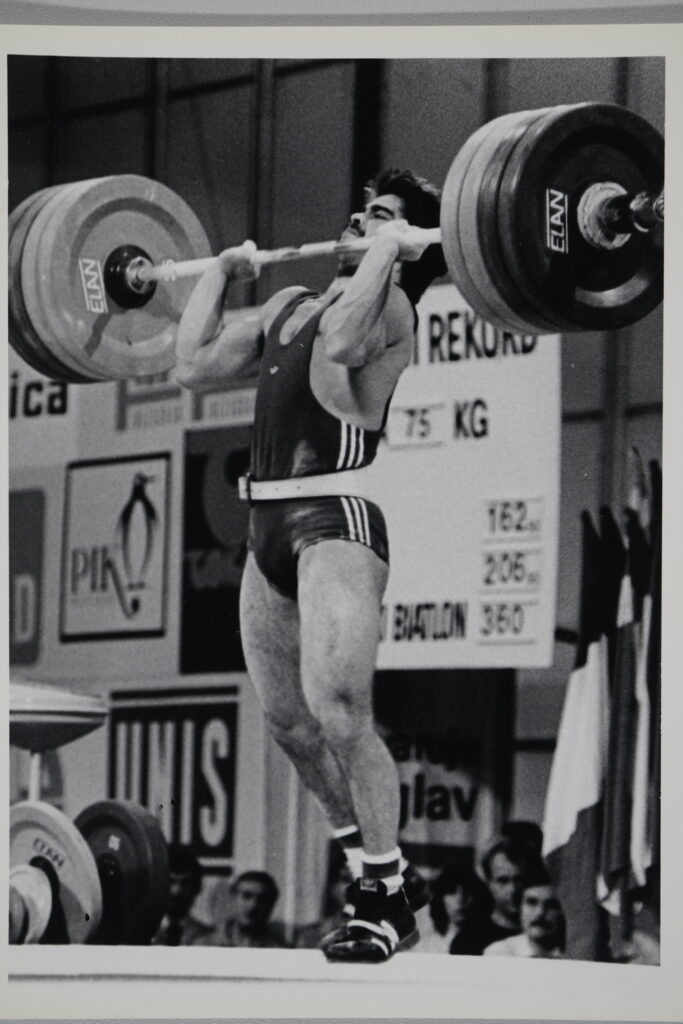
Just after the bar leaves the lifter’s shoulders as a result of the leg drive the lifter has generated, the lifter typically moves one foot forward and the other foot backward in order to lower the body as the bar is rising and to prepare to catch the bar at arm’s length. The front foot is placed flat on the floor and the back foot is balanced on the ball of the foot and the toes. This “split” position gives the lifter both stability and the ability to move forward or backward slightly to maintain balance. After the bar has been brought to a stop, the lifter returns to a standing position, first bringing the front foot back a step and then bringing the back foot forward until the feet are in line with one another.
Two important principles can be learned from the preceding discussion together with careful study of the photos. First, contrary to what most people think when they see Olympic-style lifting for the first time, the process is not merely one of lifting the bar. It involves a combination of raising the bar and lowering the body quickly enough to catch the bar at nearly the maximum height to which the lifter has been able to raise it. In order for the lifter to catch the bar successfully, the bar must have acquired enough upward speed to continue to travel upward for that very brief period while the lifter is moving under the bar (otherwise, as soon as the lifter tried to descend under the bar, the bar would fall and the lifter could never catch up to it). It is important to understand that the lifter does not lift the bar to its maximum height and then, when the bar stops, jump under it. Rather, the movements of raising the bar and lowering the body are taking place simultaneously. Consequently, the lifter must possess sufficient power to throw the bar, not just lift it. In addition, the lifter must possess considerable finesse in order to catch a heavy moving object at its maximum vertical height.
Second, the role of the arms in lifting is much smaller than you might initially assume. The arms do not lift the bar to its maximum height. Instead, the muscles of the legs, hips and back are primarily responsible for this action, generating an explosive force that creates upward velocity of the bar sufficient to cause it to continue to rise for at least a portion of the time the lifter is descending under the bar, permitting the lifter to catch the bar successfully. This is not to minimize the role of the muscles of the arms and shoulders. These muscles do interact with the bar, applying force to it as the lifter descends under and catches the bar. Moreover, strong arms and shoulders are needed to support the bar overhead. However, the role of the arms is not primary. The strength and explosive power of the lifter’s leg, hip and back muscles, the strongest muscles in the body, form the foundation for championship lifting.
Analyzing The Snatch And Clean & Jerk Via The “Six Phases” And The Trajectory Of The Bar
The technique of modern weightlifting has been studied quite extensively, particularly in Eastern Europe, and most particularly by researchers within the former Soviet Union. As a result of the methods used to perform the analysis, some aspects of technique are quite well understood, while others remain only incompletely explained. Let us review what has been learned about the technique of today’s high level athletes.
We will analyze the snatch and clean first. We will use a method similar to that advocated by A. Lukashev of the Soviet Union in 1972 (for the snatch) and further developed by B. Podlivayev in 1975 (for the clean). This method consists of breaking down these lifts into six phases or stages. (Lukashev and Podlivayev also group the six phases into three pairs of phases which they refer to as “periods”; we will refer primarily to the six phases or stages.) Breaking the lifts down into phases makes it easier to understand what is occurring when each lift is being performed. I have taken the liberty of framing the explanation of the jerk into six phases as well, because such a procedure fits well with what has been done by the aforementioned Soviet writers. The translations of the Soviet literature that I have reviewed refer to only five phases in the jerk. Much of the information that is presented in the next several sections about what lifters are doing in the various phases of the snatch, clean and jerk draws on work done by Robert Roman, a world renowned Soviet weightlifting analyst who specialized in the area of technique. (See the Bibliography for a listing of some of his fine works.)
There are at least four important limitations to using the six-stage kind of analysis. The first limitation is that this kind of analysis focuses on the snatch, clean and jerk up to the point where the bar is caught or fixed. There is little or no coverage of how the lifter stands up or “recovers” from the position in which the bar is fixed. The second point to remember is that the six phases used in the Lukashev/Podlivayev analytic method, while useful for purposes of analysis, are somewhat arbitrary. Their segments are easily visible to the external observer and are very useful for the purposes of film analysis. However, further refinements in the method of analysis will probably occur with the application of better technology. While the six phases described are easy to see and discuss, they are not really crucial in analyzing the effectiveness of a particular style. For example, the point at the which the maximum application of force to the bar occurs is neither the beginning nor the end of the explosion phase of the snatch or clean. Rather, the maximum force is applied between these two points. Similarly, the position and balance of the lifter at the point of exerting maximum force have an important influence on the outcome of the lift, perhaps more so than what goes on at the beginning or end of the phase (the major focus of the Lukashov/Podlivayev analytical approach). Yet, little research has been done, and even less has been widely published, in these and other vital areas of analysis of the dynamic aspects of technique ( such as the rate of bar acceleration throughout each of the phases of the lift).
The third limitation of this analytical method is that it is simply an analysis of what the lifter is doing, not what he or she is thinking or feeling. You do not normally teach a lifter how to lift by saying “place your back at an angle of between 25 and 50 degrees in relation to the floor” or ” move into the squat under when the bar reaches the height of the hips.” Athletes do not think in terms of angular measurements and reaction time is a factor in movement control. (There is a necessary delay between the moment when lifter directs his or her body to do something and when the body actually executes the desired motion.) Therefore, if proper technique calls for the lifter to begin squatting under when the bar has reached the level of the hips, the lifter must think of moving when the bar is in an even lower position if the actual motion is to begin at the appropriate point. In addition, many of the motions that a lifter makes are a natural reaction to the actions that have preceded it. Consequently, it is those precursor actions that are crucial to teaching and learning certain aspects of proper technique, not necessarily the patterns of motion that follow. By merely attempting to assume certain positions during the lift, the lifter may be imitating the appearance of good technique without actually using the mechanics necessary to achieve an efficient lift.
The final caveat to the analysis that follows is that what is being presented is not necessarily an endorsement of the techniques described. It is simply an explanation or what is being done by the average, highly qualified lifter. Some champions perform in a manner very close to the one described while others do things quite differently. The important thing at this point in our analysis of technique is to gain an overall understanding of what most high level lifters are doing when they perform the snatch or C&J. A subsequent discussion in this chapter will address the issue of individual variations within the model presented.
While much of importance can be learned from the basic analysis presented, it should not be viewed as “the” method to be used. The proper evaluative approach to the “average” lifting technique used by high level athletes and to what a particular champion lifter is doing is to say: “There may be a very good reasons for the majority of lifters (or the champion) to be doing things that way, but I need to understand and to experiment with their methods before I can accept their approach, even conditionally. It must be remembered that most lifters, even the champions, are often victims of “me too approaches to training and lifting (whether developed by their coaches or themselves).
It is prudent not to ignore the lessons that many before you have learned the “hard way” or to overlook the insights of those who have carefully studied technique. However, it is also prudent to remember that throughout mankind’s history the masses have often agreed on what later turned out to be a complete falsehood. As the saying goes in the study of logic: “Fifty million Frenchmen (or Americans or Russians) can be wrong.”
An Explanation of the Six Phases of the Snatch and Clean “Pull”
The six phases of the snatch and clean set forth by Lukashev and Podlivayev are explained in this section. Each phase will be analyzed in some detail in the next section. During the discussion we will often refer to the “pull”. In the context of this discussion, pull means the lifting of the bar from the floor to the point at which the lifter brings to the bar to a stop on his or her shoulders (in the clean), or overhead (in the snatch). Pull always refers to both lifts unless otherwise specified.
The first phase of the snatch and clean starts from the point where the lifter begins to interact with the bar. This includes such actions as the placement of the lifter’s feet and body in relation to the bar, the setting of the lifter’s grip and any rocking or other motions the lifter may make in preparation for lifting or separating the bar from the platform. The first phase ends at the moment when the bar “separates” (is lifted) from the platform by the athlete.
The second phase of the snatch and clean, also called the “preliminary acceleration” phase, begins where the prior phase ends (i.e., when the bar leaves the platform) and ends when the legs have straightened to their maximum extent for the first time during the pull (i.e., approximately at the point when the bar has reached knee level in the clean and the bar is at the level of the lower third of the thigh in the snatch). This also marks the end of the first “period” in the pull.
The third phase of the snatch and clean, also called the “adjustment ” phase, begins when the athlete starts to flex the knees again and to move them under the bar. It ends when the knees have reached their maximum point of flexion.
The fourth phase of the snatch and clean, also known as the “final acceleration” or “explosion” phase, begins when the knees have reached maximum flexion and ends when the knees are fully straightened, or nearly so, and the athlete is at the highest point that he or she will reach on his or her toes (i.e., the point where the lower extremities of the body reached their maximum amplitude in the pull before they begin to relax so that the body can be lowered to catch the bar). This point also marks the end of the second period of the pull.
The fifth phase of the snatch and clean, also known as the “unsupported squat under,” starts once the athlete’s lower limbs have reach their maximum amplitude of extension and ends once the bar has reached its maximum height.
The sixth and final phase of the snatch and clean begins when the bar has reached its maximum height and ends when the bar has been “fixed” (i.e., the downward progress of the bar has been halted and the lifter has some degree of control over it).
An Analysis of the Six Phases of the Snatch and Clean Pull
A detailed analysis of the snatch and clean is presented in this section. This analysis includes a number of technique metrics. The figures provided for those metrics are representative of an athlete with an average, mesomorphic physique who is 170 cm tall (approximately 5’ 7”). Athletes who are significantly taller or shorter will generate different numbers. For example, athletes who are taller will tend to move the body and bar greater distances and will tend to move the bar at higher speeds.
It should also be noted that in many areas of the analysis differences are noted in the patterns of movement that occur in the snatch and the clean. These differences are believed to exist primarily because of the differences in the grip widths and weights that are used in the snatch and the clean. A narrower grip (as is used in the clean) places the shoulders at a greater distance from the bar than does a wider grip, generally resulting in the torso being held more upright during the pull for the clean than in the pull for the snatch. This grip also produces in a greater deformation (bending) of the bar during the pull for the clean because the force applied during the pull is applied more toward the center of the bar. The heavier weights used in the clean also contribute to the greater deformation of the bar.
Some interesting trade-offs occur in the clean as opposed to the snatch. For example, the amortization phase is longer in the clean than in the snatch because of the heavier weights lifted in the clean. However, the final acceleration phase in the clean is shorter than in the snatch because the torso is straighter at the beginning of that phase.
Before we begin our analysis, the reader should have at least a basic understanding of the concepts of the line of gravity (LOG) and center of gravity (COG). It is important to understand these basic concepts of mechanics because they are used in the analysis of technique that follows. In the simplest terms, an object’s line of gravity (when it is viewed from a given perspective) is the point at which the object would balance if a straight edge were placed under the object. For example, if we were trying to balance a ball on the edge of a steel ruler, we would have to place the ball in such a way that the ruler was under the exact center of the ball (i.e., under an imaginary vertical line that divided the ball into two halves). Alternatively, if we were trying to balance a flat wooden map of the United States that was 1″ thick in a upright position, we would place the ruler near the center (east/west), but the point of balance would be unlikely to fall in the exact center measured from side to side, because the map is not perfectly symmetrical. Since the eastern and western parts of the country do not have the same shape, the left and right halves of the map would not weigh the same and would not balance along a line in the exact center. The line would be somewhat off to one side. In contrast, if we viewed such a map from the side, the line of gravity would be 1/2″ from the front of the map or 1/2″ from the back because the map is flat and made of wood that is 1” thick. Finally, if we laid the map down flat and then found the balance point between the western and eastern sides, a line drawn through the map at that point would represent its third line of gravity. The point at which all three lines of gravity intersect is the map’s center of gravity.
Finding the center of gravity of the human body is much more difficult than finding the center of gravity of a ball or a map of the United States, because the human body can change its shape at any time by simply moving a part of the body; such a movement will change its balance points. For example, when a body is viewed from the side (the perspective that is used for much of the analysis of lifting technique that follows), the center of gravity runs approximately along a line that divides the body in half from front to back. However, if the body bends forward from the waist, the center of gravity will shift forward. If one leg is then lifted to the rear, the center of gravity will shift back toward the middle of the body. In contrast, the center of gravity of the bar is always at its exact center (as measured from all directions) since the bar is symmetrical. When two objects are connected to one another, a combined center of gravity is created. For instance, if a lifter who weighs 100 kg. holds a 100 kg. bar at waist height, the combined center of gravity of the two objects will be toward the front of the lifter’s body and the rear of the bar.
The concept of the center of gravity has a number of implications for the weightlifter, and it is discussed in greater detail in Appendix 2. It should be noted that while from the technical standpoint the line of gravity concept is appropriate only for discussions of a single dimension, and the center of gravity is appropriate for discussions of three dimensions, the term center of gravity is used for single and multiple dimensions throughout this chapter, both for simplicity and because in the contexts in which it is used the difference in the terms is not material.
Its primary importance in the discussion that follows is in describing the general motion of the athlete and the bar during the performance of the snatch and C&J. For instance, during the second phase of the pull, the lifter’s center of gravity shifts toward the rear, but during the fourth phase of the pull, it moves forward.
The lifter’s center of gravity can be thought of as his or her balance point. When the center of gravity shifts back, so does the lifter’s balance and vice versa. An important principle of mechanics is that at no time may the center of gravity go outside the base of support of an object (in the case of the weightlifter the base of support is the athlete’s feet). If the center of gravity of the lifter does go forward or to the rear of the furthest edge of the foot (the toes or heels, respectively), the lifter will topple over. Since the athlete’s feet represent the base of support of both athlete and bar once the bar leaves the platform, the combined center of gravity of bar and lifter may not exceed the limits of the lifter’s feet or the entire system will fall over (with the lifter going one way and the bar the other).
In the analysis that follows, the centers of gravity of the lifter and bar and their combined center of gravity are often referred to in order to convey a sense of how these objects are moving and interacting and where the lifter’s balance is at various points during the lift.
Now let’s look at the six stages of the snatch and clean.
The First Phase of the Pull: “Pre-Lift-Off
In both the snatch and the clean, today’s lifters typically begin to exert force on the bar with their feet placed approximately at the width of the hips and turned out slightly. The bar is positioned roughly over the juncture of the metatarsal/phalangeal joints (the juncture of the toes and the foot). The torso is typically inclined at an angle of 25-50 degrees in relation to the ground or “platform”; the angle tends to be larger in the clean than the snatch, i.e., the torso is more upright. The shoulders are positioned directly over or slightly forward of the bar (a few lifters start with the shoulders slightly behind the bar, but this is generally considered to be a mistake). The shins are inclined forward and slightly outward and are close to or touching the bar.
There is typically an arch in the lumbar region of the spine (the lower back), with the rest of the spine held relatively straight (i.e., the curve that normally exists in the thoracic region of the spine is reduced in most athletes at the start of the pull). The shoulders are slightly back but are not shrugged upward toward the neck and the arms are straight. The hips are at approximately the same horizontal level as the knees but are often somewhat above or below the knees. (The hips tend to be higher in the clean than the snatch.)
The differences in hip position and torso angle in the clean and the snatch are due in part to the wider grip that is used in the snatch (causing the lifter to have the torso closer to the bar and hence often to lower the hips further at the start) and in part to the difference in the weights used in the snatch and the clean. It is harder to start the bar from a lower hip position, so when heavier weights are lifted, as they are in the clean, the hips tend to be placed in a higher position. The angle of the knees in the starting position is between 90[degree] and 45 o (the smaller the angle the more fully the athlete’s knees are bent).
At the start of the pull, the position of the head typically ranges from being in line with the torso to being held in a vertical position. Having assumed this position the lifter begins to exert force against the bar. When the force exerted on the bar reaches a level that exceeds the combination of the bar’s weight and inertia (the resistance of a body to change in what it is doing, in this case not moving), separation of the bar from the platform takes place. At this point the center of gravity of the athlete is typically at the middle of the foot or somewhat behind that point.
The Second Phase of the Pull: Preliminary Acceleration
Most athletes separate the bar from the platform in a relatively smooth fashion and then begin to accelerate the upward motion of the bar. During this phase of the pull, the bar travels toward the lifter, and the center of gravity of the lifter shifts toward the heels. Throughout most of the preliminary acceleration phase, the angle of the back in relation to the platform remains essentially the same as at the moment of bar separation, an average of 30 o in relation to the platform in the snatch and 32 o in the clean; toward the end of this phase, the angle of the torso begins to increase (i.e., the torso begins to straighten). The hips rise, while the torso of the lifter travels upward and forward so that the shoulders move well in front of the bar. If the head did not begin in a vertical position it often begins to assume such a position during this phase of the pull. The acceleration phase typically begins with the knees at an angle of between 80 o and 110 o and ends when the knees have reached an angle of 145 o to 155 o. The angle in the snatch tends to be at the higher part of this range, and the angle in the clean at the lower part of this range; athletes with a longer torso and shorter legs tend to have the lower knee angles in these ranges and athletes with the opposite conformation have larger knee angles. Because the legs straighten more in the clean than in the snatch, the torso shifts forward more in the clean. The shins achieve an essentially vertical position at the end of this phase. The bar is usually at about 31% of the athlete’s height in the clean and at 35% in the snatch (just above the knees in the clean and approximately at the lower third of the thigh in the snatch).
As the preliminary acceleration is executed, the centers of gravity of the bar and athlete move closer together than they were at the start of the pull. The bar moves toward the athlete less in the clean than in the snatch, but the athlete moves toward the bar to a greater extent. (The further apart the centers of gravity of the body and the bar are at the start, the more the bar will shift at this stage in the pull.) This phase of the pull generally takes about half a second (the time involved in the snatch is usually very slightly less than for the clean). The velocity achieved by the bar at this point is approximately 1.5 meters per second in the snatch and 1.2 meters per second in the clean (taller lifters tend to generate somewhat greater bar speeds and shorter lifters somewhat lower). By the end of this phase, the bar has shifted as much toward the athlete as it will at any point in the pull (4 to 12 cm in the snatch and 3 to 10 cm in the clean, the bar shifting a greater distance for taller lifters).
The Third Phase of the Pull: Adjustment
The third phase of the pull is called the amortization or adjustment phase. This phase is used to position the bar and body appropriately in order to properly execute the fourth or “final explosion” phase of the pull. During the adjustment phase, less force is applied to the bar than during either the preceding or succeeding phase. In effect, the lifter is relying on the acceleration developed during the second phase of the pull to keep the bar moving upward while the body assumes a favorable position for the final acceleration (though the lifter is normally not consciously doing this). This movement is often referred to as a rebending of the legs or a “double knee bend” (since the knees have been bent once to lift the bar from the floor and then rebent after the bar has passed the knees).
During the third phase, the lifter continues to straighten the torso (a process that was begun at the end of the previous phase). However, this straightening is carried out more forcefully and extensively in the third phase of the pull. If the head is not held in a vertical position at the start of the pull or during the second phase, it will often assume that position during this phase of the pull. Partially as a consequence of the torso moving in an upward and backward direction, an opposite reaction occurs in the knee and hip joints (i.e., they move forward and down). The combined actions of the legs hips and torso place the body in a position favorable for expressing the all important force of the final explosion. In addition, this process keeps the center of gravity of the body close to the bar (as compared to a position that would have been well behind the bar had the hips and knees remained in the same position while the torso straightened).
The forward and downward movement of the knees take about .1 to .2 seconds (toward the lower part of this range in the snatch and the higher in the clean) and ceases when the knees reach an angle in the range of 125 o to 135 o (the lower half of the range in the snatch and the upper half in the clean). The average torso inclination at this point is 58 o in the snatch and 60 o in the clean.
During this phase the feet normally remain flat on the platform, though some exceptional lifters do begin to rise on the balls of the feet. The bar reaches approximately the lower third of the thigh in the clean and the middle of the thigh in the snatch. The bar is typically just over the middle of the foot (a little closer to the ankle in the snatch). The center of the shoulder joints is typically equal to 3% to 4% of the athlete’s height in front of the bar. The speed of the bar has dropped by an average of .08 to .1 meters per second during this phase (toward the higher end of this range in the clean and the lower in the snatch).
The Fourth Phase of the Pull: Final Acceleration
The fourth phase of the pull is the one in which the athlete applies the maximum and most critical force to the bar. This is accomplished by explosively straightening the legs and torso, lifting of the shoulder girdle upward and backward and rising on the balls of the feet and toes. It should be noted that not all lifters straighten the legs fully during the explosion phase of the pull or jerk and that some high level lifters do not rise on the toes to any significant extent at all. Some coaches believe that this lesser amplitude of body straightening is an advantage.
During this fourth phase of the pull , the bar describes a forward arc as the combined center of gravity of the bar and athlete shifts toward the toes of the athlete (upon which the athlete is typically balanced at this stage) until, ultimately, the bar finds a nearly vertical direction. This stage takes approximately .1 to .25 seconds to complete (the clean requiring less time than the snatch). At the end of this phase, the athlete’s center of gravity has moved up and back as the bar has moved forward, and the body assumes a straightened position with the entire body generally having a slight backward lean. A straight but slightly backward leaning line passes through the bar , the lifter’s shoulders and the balls of the feet. The combined center of gravity of the bar and lifter is at approximately the same vertical line as the feet of the lifter, which are now supported on the balls of the feet (on average the bar is actually of 2 to 4 cm forward of the base of the toes). The bar reaches speeds of 1.65 to 2.05 meters per second in the snatch and 1.2 to 1.6 in the clean (taller athletes tending to achieve greater speeds than shorter athletes).
The Fifth Phase of the Pull: The Unsupported Squat Under
The unsupported squat under begins with the lower limbs of the athlete at their most extended position and continues while the athlete is moving into position for the squat under. It ends when the feet make forceful contact with the platform once again. Once the final acceleration has been completed, the bar continues to rise, primarily as a result of the momentum gained during the final acceleration phase. However, the speed gained during that phase is not sufficient to account for the total height that the bar ultimately reaches (68% to 78% of the athlete’s height in the snatch and 55% to 65% in the clean). Several explanations have been offered for the extra height that the bar achieves. One is the interaction of the arms and the bar while the athlete begins to descend into the squat or split position (i.e., while the athlete’s feet still are in contact with the floor, a period of .05 to 1 second in the snatch and .1 to .15 of a second in the clean).
A second factor cited is the thrusting of the feet from the platform during the descent under the bar (because the bar’s velocity is higher after this thrust). In a way, the body collides with the bar after the maximum effort has been exerted in the explosion (the body goes up and then bounces down away from the bar), adding some impetus to the bar.
A third factor is the interaction of the arms and bar as the athlete descends in the unsupported and supported phases of the squat under. The action of the arm flexors and the muscles of the shoulder girdle (in the latter part of the snatch descent and during the jerk, the arm extensors come into play) after the feet have left and then returned to the ground can generate an upward reactive force on the bar, resulting in additional acceleration. This acceleration occurs when the force of the body returning to the platform is transmitted back to the bar thorough the arms.
During the unsupported phase the center of gravity of the lifter typically shifts forward somewhat as the athlete descends under the bar while it moves upward and then downward and backward. After the feet are thrust from the platform, they typically remain out of contact with the platform for between .15 and .33 of a second in the snatch and .1 and .2 of a second in the clean.
The Sixth Phase of The Pull: The Supported Squat Under
Once the lifter’s feet have landed on the platform in a flat footed position after being thrust from it during the unsupported squat under, the lifter quickly assumes a squat position if the lifter uses this style (and most do). In this position the heels are under the hip joints, the toes are turned out to the sides, the back is arched and the torso is tilted slightly forward (more so in the snatch than in the clean). The combined center of gravity is in the middle of the foot. In the snatch the arms are straight, with the shoulder blades pulled together. In the clean the bar rests on the shoulder muscles, and the elbows are up, preferably at or near the level of the bar.
During the lowering of the body, the bar moves backward and then down. The downward motion is typically 5% to 9% of the athlete’s height in the snatch and 14% to 18% in the clean. The bar is actually fixed (i.e., its downward progress is stopped) at 62% to 70% of the athlete’s height in the snatch and 40% to 48% in the clean.
Roman and many other analysts believe that if the pull is performed correctly overall, the combined center of gravity of the bar and athlete will shift forward slightly during the pull. As a result the athlete must jump slightly forward in the squat under. Next best, according to Roman, is when the bar shifts only very slightly backwards during the pull, in which case the feet are jumped straight out to the side as the athlete squats under the bar. In the least desirable instance the lifter pulls the bar significantly back, causing the lifter to jump back. Roman suggests that this makes it more difficult for the athlete’s movement to be precise and for the bar to be brought under control. A number of the Bulgarian coaches, however, are very persuasive defenders of the latter style. It should be noted that many world records have been established by lifters using all of these styles.
An Analysis of the Six Phases of the Jerk
The technique of the jerk, like that of snatch and the clean, can be broken up into six phases: the start (the motions the lifter makes and the position the lifter assumes prior to bending or “dipping” the legs to thrust the bar overhead); the initial dip; the braking portion of the dip; the thrust; the unsupported part of the squat or split under; and the supported phase of the squat or split under. As was the case in the analysis of the snatch and clean, these six phases exclude the recovery from the receiving position of the bar in the jerk (e.g., the split position). Although there are important differences between the phases of the pull and the jerk, in some respects the six phases of both movements have much in common. Both the similarities and differences will be explained below.
The same caveats that applied to the description of the snatch and clean also apply to the description of the jerk. In brief, they are: a) the analysis, in the main, ignores the recovery of the body to a standing position once the bar has been fixed; b) the segments analyzed are somewhat arbitrary, but they are the segments upon which the greatest amount of data has been gathered; c) the analysis describes what the lifter is doing but not necessarily what he or she is thinking or feeling;, and d) the descriptions are of what is being done by high level athletes today, not necessarily what athletes should be doing.
In both the pull and the jerk, the alignment of the body at the start has an important influence on the performance of the subsequent parts of the movement. The pull and the jerk share a preliminary phase of motion (in the snatch and clean the bar moves up during that phase, in the jerk it moves down) followed by an amortization phase that brings the body and the bar into proper position for the important final explosion that imparts the majority of the force needed to lift the bar to the proper height. Finally, two phases of the squat under in the snatch, the clean and the jerk have characteristics that cause the bar to be lifted higher than the bar velocity at the end of the explosion would suggest, characteristics that enable the athlete to fix the bar in preparation for a recovery to the final position of the lift.
The First Phase of the Jerk: The Start
At the start of the jerk, the shoulder and hip joints of the lifter and the bar all form a vertical line with, or slightly behind, the middle of the foot. The feet are placed approximately at the width of the hips, either straight or with the toes turned out slightly.. The arms are relaxed. The elbows are in front of the bar (if the bar were viewed from the lifter’s left side as the center of a clock, the elbows would be anywhere between the seven o’clock and nine o’clock positions). Lifters who keep the elbows relatively low (i.e., at the seven o’clock position) because they find a higher elbow position is uncomfortable or impedes their breathing at the start, sometimes raise the elbows just before the second part of the jerk begins. The head is normally tilted slightly back, and the line of sight is generally looking slightly up. The combined line of gravity of the bar and athlete, viewed from the side, is in the middle of the foot. The balance of the lifter can be anywhere in the middle third of the foot with a weight that is 150% of the athlete’s weight, though it is generally recommended that the weight of the lifter and the bar should be felt toward the rear portion of the middle of the foot, rather than toward the front. However, as the bar gets heavier, the point of balance through which the lifter can control the bar grows smaller. For a weight that is 275% of the lifter’s bodyweight, the range of balance is cut roughly in half, and most of the range lost is from the front half of the range that exists with 150% of bodyweight. The first phase of the jerk ends when the lifter begins to bend the knees for the initial dip.
The Second Phase of the Jerk: The Dip
When the lifter executes the initial dip, assuming that dip is perfectly vertical, the lifter’s balance (technically, the lifter’s “center of gravity”—a term explained in Appendix 2) shifts slightly forward because the knees move forward of their starting position and all other parts of the bar and body remain essentially in the same vertical line. It is considered preferable to have the combined center of gravity of the bar and lifter remain in the same position, or even to travel slightly backward during the dip, therefore; some lifters let their pelvises travel slightly back during the dip to counteract the small shift in the lifter’s center of gravity that takes place when the knees move forward during the dip. This does not necessarily mean that the shoulders of the athlete and the bar move forward more than is normal (although there is a school of thought that advocates dipping slightly forward, though not beyond the front of the foot, and then tilting the torso backward as the athlete drives up out of the split). During the initial dip the bar normally shifts forward by 1 to 2 cm (such forward movement should be avoided).
The average time for the initial dip is just over .25 of a second, and this time does not vary with the height of the athlete (taller athletes tend to execute the initial dip more quickly than shorter athletes). The distance covered by the initial dip is typically just under two-thirds of the distance that will ultimately be covered by the lifter during both the initial and second parts of the dip. At that point the knee angle of the lifter is typically between 114o and 132o. The initial dip ends when the lifter begins to resist the downward progress of the bar in order to stop it.
During the preparatory dip for the jerk, the speed of the bar can vary from one that is faster than a pure free fall of the bar (because the lifter is pulling down on the bar to accelerate its downward speed) or to a speed that is much slower than a free fall (because the lifter is resisting the downward movement of the bar). Most analysts suggest a speed close to the free-fall speed or slightly slower (i.e., the lifter should neither rush into the dip nor substantially resist the bar’s downward motion). This “natural” kind of dip speed not only enables the lifter to maintain control over the bar but also permits the optimization of the lifter’s use of the elastic qualities of the leg muscles and the bar. (This issue will be discussed further later in this chapter.)
The Third Phase of the Jerk: The Braking Phase
The braking phase normally takes about .12 of a second and encompasses a little more than one-third of the overall depth of the first and second phases of the dip. At its conclusion the downward progress of the center of the bar has stopped. The knees are typically at an angle of between 99o and 111o. Overall, between the first and second portions of the dip, the bar has typically been lowered between 8% and 12% of the height of the lifter. At the lowest point of the dip, the athlete normally pauses for between .01 and .04 of a second (i.e., there is virtually no detectable pause, but, rather, an immediate rebound).
The Fourth Phase of the Jerk: The Thrust or Explosion
The recovery from the lowest point in the dip for the jerk to the starting position of the dip takes approximately .02 of the second, or about half time it took to get from the starting position to the lowest point in the dip. The lifter is actively influencing the bar for about 85% of the time that it takes to perform the upward thrust, and acceleration is only taking place for 75% of the thrust. Maximum velocity of the bar is achieved at a point a little less than 1% higher than the initial position of the bar before the dip. At this point the athlete has shifted his or her area of support to the toes (and has risen somewhat on the toes), and the knees are nearly straight (and they appear to be straight). The velocity of the bar is between 1.45 and 1.8 meters per second (the lower figure is more common for shorter athletes, the higher for taller athletes). This velocity only accounts for about half of the height the bar reaches at its highest point in the jerk. It is hypothesized that the balance of the force that causes the bar to reach its ultimate height is generated by the force of the lifter’s feet being replaced on the platform in the split—force delivered to the bar by the lifter’s arms pushing up on the bar as the feet make contact with the platform—and the force generated by the arms and shoulders once the feet have been replaced on the platform. The thrust ends when the legs of the lifter have reached their maximum point of extension in the drive.
The Fifth Phase of the Jerk: The Unsupported Squat Under
After the thrust is executed, the athlete’s feet begin to leave the ground. (The back foot is slightly ahead of the front foot when the lifter uses the split style in the jerk, as does the vast majority of lifters.) The athlete pushes against the bar with the arms and shoulders to push the body down. During this time the lifter’s balance is moving slightly forward and down while the bar is moving up for 70% to 80% of its upward path and then upward and backward slightly for the rest. The unsupported squat under phase ends when both feet have made contact with the platform again.
The Sixth Phase of the Jerk: The Supported Squat Under
As noted, the back leg lands before the front in the split. That leg is nearly straight (typically at an angle of 160o, and the foot is balanced on all of the toes. Therefore, the heel of the back foot is turned out slightly. The front leg in the split has a knee angle of 90% or more, the thigh is angled from 10o to 20o from the platform, and the shin is vertical or inclined slightly in the direction of the lifter. The front foot is flat on the platform. The bar is typically in a position slightly behind the athlete’s head, at about the same vertical plane as the shoulder blades of the athlete. The hips, shoulders, elbows and wrists are all in the same vertical plane, the head is vertical and pushed forward somewhat and the back is arched. The front foot is typically a little more than one foot-length in front of the hip, and the back leg is a little less than two foot-lengths to the rear of the hip. Altogether, the torso has been lowered a total of 15% to 20% of the height of the athlete. During the amortization of the bar in the jerk, it typically drops between 3 cm and 8 cm.
The Movement of the Bar During The Pull and the Jerk
The Trajectory of the Bar During The Pull
Perception of the pattern of bar movement during a snatch or clean is affected by your position in relation to the bar and lifter. If you are watching a lift from the front, the bar will be perceived as moving vertically and evenly, i.e., the bar will be parallel to the ground during the pull. However, if the lifter is viewed from the side, the observer can see that the bar travels backward and forward during the lift, as well as upward.
At first glance, this pattern of bar movement may seem odd. After all, science tells us that the shortest distance between two points is a straight line and that a strictly vertical trajectory will give a projectile its greatest height. It also tells us that once horizontal motion is imparted to an object, the object will continue to travel horizontally until it meets a force that interrupts that motion. These principles clearly suggest that the straighter the pull, the better. However, considerations other than the three mentioned above influence the most effective pattern of bar movement. For example, the lifter’s line of gravity travels forward from the heels to the toes during the third and fourth phases of the pull. This generates a tendency to apply a forward force to the bar during the amortization and final explosion phases of the pull. More important, the lifter typically makes contact with the bar at the middle to top of the thighs during the pull. The combination of these factors (which are more pronounced in the snatch) drives the bar forward.
Much work has been done in Eastern Europe and the United States to analyze the pattern of the bar’s travel during the pull. (In the United States most of this work has been done by Dr. John Garhammer, who has been active as an athlete, coach and sports science advisor in the USAW for many years.) The evidence provided by this research is quite conclusive in certain respects. It is clear that for most accomplished lifters the pattern of bar movement very roughly approximates the shape of a somewhat flattened S. The bar first moves in a backward curve toward the lifter in the second and third stages of the pull; then and in the final explosion phase, it moves in a curve away from the lifter. Finally, during the unsupported phase, the bar loops backward and down toward the lifter again. The curves traveled by the bar tend to be flatter in the clean than in the snatch. The shape of the trajectory in the pull tends to be much more consistent among lifters during the third through fifth stages of the pull than during the second stage of the pull. During the third stage of the pull, virtually all lifters pull the bar toward the body; during the fourth stage there is almost always some movement of the bar away from the body; and at the end of the pull for a successful lift, the bar nearly always travels in a downward loop backward toward the lifter. In contrast, during the second phase of the pull, many lifters pull the bar toward the body while some pull the bar in an almost perfectly vertical pattern; some actually cause the bar to move away from the body during the first phase of the pull (although this pattern can hardly be considered good technique).
Although the pattern of the bar’s movement generally describes the shape of a flattened S, the S can be slanted from the vertical, and its shape can deviate rather dramatically from the curves of the letter S (see Figs. 5 a-c). Figure 5(a) represents the fairly conventional kind of bar pattern, with the overall S-curve being positioned vertically and the curves within the S being rather significant. Figure 5(b) depicts an S-curve in the same general shape, but it is essentially tilted somewhat backward. This type of pattern indicates that the lifter is pulling with his or her bodyweight, and/ or the bar itself, too far back toward the heels at the start of the pull, or soon after the start, and that the lifter is exploding upward and rearward instead of primarily upward during the final explosion phase of the pull. Figure 5(c) shows the bar pattern of a lifter who has the hips very high during the early phases of the pull and who begins with the bar forward of the juncture of the toes and the foot. Such a lifter may produce a curve that tilts somewhat forward and may actually finish with the bar forward of its initial position on the floor.

While studying the pattern of bar movement during a lift can be very useful to both lifter and the coach, it should be remembered that bar movement is more appropriately viewed as an effect rather than a cause. It is true that if the bar moves significantly forward or back of its initial point during the course of the pull, it can cause the lifter to lose control of the bar while trying to fix it in the low position of the squat or split. Therefore, in a sense, it is this pattern that causes the lifter to miss. However, the faulty movement pattern of the bar is only a symptom of improper positioning of the joints of the body and/or the bar and body in relation to one another during one or more preceding phases of the pull. It can also result from improper timing of force application during the pull. These faults must be corrected if the pattern of the bar’s movement is to be corrected. This is not to say that it is not possible for the athlete and coach to use the bar trajectory as a means for correction in the pulling style. For example, the lifter could be given feedback on the curve at the top of his or her pull, learn to associate certain feelings with the desired curve and thereby correct the pull. Nevertheless, it is the correction of the positions and force patterns of the body that correct the curve, not the reverse.
It is important to understand that each of the three styles depicted in the illustrations of bar trajectory have been used with success by some very accomplished athletes. The real problems develop when the lifter does one of two things. The first happens when the bar does not travel backward towards the lifter during the initial stages of the pull. Such a bar pattern is indicative of the lifter who begins with the bar too far behind the juncture of the foot and toes, with the combined weight of the bar and body toward the rear of the foot, and who keeps the back too upright or attempts to straighten it too early in the pull. Occasionally, forward movement of the bar during the second stage of the pull is seen in the lifter who begins with the correct balance but shifts the body weight toward the toes and/or uses the arms to direct the bar forward during that stage of the pull. The lifter who holds his or her torso too upright or tries to straighten it prematurely will tend to have shins that are abraded (although abrasion can occur with lifters who are pulling more of less correctly as well) and will tend to exhibit a lack of both consistency and smooth movement during the second stage of the pull. There will also be a tendency for the bar either to move away from the lifter or to have too little horizontal movement toward the lifter during the second half of the S. This is because the bar is too far forward of the lifter’s point of balance during the final explosion for the lifter to direct it back over his or her body by the end of that explosion. Typically the bar will end up over its original position on the platform, the lifter will either jump back or remain in place, and the bar will be left forward of the lifter.
A second major fault occurs when the combined weight of the lifter and bar is shifted toward the rear of the foot to a greater degree or for a longer period than is appropriate during the pull. The result is that the lifter’s balance is in the middle or even toward the rear of the foot as the final explosion of the pull commences. In addition, the athlete’s shoulders will travel to a position behind the bar earlier than is appropriate. This will cause the athlete to apply a rearward as well as an upward force to the bar during much of the pull. This kind of bar pattern results in a rearward displacement of the bar from the starting point and hence a need to jump back during the squat under in order to be in a position to control and ultimately fix the bar. If this fault is pronounced, it can lead to less consistency in lifting performance and greater stress on the joints and muscles as the lifter attempts to bring the bar under control.
The Bar’s Relative Speed at Various Points in the Pull
The bar typically achieves its greatest upward velocity during the second and fourth phases of the pull. However, lifters generally create different relative bar speeds in the second and fourth phases of their pulls. The bar speed generated during the fourth phase of the pull is almost always greater than the speed achieved during the second phase. The difference in speed between the second and fourth phases of the pull tends to be greater in the snatch than the clean. The ranges of the relative speed differences between the second and fourth stages of the pull are as follows (for purposes of comparison, it is always assumed that the speed during the second phase of the pull is 1.00): 1.00 to 1.50 in the snatch and 1.00 to 1.40 in the clean. This means the bar always moves at least as fast in the fourth stage of the pull as in the second, but it may move up to 50% faster.Now that we have described the movements of the body and the bar during the snatch and clean, let us evaluate these movements during the jerk.
The Trajectory of the Bar During the Jerk
The trajectory of the bar during the jerk is very different from that of the pull. The bar travels down in a virtually straight line as the lifter dips and then goes nearly straight up until the lifter moves under the bar into the split or squat. At that point the bar describes a backward and downward loop similar to that seen during the snatch or clean but typically a little less extreme in terms of the amount of backward loop. This straighter overall path is not surprising when one considers the relative simplicity of the jerk drive as compared with the pull (e.g., the knees do not have to be brought out of the way or back and only the legs are imparting force). See Figure 5 (d).
General Guidelines For Sound Technique
Although the six-stage analysis of technique presented above conveys some important issues regarding technique, many aspects of technique are ignored in such an analysis. The section that follows will explain a number of important aspects of technique that have not yet been covered. These represent some fundamental aspects of sound technique that come more as a result of experiencing and coaching technique than from observing the grosser features of technique via film analysis.
Guidelines For All Lifts
Apart from the aspects of technique that have already been covered, there are some additional principles of weightlifting technique that apply to all lifts in nearly equal measure. These principles are discussed in the next several sections.
Proper Breathing While Lifting
While not technically part of the subject of weightlifting technique, proper breathing is an important part of weightlifting. Although weightlifting is considered to be an anaerobic activity, it does increase the body’s need for oxygen far more than most activities that are considered to be aerobic. What makes it anaerobic is that the activity of weightlifting is not sustained for a long enough period to use up the body’s anaerobic energy supply. Therefore, a lifter could simply not breathe at all during a lift and still execute it without difficulty most of the time. Consequently, there is a tendency for some athletes to attempt to hold their breath throughout a lift. This should be avoided for at least two reasons.
One reason is that if a lift takes a long time to complete, the lifter may run out of oxygen, much in the same way a resting person holding his or her breath for a minute without exercising might do. An example of this would be a C&J during which the lifter struggled for balance in the squat position, remaining there for several seconds, then arose from the squat position, took some time with the weight at the chest preparing for the jerk and then struggled to control the jerk overhead; this process could all take from 15 to 30 seconds and would result in one very breathless lifter. Another example would be a lifter who was doing several repetitions or “reps” (lifting the weight several times in succession without resting) in a simpler exercise.
Another important reason to breathe properly is to avoid unnecessary increases in blood pressure when lifting. There can be a twofold or greater increase in blood pressure when the major muscle groups of the body are involved in a substantial muscular effort. However, at least one group of researchers has found that this increase is due as much to the lifter’s making an effort to expel air against a closed glottis (a portion of the larynx through which air flows during breathing) as to the exertion itself. Therefore, proper breathing can reduce this component of the increase in the pressure.
There is considerable evidence that the overall issue of elevated blood pressure during exertion should not cause great concern. Empirically there have not been any instances of strokes occurring during weightlifting competitions. (I know of at least one instance in which a lifter over the age of forty had a heart attack while warming up for a competition, but this athlete had existing coronary artery disease of which he was apparently unaware.) If heightened blood pressure were a very significant risk, we would expect to see more evidence of it when the strain was greatest.
On a more scientific level, researchers have argued that a difference in pressure across the walls of the heart and its large blood vessels can occur. This is because the pressure outside increases at least as much as the pressure inside. The brain is protected in a similar fashion in that any increase in intrathoracic pressure is transmitted to the cerebrospinal fluid, counteracting the increase in the pressure within the blood vessels that supply the brain. The peripheral vessels are more subject to the increased pressure, but their smaller diameter makes them more able to accept the increased pressure. There is actually more concern among some researchers about breathing too deeply and frequently (hyperventilation) before a heavy exertion than about breathing too little. This is because it has been discovered that hyperventilation before heavy exercise can lead to convulsions or even fainting. In short, extremes in breathing patterns are to be avoided.
As a general rule, proper breathing consists of inhaling just before or as a weight is lowered and breathing out while it is raised. During complex motions like the snatch and C&J, there are actually several points where breathing generally occurs. In the snatch there is usually some exhalation during the pull, particularly in conjunction with the final explosion of that pull. The lifter often does not inhale again until he or she recovers from the squat or split position but may exhale the rest of the air that was not expelled during the pull as the recovery to a standing position occurs. However, if the lifter remains in the low position for more than a few seconds, he or she may inhale at the low position and then exhale during the recovery to a standing position.
In the C&J, as in the snatch, there is often a partial exhalation during the pull, with the remaining exhalation occurring during the recovery from the low position. If the lifter remains in the low position for some time, there may be some breathing while in that position and exhalation during the recovery, but this is unusual. After the recovery from the clean, the lifter generally takes several quick breaths in preparation for the jerk, then ceases breathing during the actual dip for the jerk, sometimes exhaling as he or she lowers the body to catch the bar at arm’s length. Some lifters move so quickly into the jerk that they do not take any additional breaths after the clean, but this is the exception rather than the rule.
In preparation for any lift (the snatch, clean, or jerk), the lifter should at least partially inflate the lungs and use the air that has been taken in to thrust the chest out just before the lift begins. This elevation and expansion of the rib cage give the lifter important assistance in achieving the rigidity of the torso that is so necessary during the pull and jerk. It is certainly not necessary to expel air with a great deal of force or an accompanying shout while lifting, but some lifters feel that such an action improves their concentration and power.
When the lifter performs exercises other than the snatch and C&J (or related movements), the general rule for breathing is to breathe in just before lowering the weight or while it is being lowered and to exhale toward the completion of the lift. For instance, when one is squatting, one typically takes one or more shallow breaths before the squat, then lowers the body into the squat position. A partial exhalation occurs as the lifter rises, at or just past the most difficult part of the squat.
Locking Body Parts
A number of elements of technique are difficult to describe verbally. They are things that you can feel, but not easily explain. The concept of locking body parts while lifting is one such notion.
The need to lock or make rigid a given body part stems from the need to use that part of the body as a means of transmitting force (rather than its acting as a source of that force). One example is locking the back in the pull. When a lifter properly locks his or her back, or any other body part, only a part of that lock arises out of the actual position of the back or other body part. In the case of the back, it is difficult to hold it rigid if the back is in certain positions (e.g., rounded or greatly bent at the waist). It is easiest for most people to lock their backs when the back is in a fairly natural position, the kind of position the back is in when the lifter stands in a good posture. That is, the shoulders are slightly back, the chest out just a little so that the normal curve in the thoracic area of the spine is reduced (though not eliminated) and the normal curve in the lumbar area of the spine is maintained. The exact position will vary somewhat with the anatomy of the lifter. For example, some lifters will find that their normal curve in the thoracic region of the spine as well as a curve in the opposite direction in the lumbar spine are conducive to keeping the back rigid. Others will find that virtually eliminating the arch in the thoracic area of the spine helps them to solidly lock their backs. It is most important that the lifter find a position in which the rigidity of the back can be maintained, even under great stress.
Apart from the lifter’s assuming a strong position, the key to maintaining the back in a rigid position is increasing the level of tension in selected muscles of the torso to the point where the back has the feeling of being locked. The lifter will know he or she is in the correct position when it feels as though the back simply cannot be moved from its locked position, no matter how large an external force is applied to it. The ideal position must be rigid and yet comfortable enough to be sustained as the lifter prepares to pull and during the pull itself. Maintaining the torso in a rigid position during the pull and jerk is easier when the lifter makes an effort to push the chest out by inflating and lifting the rib cage. The ultimate test of whether the back is in its proper position is its performance during the pull. If the back “gives” at any point (if the position of the curves in the spine changes or the muscles are felt to lose their tension), then the position needs further attention.
If the lifter is having difficulty achieving the locked position, there are several possible causes. The most likely is that the position chosen initially is not the ideal one for that lifter. A larger or smaller curvature in both areas of the spine can be tried, but any changes should be very gradual. For example, if the thoracic region of the spine experiences an increase in its curvature during the pull, it may be a result of the lifter’s assuming a position that has reduced the normal curvature so much that the lifter cannot sustain the position. On the other hand, the lifter may have allowed the starting curvature to be so great that it placed the back in a weakened mechanical position, and the lifter could not sustain that position when force was applied; the result was that the back gave even further. Once that standard back position has been tried, the lifter needs to experiment and to pay attention to his or her body in order to find the most secure position.
Another possible reason for the problem is that the lifter has inadequate flexibility in the hips or legs. A lack of flexibility can make it difficult for the lifter to assume a correct starting position or make that position so difficult to assume that the position is lost as soon as force is applied. An example of this kind of problem is when the hamstrings are so tight that the lifter cannot maintain an arch in the back during the pull. The obvious solution here is to improve flexibility so that the lifter is able to assume and maintain a proper position.
Still another possible cause of failure to lock the back is the lifter’s inability consciously (at the early stages of learning) and unconsciously (at the later stages of learning) to maintain proper tension in the muscles of the back. A tension that is too small will cause the back to lose its position when force is applied; an excess of tension will make it impossible for the lifter to execute the pull smoothly. A related problem is the failure to relax the muscles that pull the trunk forward. For example, if the lifter unnecessarily contracts the abdominal muscles during the pull, it can cause the spine to round out.
The final major cause of failure to lock the back is relative weakness in the back muscles; weak back muscles cannot withstand the force that is applied from the legs during the pull. The strength of the lagging back muscles can be improved through special exercises for the back, such as hyperextensions. Perhaps the best method to strengthen the back is to practice deadlifts with the back in perfect position. These assistance exercises are explained in detail in Chapter 5.
In general, the portions of the lift that call for rigidity in any body parts are those in which the greatest force is applied or received. These moments are: the second stage of the pull; reaching the bottom of the dip in the jerk; beginning the final explosion in the pull and jerk; catching the bar on the shoulders in the clean; and fixing the bar overhead in the snatch or the jerk.
Finding a Focal Point
Many sports teachers emphasize the importance of a specific kind of visual focus or attention. Baseball players and golfers are taught to “keep their eyes on the ball.” Skaters, divers and gymnasts are taught to maintain a “focal point.” This means that while spinning or somersaulting, they try to keep their eyes on a fixed object for as much of the movement as possible. Doing so helps them both to understand where they are during a movement and to maintain their balance.
The emphasis on finding a focal point tends to take a back seat in coaching lifting, but it is a point of some importance nonetheless. Focusing his or her eyes on a fixed point will help the lifter to maintain his or her balance (especially important in the large arenas in which competitions are often held) and to understand his or her body position at any point during the overall movement. It will also help the lifter to control unwanted head movement since it is difficult to move the head wildly while maintaining visual contact with a specific point.
In the snatch I recommend that the lifter begin by maintaining visual contact with a point on the wall in front and slightly above eye level when in the squat position. This point of focus, which can be used during both the pull and the squat under, is relatively comfortable during the pull, and it tends to keep the head well up and the spine in good position while the lifter is in the squat position. If the suggested focal point brings the desired results, it can be maintained. If the lifter feels uncomfortable or unbalanced after giving the suggested point of focus a fair trial, then modifications can be experimented with. As with so many aspects of technique, the lifter will find that general principles (here, the need for a focal point) must be adapted to his or her own circumstances; the lifter must decide where the points should be and when they are used.
In the clean the lifter can use a focal point similar to that used for the snatch. In the jerk the eyes should be are focused on a position that is similar in principle but different in application (because the lifter is standing instead of being in the full squat position). The line of sight should be slightly above eye level when the body is in a standing position.
For the lifter who elects to pull in a style that keeps the rear of the head aligned with the spine (a technique discussed in further detail in the next section), there will need to be two focal points during the snatch and the clean. The first point will generally be on the floor several feet in front of the lifter during the early stages of the pull. Contact with a fixed point will generally be lost during the third and fourth stages of the pull, but in the fifth and sixth stages the lifter will find a point of focus appropriate for controlling the bar in the squat position.
Positioning the Head
What is inside a lifter’s head is his or her most vital tool for weightlifting success. But the physical position of the head is also an important part of weightlifting technique. Since the head is not an inconsequential portion of a lifter’s bodyweight, its position affects the center of gravity of the lifter. In addition, the proper position of the head tends to align the spine properly, making transmission of force from the lower body and torso to the bar more effective. Finally, the proper positioning of the head can facilitate the lifter’s using his or her vision to maintain his or her balance while moving.
There is some controversy over the positioning of the head during certain phases of the pull. Virtually all analysts believe that the head should be aligned with the body at the end of the pull. Years ago it was believed that throwing the head backward during the final explosion of the pull aided the lifter in fully extending the legs and back and thereby imparting maximal force to the bar. Today it is generally accepted that the lifter can impart just as much vertical force to the bar without throwing the head and at the same time speed up the transition from the final explosion to the squat under. Most theorists also agree that head has a neutral function once the pull has commenced (i.e., it does not direct the body but rather serves as a relatively motionless extension of the body). However, there are considerable differences of opinion about how the head should be positioned during the early stages of the pull.
One group of theorists believes that the head should be held in line with the spine throughout the lift. This means that the lifter will be looking forward and down during the early stages of the pull. Advocates of this pulling style argue that the lifter will tend to keep his or her shoulders over the bar to a greater extent during the second and third stages of the pull when the head is in line with the spine. In addition, they believe that any tendency to shift the body and bar too far towards the rear of the lifter will be reduced with the head-in-line position. Finally, they assert that holding the head in line with the spine early in the pull facilitates keeping the head in that position at the end of the final explosion and during the unsupported squat under. As a result, advocates of this style argue, the lifter will be able to elevate the shoulders more easily, which will assist both in imparting force to the bar with the trapezius muscles and in using those muscles to assist in the descent under the bar.
Advocates of maintaining the head in an upright and vertical position throughout the pull argue that the head-up position at the start of the pull assists the lifter in maintaining an arch in the back. In addition, they believe that with the head in a vertical position, the lifter will be able to maintain a focal point throughout the first four stages of the pull and most of the squat under, which helps the lifter to maintain his or her balance.
I find the arguments made by this latter group to be more persuasive, and most lifters seem to agree, but there have been some outstanding champions who have used the head-in-line positioning technique very effectively. There is certainly no harm in a lifter giving both methods a try.
Before leaving the subject of head positioning, a few points should be made about the position of the head in the jerk, a subject that is far less controversial than that of the head position while pulling. In the jerk the head is generally tilted slightly backward during stages one through four of the lift. More importantly, the lifter also pulls the chin in toward the neck and moves the head backward in relation to the spine. This is done primarily so that the lifter can keep the chin out of the way of the bar during the drive. During the squat under phases of the jerk, the rear of the head is brought forward to align itself with the spine or is even placed somewhat forward of it.
Moving Under the Bar Rapidly and Immediately
During the fifth and sixth stages of the snatch, the lifter works to gain control over a bar that has effectively been “launched” into the air during the fourth stage of the pull. The faster the lifter’s feet regain contact with the floor and the faster the lifter assumes a position in which he or she is able to receive force, the better able the lifter will be to catch a bar so launched,.
Rapid movement under the bar can be facilitated by a conscious effort to lower the body quickly. In the snatch and clean the lifter needs to think of pulling himself or herself under the bar once the squat under has begun. In the snatch and jerk the lifter needs to push out forcefully with the arms and in the clean to raise the elbows as vigorously as possible as the bar nears its final position.
A conscious effort to place the feet against the platform as quickly as possible after the final explosion is extremely important, as such an effort can significantly shorten the unsupported squat under phase, enabling the lifter to apply upward force against the bar as quickly as possible after the squat under has commenced. Hundredths of a second are important here. Some coaches advocate that the lifter actually stamp the feet against the platform as the feet make contact. They believe that a conscious effort to stamp the feet will result in a more rapid placement of the feet. This does seem to help in certain cases, but an overemphasis in this area can lead to the lifter’s unnecessarily lifting the feet well above the platform to make a stomping noise, thereby jarring the body when the bar is caught (and actually making it harder to control). It also increases the time that the bar is unsupported by the athlete—which means there is more time for the bar to gain downward velocity. Vigorously replacing the feet on the platform and immediately exerting force downward against the platform transfer upward force rapidly to the bar, making it easier to control. The key is to make solid contact rapidly, not to make as much noise with the feet as possible.
Bulgarian Antonio Krastev, former World Superheavyweight Champion and world record holder in the snatch, has told me that the Bulgarians emphasize a rapid placement of the heel of the front foot in the jerk, with both feet remaining very close to the floor during the movement into the split position. He also points out that any unnecessary rising on the toes during the final explosion in the jerk is to be avoided. As a group, the Bulgarians are probably the surest jerkers in the world, so this advice, in addition to squaring with theory, has yielded excellent results.
Some of the Bulgarian coaches actually teach their lifters to jump back at the end of the fourth stage in the pull. They believe that if the lifter explodes with the trunk upward and backward, the bar will travel rearward at the end of the pull and that the lifter will therefore need to jump back. As this tends to be an individual matter, I do not subscribe wholesale to the idea. Nevertheless, thinking of moving the feet forward or backward as well as sideways during the squat under may well be valuable for some lifters.
One final point on a rapid and precise squat under. Lifters who truly master technique develop an ability to use a rebound from the effort of the final explosion of the pull to propel them under the bar. This is a very difficult feeling to describe, but when a lifter applies a very explosive effort to the bar during the final explosion phase, he or she will feel a point of extreme resistance on the part of the bar. This is natural, as the lifter is attempting to accelerate the bar and the upward force applied to the bar is experienced by the body as a downward force on it (see Newton’s third law of motion as explained in Appendix II). If the lifter’s upward effort against the bar is rapid and strong enough the lifter can use the downward force against the body as a mechanism to drive the body rapidly downward. Lifters who master this nuance of technique will find an immediate improvement in the crispness with which the bar is locked out or racked at the shoulders and an increase in the weights that can be lifted.
Moving with the Greatest Possible Speed Consistent with Maintaining Control
One general principle of technique is that the lifter should always endeavor to move both the bar and himself or herself with the greatest speed that is consistent with maintaining proper body positioning and balance. Weightlifting is a sport where speed matters and, therefore, speed must be focused on at all times. This is not to say that speed is always achieved (it is hard to move the bar very quickly while pulling on a limit clean), but the lifter must strive for speed in the context of what he or she is trying to accomplish during a given stage of the lift. For example, it is not crucial that the lifter move with maximum speed during the first stage of the pull. At this stage, as was noted earlier, proper grip and body positioning are of foremost importance. Nevertheless, once proper body position and grip are established and concentration on what is to follow is achieved, the lifter’s overall results are influenced by how quickly he or she carries out the first stage of the pull. In the context of the first stage of the pull, for the lifter who pull from a static start, this would mean getting set quickly. It would mean pumping quickly for the lifter who uses that style and “diving” quickly for the lifter who uses the dive style (all of this within the context of assuring grip and proper starting position first).
Speed is most critical from the third through the sixth stages for the pull and jerk. Speed in amortization, speed during the explosion and speed in moving under the bar are all absolutely essential. Therefore, throughout a lifter’s career, speed must be emphasized, and the lifter must always be endeavoring to move the bar and body faster and faster. Doing this during any workout (regardless of the intensity of that particular workout) can provide the lifter with a continual mental challenge. Naturally the emphasis on speed must be increased gradually in order to permit the lifter’s body to adjust to the stress that additional speed can place on the muscles and connective tissue. There are exceptions to the speed rule, such as when a lifter is training with slow movements to stimulate greater muscle tension.
The Value of Limited Bar Drop
When you watch lifters at top international events like the World Championships, you cannot help but be struck by the variety of techniques used by the very top lifters. However, upon closer study a number of common characteristics can be identified. One of the most important is a minimal bar drop. What is bar drop? I define it as the distance the bar travels from its highest point in the lift before it is brought under control by the lifter. The distance tends to be shortest in the jerk, longer in the snatch and longest in the clean. Generally speaking, the shorter the bar drop, the more efficient the technique on a number of levels. The issue of bar drop is harder to detect and less important in the clean because the bar must be allowed to drop over a relatively long distance in order to amortize the downward force of the bar. Because heavier weights are used in the clean than in the snatch (thereby reducing the distance the bar can be thrown during the later stages of the pull), the bar will fall a greater in the clear distance before the lifter can bring it under control. But there is a significant difference among lifters as to how long this descent takes in the same lift.
What are the variables that affect the distance a bar drops? One variable is the velocity at which the bar is traveling when the lifter begins to descend under the bar. If the bar has a greater velocity, it will rise for a relatively longer period and the athlete has a better chance (longer time) to get under the bar and “fix” it before it drops a great distance. The second factor affecting the drop in the bar is the time it takes the lifter to drop into the receiving position. That time interval is a function of the distance the lifter has to travel; the speed of the switchover from the explosion to the squat under phase, the speed with which the lifter executes the squat under and the speed with which the lifter can begin to exert upward force against the bar in the squat or split position so that the weight can be caught. The higher the lifter’s body before the drop begins and the deeper the position to which the body descends, the greater the distance the lifter needs to travel. Whatever that distance, the faster a lifter switches from the explosion to the squat under phase and the faster the lifter moves into the catch position, the less time the bar will have to drop. One of the surest signs that the body has been overextended or held too long in the extended position during the pull is that there is a “pressing out” in the snatch or the bar “crashes” on the lifter in the snatch or clean; the bar seems to be moving falling very quickly by the time to lifter is in a position to receive it, making the catch more difficult to execute and placing undue strain on the joints. This crashing motion is proof that the bar has picked up too much downward speed before the lifter was in a position to stop the bar’s downward descent. Another indicator of this problem is when the coach is able to clearly see with the naked eye the lifter fully extend his or her body during the final explosion phase of the pull. Lifters with proper timing appear to barely reach a position with the body fully straightened before they squat under (although film analysis may show the lifter fully straightened and somewhat on his or her toes).
A third factor that affects bar drop is the amount of force that is applied to the bar as the lifter drops, which can occur as a result of the interaction of the bar and body (e.g., the force applied to the bar as the body makes first contact with the ground). As was mentioned above section in “Moving Under The Bar,” there is also a point toward the end of the explosion in which the lifter can feel a reaction from the explosion, a force which seems to push the body back down from the bar. If the lifter can learn to align the timing of the squat under to coincide with that reaction force, its speed and effectiveness will be significantly enhanced.
The shorter the bar drop, the better is the athlete’s performance in the technique variables described above. Therefore, bar drop is one important measure of how far a lifter has traveled in terms of technical mastery. In addition, the shorter bar drop is much easier on the body in terms of the effort needed to decelerate the bar. All things being equal, the longer the bar drops, the greater speed the it gains. More speed means more force will be required to stop the bar’s downward travel. At the very least this will tire the lifter more quickly, and at the worst it can lead either to acute injury or to a chronic accumulation of microtrauma, making the body susceptible to injury over time. Consequently, the lifter is well advised to master the shorter bar drop.
One final advantage of a shorter bar drop is that the lifter can fix the bar at a lower point. For example, if a lifter pulls the bar so that he or she requires a 5” drop before the bar can be brought under control, the bar will have to be pulled 2″ higher than if the lifter needed only a 3″ drop to fix the bar.
How can the lifter minimize bar drop? There are four basic means. First, the greater the momentum the lifter can apply to the bar before descending under it, the more time the lifter will have before the bar begins to fall. This momentum is achieved both by improving the lifter’s explosive power through training and by making sure that the lifter is performing the final explosion at a point where the body’s capability for delivering maximum force is greatest. For example, if a lifter can achieve the same bar height by exploding violently with the bar at mid-thigh or by accelerating the bar more gradually and pulling longer, the former approach is preferred. Consequently, the timing of the switchover between the final explosion and its follow through and the squat under must be both optimal and precise.
A second important factor in minimizing bar drop is to shorten the distance the lifter has to drop. This is accomplished primarily by avoiding overextension of the body (e.g., by not going unnecessarily high on the toes or leaning back excessively at the top of the pull, from which position the lifter has to travel a greater distance to get under the bar in a position that is suitable for receiving the weight). Another is method is to assure that the lifter goes no lower than is necessary to fix the bar. This does not mean that the lifter should not gain control over the bar and then use a comfortable stopping distance to decelerate the downward motion of the bar. Rather, it means that the lifter should not jump into the lowest possible squat under position immediately, whether or not the bar’s position requires it. Some lifters actually pull the bar down on themselves in a race to beat the bar down to the bottom position. This movement both increases the bar’s downward velocity and places the lifter in a weaker position in which to catch the bar.
A third way to reduce bar drop is to minimize the time spent in the unsupported squat under phase, which means that he or she must cover the necessary distance in the smallest possible time. This generally involves focusing on moving under the bar as quickly as possible, interacting energetically with the bar so as to use it as a basis for increasing the speed of the descent and using the forces generated by the body itself in order to increase the speed of the descent (e.g., whipping the elbows quickly to create an opposite downward force on the body).
The last way to minimize bar drop is to exert upward force on the bar as early as possible in the squat under phase of the pull or jerk. This helps to transmit force from the floor to the bar and to cause the bar to achieve greater height than it would merely through the force applied during the explosion phases of the pull or jerk thrust.
Returning the Barbell to the Platform After a Successful Lift
When a lifter succeeds in lifting the bar and has completed a “set” (one or a series of lifts preceded and followed by a rest period), he or she needs to return the bar to the platform. In the days when weights were made solely of cast iron, there was little choice for most about how the bar was replaced on the platform. The bar had to lowered with some care lest it damage the flooring beneath (dropping the bar was restricted solely to instances in which a lift was missed). Since rubber “bumper” plates were perfected, the practice of dropping the bar after a lift has come into vogue.
Dropping the bar, especially immediately after the lift has been completed, is a poor habit. It can create a tendency for the lifter to lose control of the bar at earlier and earlier stages in the lift. Then, at competition time, it is possible to fail to control the bar long enough to satisfy the rules of the game. To prevent this, athletes should hold every heavy (90% or better) lift in training just a bit longer than is necessary to gain control of the bar and make an effort to control the bar to a certain extent on the way down (the methods for doing this will be explained shortly).
Apart from the fact that dropping the bar tends to cause some lifters to lose the ability to control it, dropping the bar with unnecessary frequency and force hastens the destruction of the equipment you are training with. Bars will be bent and come apart more easily. “Bumper” plates will lose their spring and become damaged prematurely. The flooring on which the lifts are done will become damaged and the sub-flooring or structure of the building in which the lifting is performed can become undermined.
Weightlifting has not historically been a moneymaking sport for those who sponsor it, so finding a facility at which weightlifters can train for weightlifting competition is often not a simple task. Unfortunately, many weightlifters have made the sport even more unappealing to gym owners because they have cultivated a reputation for destroying equipment and facilities. Therefore, the facilities that do exist for weightlifting practice and competition should not be abused. If lifters limit dropping the bar to missed lifts, or at least to lifts with 90% or more, I would estimate that the rate of equipment wear and destruction could be reduced by 75% to 90%. A bar’s life could be increase from several months or years (depending on the quality of the bar) to several decades or more. It also means that lifters would be far more welcome in gyms, Y’s and other facilities. Weightlifting would then become more popular and widespread.
Whenever you discuss this topic with weightlifters and coaches, you will always hear the counterargument that “lifters are unnecessarily injured by having to lower the bar.” In my experience, this is a half-truth. While lifters do sustain occasional (and generally very minor) injuries as a result of lowering the bar, almost all of those injuries occur as a result of the lifter’s failure to lower the bar under reasonable control. Moreover, it has been my experience that many more lifters have been injured as a result of dropping the bar unnecessarily (such as when the bar bounces up and hits the lifter’s hands or shins) than by lowering it under control.
Irrespective of whether or not dropping the bar is advisable, there is absolutely no excuse for a behavior that some lifters cultivate: throwing the bar down. When an athlete lowers a bar somewhat and then lets it fall to the platform (or misses a lift and very appropriately lets in fall), the bar travels a limited distance, gaining speed solely as a result of the pull of gravity. Such a fall will have limited force. When a lifter throws the bar down from his or her full height, the bar not only falls further (i.e., from a greater height); it also falls with the added downward force supplied by the lifter. This kind of behavior is unnecessary, dangerous and destructive. It should not be tolerated.
Athletes who complain that lowering the bar hurts have probably never received instruction in the proper technique for lowering the bar. That technique varies slightly among the snatch, the clean and the jerk, but the principles used in each are the same: the bar and body are rendered motionless, the centers of gravity of the bar and body are lowered together, the arms then offer some resistance to the bar as the center of gravity of the body is raised and the descending bar is then brought under control and returned to the platform.
In the jerk the method used is to bend the legs into approximately the quarter squat position while still holding the bar overhead. From that position the bar is lowered toward the shoulders with some resistance from the arms, while at the same time the legs are returned to a nearly straightened position (which raises the lifter’s shoulders). As the bar comes in contact with the lifter’s shoulders, the lifter allows the legs to rebend to absorb the shock of the descending bar. (The torso is kept strictly vertical during this process; it is particularly important not to permit the torso to lean back when the bar is received on the shoulders.)
A similar process is followed in the snatch, except that the bar is caught at the top of the lifter’s thighs instead of the shoulders, with first the arms and then the thighs offering the primary resistance to the descending bar. In the clean the shoulders are lowered by bending the legs; then the arms offer some resistance as the bar descends, and the legs nearly straighten once again to stop the bar at the mid-thigh position. Once the bar has been lowered to mid-thigh after a snatch or clean, it is lowered with the legs and arched back to the floor. Following these steps will make lowering the bar a relatively easy process and will actually make the lifter stronger by providing some eccentric muscle action training. (See Appendix 2 for an explanation of eccentric muscle action.).
Irrespective of the issues raised above, there will be times when the lifter will want or need to drop the bar after a successful lift. In such situations, certain safety rules must be followed. First, the platform must be clear of any plates or other objects that make it anything but perfectly flat. When the bar is to be dropped, it must be on a surface that is free of objects from which the bar can ricochet. Dropping the bar at the edge of a raised platform should be avoided, as the bar can rebound against the corner of the platform and travel horizontally with great force.
Second, before dropping the bar the lifter should lower the body as much as is comfortably possible (e.g., by bending the legs) so that the length of the bar’s fall is reduced. Third, the lifter should keep all parts of his or her body behind the falling bar (including the wrists, which should never be above the bar). When a lifter has his or her legs near the bar or the wrists above it, any rebound of the bar when the it hits the platform, can cause an injury. When the hands are in contact with the bar but the palms are facing the floor and the wrists are behind the bar, any rebound of the bar will simply push the hands up. If the lifter lets the bar go entirely before it hits the platform, he or she should keep the entire body well behind the bar; even if the bar travels in a somewhat horizontal direction when it rebounds, it will not hit the lifter. Following these procedures should make lowering the bar a safe procedure in all cases. A description of how to drop the bar after a missed lift is provided in the next chapter.
Guidelines for the Snatch and Clean “Pull”
The Importance of the Starting Position in the Snatch and Clean
The importance of the starting position in the snatch and clean cannot be overemphasized. While a good starting position does not assure a successful lift, it is very difficult, if not impossible, to exhibit proper technique without a good starting position, and many lifts have been lost due to a failure to achieve an optimal starting position. This is particularly tragic when you consider that the skill required to assume a functional starting position is minimal and the opportunity to assume it greater than for any other portion of the lift because timing is not necessarily an important issue, particularly if the athlete starts from a static position. (Bar timing is a very important issue in all other phases of the lift.) Even if a lifter uses a “dynamic” start (which will be discussed shortly), precision is easier to achieve in the starting position than in any other phase of the lift because the lifter need only control the movement of his or her body, not the bar and the body, as is required at other stages in the lift.
The starting position can be viewed from two perspectives: from he position of the various joints of the body in relation to the bar and one another and from the tension of the various muscle groups at the moment of starting the lift (separating the bar from the platform). You can use the position of the joints relative to one another, as described in the Eastern European literature, as a guideline for a good starting position. Ranges for the angles of each of the key joints were given in the description of the six stages of the pull. These ranges will be appropriate for the vast majority of lifters, but occasionally a lifter will find it necessary go outside these ranges in order to find the optimal position. This is reasonable if the positions in the normal range have been given a fair trial and it is obvious that some facet of the lifter’s structure makes a different position more advantageous. However, regardless of the position assumed, certain basic principles should be followed in assuming the starting position in the snatch and clean.
1. The lower back should be slightly arched and the upper back should have a minimal curve in the thoracic region of the spine (one that can be sustained throughout the pull). In addition, the chest should be out (in the classic military “at attention” kind of position) and the shoulders slightly back, and the latissimus dorsi muscles should be somewhat flexed. This kind of positioning and muscle tension assures that the power of the leg and hip muscles will be transmitted directly to the bar during the most explosive parts of the pull. In addition, they provide the athlete with protection for the spine; when the spine is in the position described, it is relatively strong and stable. The tension in the latissimus dorsi muscles arises from a slight backward pressure on the arms. This pressure continues during the second and third phases of the pull, when it aids in keeping the bar close to the lifter’s body.
Lifters who have trouble achieving a sufficient arch in the back at the start may find it helpful to employ one of three techniques to assure proper back positioning. One approach is for the lifter to begin with the hips higher than they will be when the bar leaves the floor and to align the back properly while in that position. Then the lifter can set the back in the proper position and lower the hips (maintaining that back position) just before commencing the pull. A second option is for the lifter to prepare for the pull by standing fully erect at a position of strict attention. The lifter lowers the body by bending the legs and hips and inclining the torso while maintaining the arched position of the torso. The lifter must guard against looking down for the bar as his or her hands near the bar, since the effort to do so often results in losing the arch. Once the bar has been grasped and the initial arched back position maintained, the lifter can look down, with as little head movement as possible, to assure an even grip. The third option is for the lifter to position the feet and hands properly, then to lower the hips while arching the back, pulling the shoulders back and looking up. This action helps many lifters to achieve a proper position. Then the lifter can raise the hips to their proper starting position for the pull.
2. The arms should be straight and the trapezius and related muscles should be relatively relaxed. Premature contraction of the arms makes the pull more difficult, both off the floor and at the point where the bar passes the knees. Premature tension in the traps makes the final explosion in the pull more difficult (the need to keep these muscles relaxed does not contradict the advice given in the prior section to keep the chest out and the shoulders back, because that can be done with the trapezius muscles in a relaxed state).
It should be noted that a very small number of some very high level lifters have extended the concept of relaxing the upper body well beyond what is suggested above. Bob Giordano, a US Olympic Team member in 1980, used to advocate relaxing the thoracic region of the spine and even the lower back somewhat, (i.e., employing a slightly rounded back) during the early stages of the pull. His reasoning was that if the back was held in a relaxed position, it could impart force more effectively at the top of the pull with a powerful contraction of his back muscles. Bob feels his unconventional method helped him to become one of the strongest pullers in the country, if not the world. Bob is not alone. Yordan Mitkov, the Bulgarian Olympic champion and world record holder of the 1970s, used a rounded back style in the pull, (although I do not know if it was intentional in his case). While I would not go so far as to recommend the use of a rounded back during the early stages of the pull (or at any other time while executing the classic lifts or related exercises—because I believe it exposes the athlete to an increased risk of a back injury) I must admit that the styles used by these men underscore the value of relaxing the muscles of the upper back during the early stages of the pull.
3. The balance of the lifter should be felt in the middle area of the foot. If the weight is felt toward the heels, it means that the overall position of the body in relation to the bar is too far towards the rear. This will almost invariably cause the lifter to have less control of the motion of the bar during the pull and to make the motion of the body and the bar less fluid. It is also likely to cause the lifter to sacrifice some ability to apply force to the bar. If the weight and the lifter’s balance is toward the front of the lifter’s foot as the bar comes off the floor, there will be a tendency for the hips to rise faster than the shoulders as the bar travels towards the knees. The athlete may also be forced to jump forward to catch the bar as it travels in that overall direction during the pull. Added strain is placed on the knee and ankle joints bar if the bar is somewhat forward when it is “caught “ by the lifter, and added strain is placed on the back when it is too far forward in the pull (the latter because the lifter is in an unfavorable mechanical position in which to exert force on the bar when the bar is unnecessarily forward of the lifter’s body).When the weight is too far back on the heels from the start, the center of the shoulder joint is behind the bar as the bar comes off the floor and/or the shoulders assume that position during the pull to the knees. In contrast, when the bar, and/or the athlete’s balance, is too far forward as the bar leaves the platform, the shoulders move backward in relation to their starting position as the lifter reaches the end of the second phase of the pull.
The coach and lifter must be careful to distinguish between positions and feelings before the bar clears the platform and while it is being raised from the platform. It matters little where the balance is felt prior to the liftoff, as the lifter adjusts the position of his or her body and its relationship to the bar. What matters is where those positions, balance points and tensions are felt as force is being applied to take the bar off the floor.
Joe Mills (a national champion weightlifter in the 1930s and coach of hundreds, if not thousands, of lifters over the years including world champions) and I were so convinced of the importance of the starting position and the related position of the body during the first and second phase of the pull that we decided one year to conduct an informal experiment at the Philadelphia Open (in its day probably the premier annual open competition in the United States). We observed a lengthy series of lifts to see how accurately we could predict the outcome of snatches and cleans solely by observing the pull from the floor to the knees. We found that our predictions were accurate approximately two-thirds of the time. Perhaps we were just lucky that day, but I think not. The early stages of the pull are critical, and the first stage is the foundation for much of what follows.
The Importance of Gripping the Barbell Securely
The degree to which the subject of the grip is ignored in weightlifting circles is a continual source of amazement to me. In sports such a bowling, golf and baseball, sports in which no special grip strength is required, a proper grip seems to be discussed more widely. In weightlifting, where the grip is in direct contact with the projectile to be launched and the forces involved are so close to the lifter’s maximum ability, little is said beyond “get a sure grip” or “always use the hook grip.” Perhaps this is because most lifters feel, “I’ve never lost my grip so why make and issue out of it?” I would argue: do not assume that because you have never lost your grip, it has created no problems. We must remember that the subconscious mind is always aware of subtle changes in a lifter’s body and the bar. If the grip is subconsciously felt to be loose, the nervous system will tend to reduce the force it applies to the bar to a point where the grip will not be lost. This reduction may not be noticeable to the lifter, but it can result in a significant decrease in the force that is applied to the bar. If lifters who are blessed with large hands and good grip strength find this argument unconvincing, they can skip the next section. For those who want to learn to maximize their gripping strength and confidence, please read on.
Before going on to the subject of assuring a secure grip, the reader should recognize that a secure grip is only important when the lifter is pulling. When the bar is supported overhead or at the shoulders, it is advisable to have all of the fingers securely around the bar, but the grip should not be tight. A tight grip while flipping a snatch overhead, racking a clean or driving a jerk overhead is a recipe for disaster. The speed that is so crucial during these stages of the lifts will be greatly hampered by any attempt on the part of the athlete to grip the bar tightly.
Techniques For Maximizing the Effectiveness of the Grip
There are several techniques for maximizing the force of your grip on the bar. One of the simplest and most direct methods is to strengthen the grip. This subject is covered in Chapter 5, but a few comments on the subject are in order. First, since the strength required of the lifter is that of isometrically gripping a bar, the best form of training for the grip is to do just that, to hold the bar isometrically. The lifter can practice holding with and without a hook grip for variety; the weights used should sometimes be ones which nearly cause the grip to loosen slightly. When the lifter does singles in the lifts and some pulls (at least during the first repetition or when doing singles), grip aids (such as straps) should not be used. However, when the lifter is performing repetition lifts or pulls, using “straps” (see Chapter 4 for a definition) is a good idea, particularly when these movements are being executed from the hang.
Since the strength of the grip is affected by the position of the arm (e.g., the grip is stronger with the arm bent than with the arm straight), there may be special circumstances in which bending the arms in the pull might actually assist the lifter in holding onto the bar, if such bending can occur in such a way as not to adversely affect other aspects of the lifter’s pulling style. This is very difficult to accomplish and is a complex technical issue, somewhat beyond the level of this book.
A special means of gripping the bar called a “hook” grip is perhaps the greatest method ever developed for improving a lifter’s grip and is used by virtually every high caliber lifter. The technique of the hook consists of wrapping the thumb around the bar and then placing the first, second and third fingers of the hand around the thumb and the bar. Why is this technique so effective? I am aware of no scientific research on the subject, but several reasons can be discerned with some thought. First, the hook grip places the thumb (easily the strongest finger on the hand) in a better position to apply force to the bar than with the normal grip (fingers around the bar and thumb on top of the fingers going in the opposite direction). With the normal grip, the thumb is not in direct contact with the bar, and its only contribution to holding the bar is that of pressing on the index finger with the last joint of the thumb, a rather poor position for the thumb in terms of applying force. With a hook grip, nearly the entire thumb is in direct contact with the bar; more importantly, the first joint of the thumb (a joint which is directly connected and is in close proximity to the powerful pollicis muscles at the base of the thumb) is in contact with the bar, giving the thumb better leverage in applying their force. Another advantage of the hook grip is that while the thumb is in a stronger position, the other fingers press against the thumb while they are still in a good position to exert their strength (the second segment of the fingers presses against the thumb and bar— not the last, as is the case with the thumb when a normal grip is used). Finally, when the hook grip is used, the lifter is able to harness the force of friction more effectively than is possible with the conventional grip, since the normal friction between the thumb and the bar is augmented by the pressure of the fingers on the thumb.
In terms of applying the hook properly, there are several guidelines. However, these guidelines vary with the needs of the lifter. For example, for the small handed lifter, it is useful to spread the hand (i.e., to hold the fingers apart as much as possible) before gripping the bar. This stretches the skin and soft tissues of the hand and enables the lifter to assume a grip with the bar deeper into the hand, a more secure position overall (particularly for the lifter with a small hand). Another pointer for the small handed lifter is to begin the grip by pressing the spot between the thumb and forefinger deeply into the bar and then roll the hand until the rest of the fingers are gripping the bar, again, to get the bar deeper into the hand (perhaps enabling the thumb to contact an extra finger or to be in better contact with the same fingers). All lifters, regardless of the size of their hands, should employ the hook grip by wrapping the fingers snugly around the thumb and/or bar, with as many fingers covering the thumb as securely as possible.
Two final comments need to be made about the hook grip. One is that the lifter will experience considerable discomfort, even significant pain, when first using the grip. Usually, the peak of the pain occurs just after releasing the hook. The lifter may also notice a discoloration on the thumbs from minor internal as a consequence of the pressure of the bar and fingers against the thumb (i.e., a black and blue mark). In most cases, both the pain and any discoloration will pass, usually after a few weeks. The only residual effect will be a more secure grip. If the fingers develop a soreness that continues unabated from one workout to the next, the lifter should slow the breaking-in process. This is done by performing only some lifts with a hook or skipping a workout with the hook to allow the soreness of the fingers to abate. Many lifters find that wrapping surgical tape around the thumb before the workout lessens any irritation of the skin of the thumb as a result of hooking.
Another issue that is related to the hook is when to release the grip. Many lifters, perhaps the majority, automatically release the hook and assume a normal grip as the hands are turned from the palms-down position to the palms-up position during the squat under. Other lifters continue to maintain the grip until they replace the bar on the platform after the snatch. Almost all lifters jerk with a normal grip (which means they switch from the hook to the regular grip either during the hand turnover or during or after the recovery from the clean).

It should be noted that some lifters jerk with a “thumbless” grip. With the thumbless grip, the thumbs go around the bar in the same direction as the other fingers (instead of in the opposite direction as they do in the regular and hook grips). Advocates of this style feel that it makes their position stronger and more comfortable overhead. Most lifters do not notice any improvement with this style. Only personal experimentation will help a lifter to determine whether the thumbless grip is of any benefit. However, I do not recommend the thumbless grip, because it is far more likely for the bar to slip completely out of the hand (an extremely unlikely event with either a normal or thumbless grip but much more of a possibility with the latter grip). Fig. 6 depicts, from left to right, the thumbless, hook and regular grips.
Still another strategy for improving the grip is to increase the friction between the hand and the bar. The most common way of doing this is to use chalk (magnesium carbonate) on the hands. Magnesium carbonate dries the hands and considerably improves the grip. Another strategy is to remove oils from the hands with a skin drying agent before applying chalk. Special cleansers (such as “Pernox”) used to treat oily skin conditions are available at any drug store and will serve this purpose well.
Finally, there is the strategy of growing the nails a little (particularly the thumbnail) so that at least 1/16 “of white area is visible. This gives the skin at the tips of the fingers something to push against when the they are compressed against the bar. In the case of the thumb, an even longer thumbnail presents a greater surface area for the fingers to press against when they are engaged in the hook grip. A better grip can be achieved in the area of the thumbnail by taking the sheen off the nail with fine sandpaper and then actually scoring the nail with coarse sandpaper.
How much can these techniques add to gripping strength? There has been no scientific study of this issue, but, as an experienced practitioner of all of the above techniques, I can assure you that they do work.
The Importance of the Position and Effort in the Final Explosion
Although the position of the body and the bar is crucial throughout the lift (particularly because an incorrect position in any part of the lift often creates a tendency to assume incorrect positions at later stages), the position just prior to the final explosion is perhaps the most crucial. If that position is off, it almost assures that difficulties will arise during the amortization and recovery phases. Therefore, both athlete and coach should devote a significant share of their attention to this issue. What is the correct position?
It is a position with the shoulders directly above the bar (not significantly in front of it or behind it, when viewed from the side): the arms straight or nearly so; the outside of the elbows turned to the side and not toward the back; the knees well bent (sometimes the athlete is beginning to rise on the toes as well); the back flat or arched; and the shoulders back but not yet shrugged upward (see the 3rd photo in the sequence in Figure 3). Ideally, the lifter’s balance is toward the front of the full foot; if the lifter’s balance is significantly toward the rear at this stage, the lifter will necessarily accelerate the bar in a rearward as well as an upward direction during the explosion. This wastes energy (a straighter bar trajectory is more efficient) and causes an excessive degree of bar motion that will be difficult to control when the bar is caught (i.e., excessive horizontal motion). As the lifter rises on the toes, shoulders, the base of the toes and the bar should line up vertically; mispositioning of the shoulders relative to the bar at this point reduces the ability of the athlete to exert maximal force and increases the likelihood that the bar will be directed further forward or backward than is optimal.
Regardless of whether the athlete pulls as quickly as possible during the entire pull or accelerates during the later phases, the lifter must make a special effort to apply a maximal explosive force to the bar at the beginning of the final explosion of the pull. This explosive effort serves to accelerate the bar, raising it and giving the athlete time to squat under the bar. Most lifters find it helpful to think of an explosive effort with the leg, hip and back extensors. Some coaches talk about “hitting” the bar with the traps at the last stage of the final explosion. Others talk of a jumping motion with the bar in the hands and an explosive shrug.
Many lifters think of making violent contact with the bar at the level of the thighs or hips at the finish of the pull; some lifers make such an effort to “hit” the bar explosively with the hips that they wear a pad over their pubic bone— arguably an illegal piece of equipment. While this works for some lifters, it has been my experience that significant contact with the thighs or hips can misdirect the bar, particularly when it is intentional. When the lifter is thinking of an explosive extension of the legs, hips and back, the noticeable contact of the bar against the lifter’s body occurs as a result of the rapid extension. If the contact occurs as a result of a conscious effort to hit the bar with the body, the lifter has wasted valuable energy and attention on a horizontal rather than vertical motion. There is horizontal motion of the hips and back during the explosion phase of the pull, to be sure, but, it is much more beneficial when that motion is a result of an effort to explode upward than when the objective is to move the hips or thighs forward into the bar (or to move the bar back into the hips).
There are, however, exceptions to the preceding guidelines. Some lifters have a tendency to extend the trunk upward and backward, with their hips held in a stationary position during the final explosion of the pull. These lifters actually seem to freeze the position of the hips and to simply rotate the trunk around that fixed point. Clearly this can lead to a horizontal misdirection of the bar. For such lifters, the instruction to drive the hips forward at the finish of the pull will often lead to a correction of the problem caused by the rotation of the trunk around fixed hips and will result in the lifter effecting the proper combined contraction of the leg, trunk and hip extensors.
Explosiveness and following a proper sequence in the use of the athlete’s muscles go hand in hand in making the final acceleration phase of the pull as effective as possible. This is because a lack of explosiveness or an improper sequence of muscle utilization will result in less than optimal acceleration. The proper sequence is legs and back together, followed by the calves and the muscles of the shoulder girdle (the arms are not really used at all during the acceleration phase of the pull). Although the combined action of the muscles of the shoulder girdle and the calves follows that of the legs, hips and torso, they do not wait until the action of the first set of muscles has ceased. Rather, the contraction of the calf and trapezius muscles begins while the legs and hips are finishing their effort, so that there is a continual application of force.
One final point should be made about the final explosion phase. From the 1950s through the 1970s, much discussion appeared in the weightlifting literature regarding the importance of fully stretching the body at the end of the final explosion phase of the pull. Athletes were pictured on their toes like ballerinas, with the legs fully locked—the more extreme the stretch the better. As more modern methods of technique analysis became available, research findings disclosed that the power developed by the lifter at the point before the legs were locked and the lifter rose high on the toes was primarily responsible for the ultimate height attained by the bar. The force applied by the lifter in the extended position was far less important. Moreover, it was discovered that many elite lifters did not lock their legs completely at the end of the final explosion. This failure to lock the legs meant that the lifter had a shorter distance to drop under the bar after the completion of the final explosion and it enabled them to drop faster (spared the time of unlocking the legs while squatting under). It has been rumored that Soviet researchers have also discovered that a snap of the legs to a completely straight position at the end of the final explosion causes the feet to be displaced in a rearward direction just after the final explosion— still another reason to avoid the legs-locked position. This in no way means that the lifter should straighten the legs at the end of the final explosion stage; it merely means that being rigidly locked high on the toes may have negative consequences that offset any advantages of an extreme stretch of the body.
In view of the complexity of the above considerations, a specific lifter’s approach to the body’s position in the final extension needs to be worked out on the basis of individual needs and through experimentation.
Balance in the Squat Position
In most cases the accomplished lifter is very comfortable in the squat position. In the snatch, most lifters find that the best position for them has the bar in line with the back of the head and with the rearmost portion of the hips slightly behind the bar. The arms are straight and the lifter is pushing up on the arms and thinking of stretching the bar as well. In the clean the bar rests on the tops of the shoulders and the elbows point straight forward, with the upper arms held parallel to the floor.
Regardless of how comfortable the lifter is in the bottom position, it is important to stand up from that position as quickly as possible. The lifter should remain in the bottom position of the squat only long enough to halt the bar’s downward progress. If an adjustment needs to be made, it is better to make it in a partially recovered position (e.g., the lifter can step forward to move his or her base of support in that direction when the bar has traveled in front of that base and as the lifter sits in the bottom position). Driving up against the bar also gives the lifter more control over the motion of the bar than when the lifter merely sits passively in the bottom position.
A position with the feet wider than the hips provides for greater stability and generally makes it easier for the lifter to keep the torso upright and the lower back slightly arched than does a position with the feet narrower than hip width. The feet are generally best kept at an angle of 45o to 75o relative to one another (although some lifters find that a smaller of greater angle is more appropriate for them). The more upright the shins, the smaller the pressure on the knee joints, but the more difficult it is for the lifter to keep the torso upright and the lower back arched. A higher heel in the weightlifting shoe enables the lifter to assume a more upright position and to keep the lower back more arched than does a lower heel, but it tends to place more strain on the knees as the knees are pushed forward of the toes in the deep squat position. A higher heel also changes the lifter’s balance to a forward direction during other phases of the pull and jerk. In addition, it shifts the lifter’s knees forward to a greater extent at the start of the pull, which means that the lifter will have to move the knees further to remove them from the path of the bar as it rises upward. Therefore, it is an advantage if the lifter can achieve the flexibility necessary to in order to assume a more correct low position and lower his or her heels,.
An Alternative Means for Lowering the Body: The Split Style
Today virtually all lifters at an international or national level employ the squat style in the clean and snatch. This was not always the case. In the early years of weightlifting, the split style was the predominant method of lowering the body to catch a weight at arm’s length or on the shoulders. Even as late as the 1950s there were more World Champion splitters than squatters, and many top lifters of the 1960s were splitters. (By the 1970s the style was almost extinct among international competitors, and it remains so today.)
Although the squat style was used by a number of notable lifters at least as early as the 1930s, the American lifting superstars, Pete George, David Sheppard and Paul Anderson, probably did more to convert the world to the squat style than any other influence: Pete George as a result of his great success with a relatively slight musculature and youthful appearance; Dave Sheppard because of his prolific recordbreaking and the sheer mastery and majesty of his technique; and Paul Anderson because he proved that even large and somewhat inflexible men could employ the squat style successfully. Before these great Americans, the squat style was viewed as too risky, too hit and miss and suited only to the few who were blessed with natural flexibility in the squat position.
As is so often the case when styles in weightlifting, or anything else, change, some very useful technologies fall into disuse or are actually lost in the process. This was certainly the case when the split style was abandoned. While it is true that the squat style is both easier to master and more efficient for the majority of lifters, the split style is still appropriate for some. It has the advantage of not requiring the flexibility of the shoulders, elbows and ankles that is required by squat style. Less rotational strain is typically experienced in the shoulder and elbow joints when a lifter uses the split style in the snatch and jerk. In addition, it requires less leg strength than the squat style, and it enables a lifter to execute the lowering of the body under the bar 30% to 50% faster than in the squat style. The time is reduced by one-third in the snatch and by approximately one-half in the clean (the bar is fixed at a somewhat higher position however). The split style also places less strain on the knee of the leg that is thrust back in the split than happens with the squat style. On the negative side, the split style tends to place more strain on at least some portions of the front leg and on the groin muscles of the rear leg than is placed on either leg in the squat style. There is also a tendency to twist the hips, with the hip on the side of the body of the forward leg being held higher than the hip on the side with the leg thrust backward. Finally, it is tougher for many lifters to master the split style because lowering the body into a deep split rapidly requires great precision with respect to foot placement.
When a lifter employs the split style, the pull is the same as in stages one through four of the squat style. A difference begins to show up during the unsupported squat under. (The Eastern Europeans refer to any lowering of the body in order to fix the bar on the shoulders or straight arms as a squat under, regardless of whether the athlete actually ends up in a split or squat position.). In the split style, instead of bending the legs while keeping the feet in contact with the platform and pulling with the arms, the athlete begins to move the back foot as soon as the legs have reached their fullest point of extension. Almost immediately thereafter, the front foot begins to move forward and the lifter is descending into the split position. In the split style the dividing line between the support and nonsupport phases is regarded by Soviet theorists as the point where the front foot lands on the platform (i.e., when both feet have made contact).
The front foot is placed approximately one and one-half foot-lengths forward, and the back leg goes back more than two foot lengths. (The actual spread of the feet will vary with the lifter, but the ratio between the movement forward and back is approximately 1:1.4, front leg movement to back.). In the split position the thigh of the front foot rests on the calf muscle, and the back leg is straight or nearly so, with the heel turned out (toes in) so that the foot is at approximately a 45o angle with the platform (when viewed from the side) and is resting on all of the toes; the front foot should either point straight ahead or be turned in slightly. The bar should be vertically in line with the hip joints, with the torso upright and the back arched (see figures Figure 7 depicts the low position of a split clean by one of the great masters of that style, two time Olympic champion Waldemar Baszonowski of Poland. For a picture of a similar position in the snatch see photo at the beginning of Chapter 11 – a world record performed by the legendary Norbert Schemansky, winner of 4 medals in four separate Olympic Games (one gold, one silver and two bronze – the last at age 40).
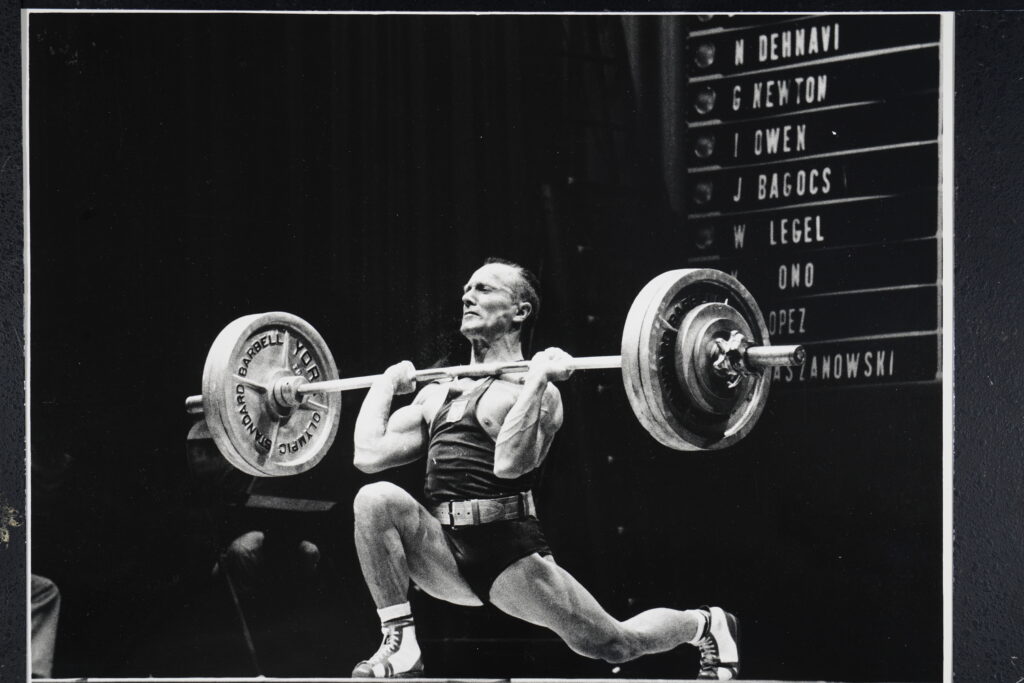
In recovering from the split position, the lifter straightens the front leg while shifting the hips, torso and bar toward the back leg (i.e., the lifter is pushing back as well as up with the front leg). At the end of this motion, when the body has risen nearly as high as possible without moving the feet, the lifter (with the weight shifted toward the rear leg) slides the front foot back to a position approximating its starting position; when a deep split is used for the jerk, two backward steps may be needed. Then the back foot is brought forward to a position in line with the front foot. The only exception to this sequence might occur when the bar is forward of the lifter’s hips when the lifter is in the full split position. In such a case the lifter might rise with the combined effort of both legs and then push off the back leg in order to run forward under the bar part way through the recovery. This is an act of desperation to save a lift, not a technique to be utilized under normal circumstances.
Guidelines for the Snatch
The Proper Position for Receiving the Bar in the Snatch
In the snatch, as was noted in the detailed analysis of snatch technique earlier in this chapter, the torso of the lifter typically assumes a nearly upright position while in the deep squat. However, in the snatch some lifters assume a position in which the body is inclined forward more than in the clean. This reduces the height to which the bar must be pulled relative to an upright position and tends to give the lifter a little greater ability to maintain his or her balance in a forward and backward direction while in the bottom position. An important factor in bar control in the full squat snatch is adequate rigidity in the arms and shoulders. Such rigidity is fostered by correct shoulder position and proper pressure against the bar. Most lifters will find that a strong support position is facilitated and stress on the elbow joint is minimized if the arms are rotated at the shoulders so that the crook of the elbows points somewhat forward and not directly upward while the lifter endeavors to bring the shoulder blades together. Proper tension in the arms and shoulders is essential both for controlling the bar and protecting the joints of the shoulders and elbows. If the muscles are relaxed, the bar can be dropped unnecessarily (even after it has achieved the proper bar height and speed for it to be caught by the lifter in the low position). If the lifter tries to extend the elbows too much or rotates the arms in too extreme a fashion, undue strain can be placed on the elbow and/or shoulder joints. The way to maintain proper tension is to think of pushing up on the bar somewhat with the arms and shoulders and to think of stretching the bar (pulling on it in a sideways direction). This simple act brings the arms, shoulders and trapezius muscles of the upper back into a well coordinated balance of tension. The result is that the pressure of the bar is distributed over more muscles and less stress is placed on any single area. If, despite the above advice, the lifter experiences undue strain in the elbows or shoulders, different relative tensions of the aforementioned muscle groups and positions involving greater or lesser rotation of the arms should be tried.
While proper positioning of the foot is an important prerequisite for receiving the weight of the bar effectively in the snatch, it is of even greater importance in the clean. This is because the bar weighs more and has fallen further by the time the lifter is able to catch it in the clean. Therefore, the subject of proper foot positioning in the squat position is covered in detail in the section on receiving the bar in the clean. When reading that section, it should be remembered that the same basic principles apply to the snatch as well as the clean, except that because standing up from the full squat position in the snatch rarely tests the leg strength of an athlete (but it often does so in the clean) the lifter can go lower in the snatch (e.g., using a wider foot stance and/or simply squatting lower) than he or she does in the clean.
Balance in and Recovery from the Squat Snatch
In recovering from the squat snatch, the lifter raises the hips up and somewhat back while permitting the shoulders to travel forward with the torso inclining forward. However, the direction of the bar is as vertical as possible throughout the process, because the line of gravity of the bar must remain within the middle of the lifter’s feet in order for the lifter to maintain his or her balance. There is a tendency for the balance to shift from the middle of the foot towards the rear of the foot as the hips travel back during the recovery. Subsequently, the balance shifts in a forward direction as the extension of the legs progresses, but it always remains toward the center of the lifter’s foot.
In his once pathbreaking book, Secrets Of The Squat Snatch, Larry Barnholth (a pioneer in teaching the squat style snatch and coach of Pete and Jim George) provided some very useful advice on recovering from the low position of the squat snatch. He advised the lifter to drive up out of the bottom position as quickly as possible after stopping the bar’s downward progress—even before the lifter feels completely balanced. As was discussed earlier, he reasoned that a lifter would be far more likely to be able to save a lift from a partially recovered position than from the deep squat.
An additional point not mentioned by Barnholth was that by immediately pushing upward on the bar, the lifter exerts control over the bar by applying a force that influences its direction. I have witnessed many lifts in which athletes merely sat in the bottom position after essentially arresting the downward, but not horizontal, motion of the bar. The bar ultimately traveled outside the lifter’s base of support and the lift was lost. Had the lifters continued to exert upward force against the bar, they would have had much better chances of gaining control.Barnholth also recommended procedures for saving squat snatches that are quite correct but seldom discussed in today’s literature. If the lifter feels the bar drifting backward, he or she should lower the head and torso, or at least maintain his or her position while raising the hips backward. If the bar is traveling forward, the lifter should lower the hips, raise the head and then immediately drive up from the squat. These reactions may feel unnatural, but so is turning into the direction of a skid when you lose control of an automobile. Nevertheless, these movements work.Barnholth was saying in a non-technical way that once the bar and body are outside their base of support (in this case the middle of the lifter’s foot), there is no chance to save the lift unless the lifter has risen high enough out of the squat position for the support (feet) to be moved under the bar quickly. Some lifters are so comfortable under the bar that they can move their feet while in the deep squat position, but this is an extremely rare ability, one which can lead to damage to the knees.
Guidelines for the Clean
The Proper Position for Receiving The Bar in the Clean
Raising the elbows high and with substantial speed (a movement known as “whipping the elbows”) and landing with the torso, feet and knees in proper position are the keys to receiving force in the clean. The elbow whip helps to keep the upper body properly rigid .(This subject is covered in greater detail in a later section of this chapter.) Proper foot positioning consists of placing the feet so that the best combination of stability and strength is achieved. This will normally be a position with the feet at an angle between 30o and 60o, although some use an angle that is considerably longer or smaller with great success. The distance between the lifter’s heels is typically between 10” and 18”.
The correct foot position for a given athlete is one in which the lifter’s lower back can remain arched, or at least relatively flat, and the upper body can be held upright (i.e., nearly perpendicular to the floor). Some lifters have no difficulty in achieving such a position with virtually any foot position. But for most lifters a wider stance and/or a greater angle between the feet help them to achieve an upright position of the torso with the back arched. A wider stance also lowers the lifter’s center of gravity and provides the lifter with a wider base of support. These factors lead to a more efficient and stable receiving position.
If a wider foot position is so advantageous, why don’t all lifters place their feet as wide as possible? The primary disadvantage of a wide foot position and/or a large angle between the feet is that this kind of position can place extra stress on the hip joints. This will be experienced by the lifter either as sort of an “unhinging” at the hips or as actual discomfort. The unhinging is somewhat difficult to describe, but the lifter feels as though all or most of the strain of the supporting effort is on the hip joint and the muscles, tendons and ligaments of the knees and ankles are under relatively little stress. Another sure sign is that the lifter feel a rotation of the femur in the hip joint during the early stages of rising from the squat position. Healthy hip joints play a major role in weightlifting success and in general human locomotion. It is extremely important to protect the hip joint from undue strain. Therefore, it is a good idea to place the feet wide enough to achieve as solid and upright torso position but no wider.
For the lifter who is extremely flexible, there is one other constraint on foot spacing. Such a lifter can find that with the feet in a wide position his or her hips actually travel well past the heels in the deep squat position, particularly when the bar is coming down with substantial force. This causes the lifter’s lower back to lose its arch and generally places the lifter in a unstable position for receiving the weight of the bar. Placing the feet in a narrower position (one in which the lifter’s buttocks touch the lifter’s ankles in the deep squat position) will enable the lifter to control the bar more effectively.
As was suggested earlier, turning the feet outward (i.e., increasing the angle between the feet) tends to cause the lifter to spread the knees and to attain a more upright position and arched back with the same spacing between the heels. The correct knee position is generally directly over the foot; placing the knees too far outside the feet will place a great strain on the hip joint and adductor muscles of the legs, and turning the knees too far inside the feet will tend to place a twisting kind of strain on the knee joints.
Apart from discomfort reported by the lifter, the clearest indicator of improper foot and leg positioning is lateral movement of the knees and/or feet when the bar is received by the lifter. The knees should be functioning essentially as a hinge when the bar is received by the lifter, and the feet should be flat on the platform. Lifters who are on their toes at any point during the supported squat under should be carefully observed in terms of foot positioning. There are several causes for the lifter being on his or her toes during the squat under, but the possibility of improper foot positioning should be ruled out. Lifters whose feet are supported on their inner edge of the foot (i.e., the outer edge of the foot is raised from the platform) while descending into the squat position or while receiving the force of the bar are almost certainly positioning their feet and legs improperly. Similarly, when the lifter’s knees are seen to wobble while the bar is being received (when they move laterally in addition to merely bending), the lifter’s positioning needs to be improved. Improvements in the lifter’s receiving position can be achieved through conscious repositioning of the feet. If that fails to achieve a satisfactory result (it almost inevitably yields an improvement of some kind), attention needs to be paid to the lifter’s flexibility and the height of the heel in the lifter’s shoe.
Apart from body positioning, the key to receiving and controlling the force of the bar lies in the action of the legs. In the squat position the lifter’s arms and torso play a relatively small role in stopping the downward progress of the bar. They must be held in a proper position so that they do not give when the bar is received, but their primary role is to transfer the force of the bar to the lifter’s legs. The legs function like shock absorbers when the bar is being received. Therefore, the arms and torso should assume a rigid position as soon as possible during the squat under, and the legs should assume the crucial role of stopping the downward progress of the bar. The legs should begin to interact with the bar as soon as possible because every split second during which the bar has no support causes it to pick up downward speed and become more difficult to control. Nevertheless, if the lifter attempts to apply a braking force too vigorously or while he or she is in an unfavorable anatomical position, the muscle-tendon unit of the thighs will be subjected to unnecessary trauma, and the elastic qualities of those muscles will not be effectively utilized in assisting the lifter to recover from the low squat position.
In short, the lifter should use the legs early and actively to bring the bar under control but should then use a sort of natural rebound from the low position to assist in the lifter’s recovery. No effort to stop short or even to significantly slow down the bar should be made unless the lifter is at or near his or her lowest position in the squat. At that point the knee, hip and ankle joints of the body and all of the muscle-tendon units that support them are being used in concert to stop the bar and to support one another (e.g., the pressure of the back of the thighs against the calves). If, in contrast, the lifter catches the bar with the thighs and calves at a near 90o angle and attempts to stop immediately, great and unnecessary stress will be placed almost exclusively on the muscle-tendon unit at the front of the thighs. In addition, while the lifter could have employed the elastic qualities of the quadriceps muscles to stand up from the squat position, he or she will be recovering from a dead stop.
The preceding discussion is not meant to suggest that he lifter “crashes” into the deep squat position at all times, offering little or not resistance to the bar. Each lifter will need to learn the proper balance of control and using the natural flow of the muscles in order to feel a relatively smooth receiving of the bar’s force and an almost seamless transition into the recovery from the squat position.
Elbow “whip” (the rapid movement of the elbows from a position above the bar during the pull to a position for receiving the bar in the clean) is a very important element of receiving the bar effectively in the clean, and a number of aspects of it are often neglected when it is taught. If you are observing a lifter from his or her left side, elbow whip consists of a rapid clockwise turning of the elbows around the bar from a position above or just behind the bar to one in which the elbows are well forward of the bar, preferably so that the underside of the lifter’s upper arm is at or near the nine o’clock position, or even above it (e.g., at ten o’clock). Coaches often talk about keeping the elbows over the bar during the later stages of the pull so that the bar will remain close to the body while the elbows are turned from the pull to the racking position on the chest. I have never been persuaded of the usefulness of this method of describing the motion of the arms to the lifter, because the elbows never bend while they are positioned over the bar in the pull for the clean (or the snatch for that matter). The arms do not bend until the lifter is descending under the bar, and at that point the elbows are behind the bar. Sometimes telling the lifter to keep the elbows over the bar will prevent a tendency to “reverse curl” the bar (i.e., keep the elbows at a fixed position near and in line with the torso and simply pull the bar to the shoulders with the arms), so this instruction is certainly worth a try. But it should be understood that this is what some lifters think, not what is actually occurring.
An approach that I have found to be much more effective in correcting a “reverse curl” kind of pull is one taught to me by Joe Mills. The Mills method was essentially to have the lifter run his or her thumbs along the front of the torso and to flip the hand over to a palms up position at the end. This movement is extremely simple and can be executed with great speed after very little practice. It teaches the lifter that the hands need not travel in front of the body (as compared with along it) in order for the hands and elbows to turn over quickly, although the elbows do necessarily go behind the bar during this process. Naturally the position cannot be precisely duplicated with the bar, because the bar will remain in front of the lifter to a certain extent. However, the lifter will quickly feel how close the bar could be and that the reverse curling motion is unnecessary and inappropriate.
With the bar, the lifter must concentrate on whipping the elbows fast and high (above the level of the shoulders if possible, to the same level at least). Most coaches and athletes understand that speed in the elbow whip is essential, so that the lifter keeps the elbows away from the knees while going under the bar and settling into the rack position. They recognize that in the clean a high elbow position in the squat helps the lifter to maintain an upright position, with the back (particularly the upper part) properly arched. Therefore, good coaching leads to assuming the correct position in the squat and to assuming it quickly. However, what is often overlooked by coaches is that the speed and force of the elbow whip are important in maximizing the lifter’s speed in descending under the bar and therefore are of immense help in improving the efficiency of the lifter’s clean. When a very forceful elbow whip is executed, it requires a powerful contraction of the shoulder muscles (which drives the elbows up). The elbows and shoulders create an equal and opposite downward force on the lifter’s body, driving the body down under the bar. Dave Sheppard intuitively recognized this principle when he told me and many others over the years to “whip the elbows like mad.” Dave had one of the fastest and greatest cleans in the sport of weightlifting, no doubt due in part to his commitment to elbow speed.
One last point on the subject of elbow whip: when a lifter has a shoulder width grip, thinking of pushing the elbows up is sufficient to get the elbows to a position of maximum height with maximum speed. However, when the grip is significantly wider than the shoulders, the lifter must think of pushing in as well as up with the elbows (i.e., think of pushing the elbows toward one another as well as up). This little trick, which was taught to me by a fine lifter named Mark Gilman, has enabled many who have tried a wide grip but have been unable to get the elbows up to master the elbow whip with a wide grip after a little practice.
Recovery from the Squat Clean
The recovery from a squat clean is quite different from the recovery from a squat snatch. First, the torso cannot lean forward as much and the hips cannot travel backward to anywhere near the same degree as in the snatch because the bar’s final position rests on the torso at the shoulders (as compared with overhead in the snatch). In the snatch, if the shoulders travel forward and the hips back, the bar can still go straight up. In the clean, if the shoulders go forward, so does the bar, and the lifter will not be able to control it. Therefore, the hips and legs must go up more than back, with the hips having a greater ability to travel back than the shoulders to travel forward (with the lifter still maintaining control).
The limitations inherent in moving the shoulders and hips front and back while rising out of the clean prevent the body from assuming positions that are mechanically the most favorable for such a process. Compounding this problem is the fact that the bar is much heavier in the clean than the snatch (so it is harder to recover from the deep squat position). Moreover, once the lifter recovers from the low position in the snatch, the lift is more or less completed. After the clean, the lifter must perform the jerk.
While there is simply no substitute for strong legs in recovering from a clean, lifters have developed several strategies for making the recovery as easy as possible. First, lifters will lean forward and let the hips travel back to the greatest extent possible while maintaining control of the bar (not only the hips but the entire body and even the combined center of gravity of the bar and lifter can shift somewhat back in the most difficult point of the recovery). Some lifters also round the thoracic region of the spine somewhat to permit the legs to continue to extend without the bar rising because the torso shortens. (Some of these lifters drive the hips forward somewhat toward the end of this process so that the are in a more balanced position to finish the recovery.) Other lifters actually shift their pelvic region to one side while they are recovering from a clean. This rounding and shifting cannot be recommended because rounding places a great deal of strain on the spinal column and sideways shifting places a great strain on the knee joints and spine, but it can be marginally effective. A much better strategy, indeed the only safe strategy, is to strengthen the legs and to use both muscular and bar rebounds to aid in the recovery from the squat position.
It is well accepted in both the coaching and scientific communities that a muscle that is stretched to any extent before it is contracted contracts with greater force. On a practical level this means that an athlete can jump higher if he or she bends the legs and then immediately jumps than if the body is lowered to the starting position for the jump, the athlete pauses and then jumps. The same basic principle applies when an athlete recovers from the deep squat position. If the lifter recovers immediately upon reaching the full squat position, virtually rebounding in a controlled fashion from the bottom (i.e., maintaining control of the torso in an upright and arched position), the recovery will be stronger than if the athlete pauses in the full squat and then recovers. Therefore, the lifter should learn to catch all cleans as quickly as possible after lowering the body into the squat position and to recover as soon as the muscular rebound is felt. The only exception to the preceding rule would be a situation in which the lifter is off balance or otherwise not in control of the bar when the squat position is reached and he or she requires a moment to assure that position. There would be a loss of the elastic potential for muscle contraction with the pause, but that loss might be offset by the lifter’s gaining greater control of the bar. Lifters who find themselves in this kind of situation sometimes find it helpful to drive the body up just slightly from the full squat and then to lower it smoothly to catch a muscular rebound and then to attempt the recovery.
Still another point to consider in the recovery from the squat is one that was made to me many years ago by Bob Bednarski, former World Champion, many time world record holder in both the 110 kg. and 110+ kg. classes and one of the greatest American lifters of all time. Bob, who was known for getting the maximum efficiency out of his leg strength, told me that he used to time his rebound from the low position in the squat with the flexing of the bar. Bob would wait until he felt the downward pressure of the bar peak and then would rebound up immediately. Since the maximum downward pressure would be felt at just about the time the bar reached its maximum bend, Bob was timing his upward muscular explosion so that it would work together with the elastic qualities of the bar to facilitate the recovery from the clean. This kind of bar reaction tends to be felt only with heavier weights and with more flexible bars.
One final note on the important point of recovering from the low position in the clean: leg strength, a good mechanical position, a muscular rebound and the spring of the bar can all be invaluable in facilitating the recovery from the clean. However, perhaps the most significant factor is applying volitional effort as one recovers from the squat. Concentrating on driving hard out of the squat and continuing that upward pressure until the weight of the bar is overcome is a critical element in recovering successfully. Even lifters with very strong legs can experience difficulty during the recovery stage of the clean if they don’t apply sufficient volitional effort.
The Period Between the Recovery from the Clean and the Start of the Jerk
While considerable attention has been devoted in weightlifting literature to the clean and the jerk, little has been said about the period between the clean and the jerk. This is unfortunate, because the transitional moments and movements between the clean and the jerk often spell the difference between a successful jerk and an unsuccessful one. For purposes of this discussion, we will define this period as beginning immediately after the lifter has gotten through the hardest point in the recovery from the clean (but the legs are still well bent) and ending the moment before the dip for the jerk. Several mistakes are common during this period.
The first mistake is a mental one, and it consists of celebrating the successful completion of the clean, rather than focusing on the jerk that lies ahead. For lifters who tend to have trouble with their jerks relative to their cleans, the sooner they begin to focus on the jerk the better; they can begin to do so after the most difficult point in the recovery from the clean has been passed.
The next points to consider are the speed achieved and the force applied during the final part of the clean recovery. During a difficult recovery, the spine will often lose its arched position, the hands or elbows will assume a position that is not the most favorable for the jerk and the bar will slide slightly on the shoulders or will press on the windpipe, the nerves and/or large blood vessels in the neck, threatening the athlete’s clearheaded performance in the jerk. All of these conditions can be corrected, at least in part, by driving the bar up with the legs at the end of the clean so that the bar leaves the shoulders very slightly. This slight thrust of the bar off the shoulders requires very little energy and momentarily leaves the body without the pressure of the bar. During this period, the arms and shoulders can be repositioned (the grip width changed if necessary), the spine can regain its arched position, pressure on the neck can be relieved and the bar can be caught again on the shoulders in the correct position from which to execute the jerk. The key to using this maneuver successfully is to drive the bar just high enough for the necessary corrections and/or preparation. Then the legs are bent very slightly to absorb the force of the bar as it contacts the body on its way down.
While this slight lifting of the bar off the shoulders after the clean can be a key element in preparing for the jerk, there are some hazards that must be avoided in executing this motion. First, if the bar is driven too far off the chest, the lifter will have wasted strength that could have been used for executing the jerk. Second, driving the bar up too much can cause the bar to crash on the lifter’s body when it falls, causing a minor trauma and perhaps forcing parts of the body into positions that are unfavorable for executing the jerk. Therefore, it is necessary for each lifter to find just the right minimum height of the drive. For some few lifters that may be none at all, and for others it may be a couple of inches above the shoulders while in a standing position. For most lifters it will be to a position just above the shoulders when standing.
If any lifting of the bar from the shoulders is to be done before the jerk, it is advisable to do it at the end of the recovery from the clean and not after the recovery is complete (i.e., not after the legs are locked and the body has become motionless in preparation for the jerk). If the lifter becomes motionless after the clean and then rebends the legs to drive the bar off the shoulders and to assume a more comfortable position, the referees may consider this preparatory motion as an attempt at the jerk. There have been some very successful lifters who systematically rebend the legs after the clean to adjust the bar and then do a separate motion for the jerk without the referees questioning the maneuver (e.g., Mario Martinez, silver medalist in the 1984 Olympics). But those lifters usually have a reputation that is well known to the referees and perform such an adjustment after every clean. However, these lifters run the risk of losing the lift because a referee can interpret the lifter’s motion as an attempt to jerk the bar (only one such attempt is permitted under the current rules). Therefore, it is better for the lifter to perform any adjustment at the last stage of the clean, when no disqualification is possible.
An additional point to consider in the transition from the clean to the jerk is the length of the time that the lifter should wait before beginning the jerk. Many coaches recommend that this wait be as brief as possible. A lifter who is not comfortable with the bar at the shoulders will certainly want to follow this advice and to move into the jerk as quickly as is reasonably possible (although a lifter who does not feel capable of holding the bar on the shoulders without undue fatigue should attempt to correct this problem). All things being equal, minimizing the time between the end of the clean and the beginning of the jerk is good advice. Unfortunately, as is so often the case, all things are not always equal. For example, some lifters can focus their concentration so that they are mentally prepared for the jerk immediately after the clean. While this is a desirable ability, not all lifters have it. For those who do not, it is important to take enough time to compose themselves after the clean and before the jerk. For those lifters who are very comfortable holding the bar on their shoulders, spending some extra seconds concentrating in preparation for the jerk presents no problem.
Another consideration is the spring of the bar that is experienced after the recovery from the clean. If the bar has a significant amount of spring, it may be flexing for some seconds after the clean. Most lifters will want to wait for this motion to cease before attempting to dip for the jerk (otherwise, the oscillation of the bar may negatively affect the precision of the dip). Moreover, the technical rules of lifting prohibit a lifter’s using the oscillation of the bar to assist him or her in performing the jerk. This rule requires that the lifter wait for the bar to stop moving before the dip for the jerk begins, or at least that the lifter does not add to any movement that is already taking place as a result of recovering from the clean. With a springy bar the lifter will need to pause for at least several seconds between the clean and the jerk.
Now that we have examined some of the fundamentals of technique in the snatch and clean and what is to be done in preparation for the jerk, let us look at some important aspects of the execution of a successful jerk.
Guidelines for the Jerk
Maintaining a Stable and Balanced Position During the Dip and Thrust of the Jerk
When the lifter prepares for the dip and thrust of the jerk, it is important to address at least three key factors. First, the lifter should have the bar resting on the shoulders and clavicles as close to the neck as is possible, with the elbows raised as high as possible and without interfering with his or her breathing or putting pressure on the arteries of the neck (either of which can lead to a light head or even to blacking out). Using these three points of support (shoulders, clavicles and hands) provides for maximum control of the bar (although the clavicles are the least important support point and are avoided by some lifters who experience discomfort with such support). In such a position it is virtually impossible for the bar to move in relation its starting position as the dip and drive are performed. The lifter should also pull in or tuck in the chin, bringing it close to the neck; lifters who leave the chin forward may actually hit their chins with the bar but are more likely to push the bar forward during the drive, out of a subconscious desire to avoid hitting their chins or noses. During the dip the elbows should never move to a lower position than that in which they started; some lifters find it helpful to raise the elbows slightly as they dip to assure that the bar does not roll forward on the shoulders as the dip progresses. The hands, while providing some support to the bar, are not being pushed up forcefully against the bar with the arms but, rather, are being used as a mechanism to assure that the bar does not roll forward on the shoulders as the dip progresses.
The second key factor in preparing for a good jerk is the positioning of the torso. There are two important elements to such positioning. First, the torso should be kept absolutely vertical during the dip and thrust (except in the special style recommended by Nechepurenko, which is discussed below). Second, the torso must be positioned so that it can maintain a rigid position during the dip and thrust. This means that curvatures in the spine should be minimized and the torso should be held rigid by the entire muscular “corset” of abdominal, oblique and spinal muscles and by the action of raising and expanding the rib cage. These muscles need not consciously be held as tensely as possible, but they should have an athletic sort of tension, strong yet flexible and ready for movement. If the torso is felt to give during the dip or drive, the lifter will need to experiment with spinal curvatures and relative muscle tensions until a stable position is discovered.
The third key factor in preparing for a good dip and drive is the lifter’s balance on the feet at the start of the dip. Since there is a tendency for the combined center of gravity of the lifter and bar to shift forward slightly during the dip, it is a good idea for the lifter to shift the weight of the body and bar toward the rear of the foot as the dip begins. In this way, even if a slight forward shift of the center of gravity occurs during the dip, there is some margin for error in terms of remaining over the lifter’s balance point. Such a position also helps to keep the bar behind the lifter’s head later in the jerk.
Another approach to assisting the lifter in maintaining proper balance during the dip and thrust was recommended by V. Nechepurenko of the Soviet Union in 1972. He advised the lifter to allow the torso to incline forward slightly and the hips to travel slightly rearward during the dip, while maintaining the lifter’s balance over the feet. Then, during the beginning stages of the thrust, the torso is straightened and the hips are brought forward so that they are directly under the torso. While this technique requires a more complex set of actions from the body than the conventional dip, it has the advantage of helping some lifters to keep both the bar and their bodies balanced over the middle of the foot throughout the first four stages of the jerk. This technique can be especially helpful for lifters with relatively stiff ankles and/or sore knees and lifters who find it difficult to keep from inclining the torso forward during the dip for the jerk.
Maximizing the Upward Thrust During the Jerk
As in the explosion in the pull, it is important that the lifter achieve an explosive thrust during the jerk. Several factors influence the generation of such a thrust. One factor is leg strength. All other things being equal, the lifter with stronger legs will be able to drive the bar higher than a lifter with weaker legs. A second factor in generating upward thrust is the lifter’s ability to reverse the direction of the downward motion of the bar during the dip; the more rapidly and powerfully the lifter is able to do this, the more force he or she will be able to generate during the upward thrust. A third major factor which influences the height to which the bar will rise is the elasticity of the bar itself. A more elastic (springy) bar can be used by the lifter to generate greater height in the thrust.
Interestingly, the one factor that will not help the lifter to generate greater jerk drive is to use the arms during the drive. Using arms will not generate significant additional upward thrust to the bar but, rather, will keep the lifter fixed against the platform when he or she should be splitting under the bar. Alternatively, it will tend to push the lifter backward and away from the bar, which will lead to the lifter’s being backward and leaning back when the bar arrives at arms length— a disaster.
The Importance of Elbow Positioning in the Jerk
Several years into my lifting career I noticed that if I permitted the outside or rear portion of the elbow to point in a forward direction, I had less strength in supporting the bar than if I made sure the outside or rear of the elbow pointed to the side with the bar overhead. Years later, Naum Kelmansky, the coach of the Lost Battalion Hall weightlifting club in New York City, gave me a even more useful tip in this area. Naum was a very promising young lifter in the Ukraine, and later a high level coach in the Soviet Union, before he emigrated to the United States. He is one of the most knowledgeable Eastern European coaches that I have met and has many valuable insights about weightlifting, particularly with respect to technique.
Naum pointed out that a rotation of the elbow beyond the point that I was using (so that the crook of the elbow is rotated somewhat forward) improves even further the strength of the overhead position. This is an especially important point for lifters who have poor arm lock or some other problem that makes holding the bar overhead difficult. Although attempting this kind of elbow positioning will normally result in the lifter’s placing the bar further behind the head than he or she has heretofore, this is a bonus and is not as important for all lifters as is the elbow rotation. A number of lifters with poor elbow lock have found this tip to be invaluable. Figures 8 and 9 depict good and mediocre (respectively) elbow rotation.
The Proper Position for Receiving the Bar in the Split Jerk
The keys to a strong lock position in the jerk are similar to those for the snatch, except that the narrower arm position generally leads to less shoulder rotation and places less strain on the elbows. Nevertheless, the need to rotate the arms, to push up on the bar, to stretch the bar sideways and to pull the shoulder blades together is just as great. In fact, many lifters who have difficulty in locking the arms in the jerk could overcome their instability in that exercise simply by turning the crooks of their elbows forward more distinctly and pulling the shoulder blades together. For most lifters the resulting position will have the bar just over the back of the head or behind it. This position is not only powerful, but it also gives the lifter something of a margin of error.
If for some reason the lifter has difficulty getting the bar behind the head in a given attempt, the effort to get the bar there will at least place it directly above the head, where the lifter may have a chance to move the body under the bar and take control. If the lifter’s normal position is with the bar just above the middle of the head or in front of it, any failure to get the bar into that position, even by a small margin, will make it difficult to get the bar under control.
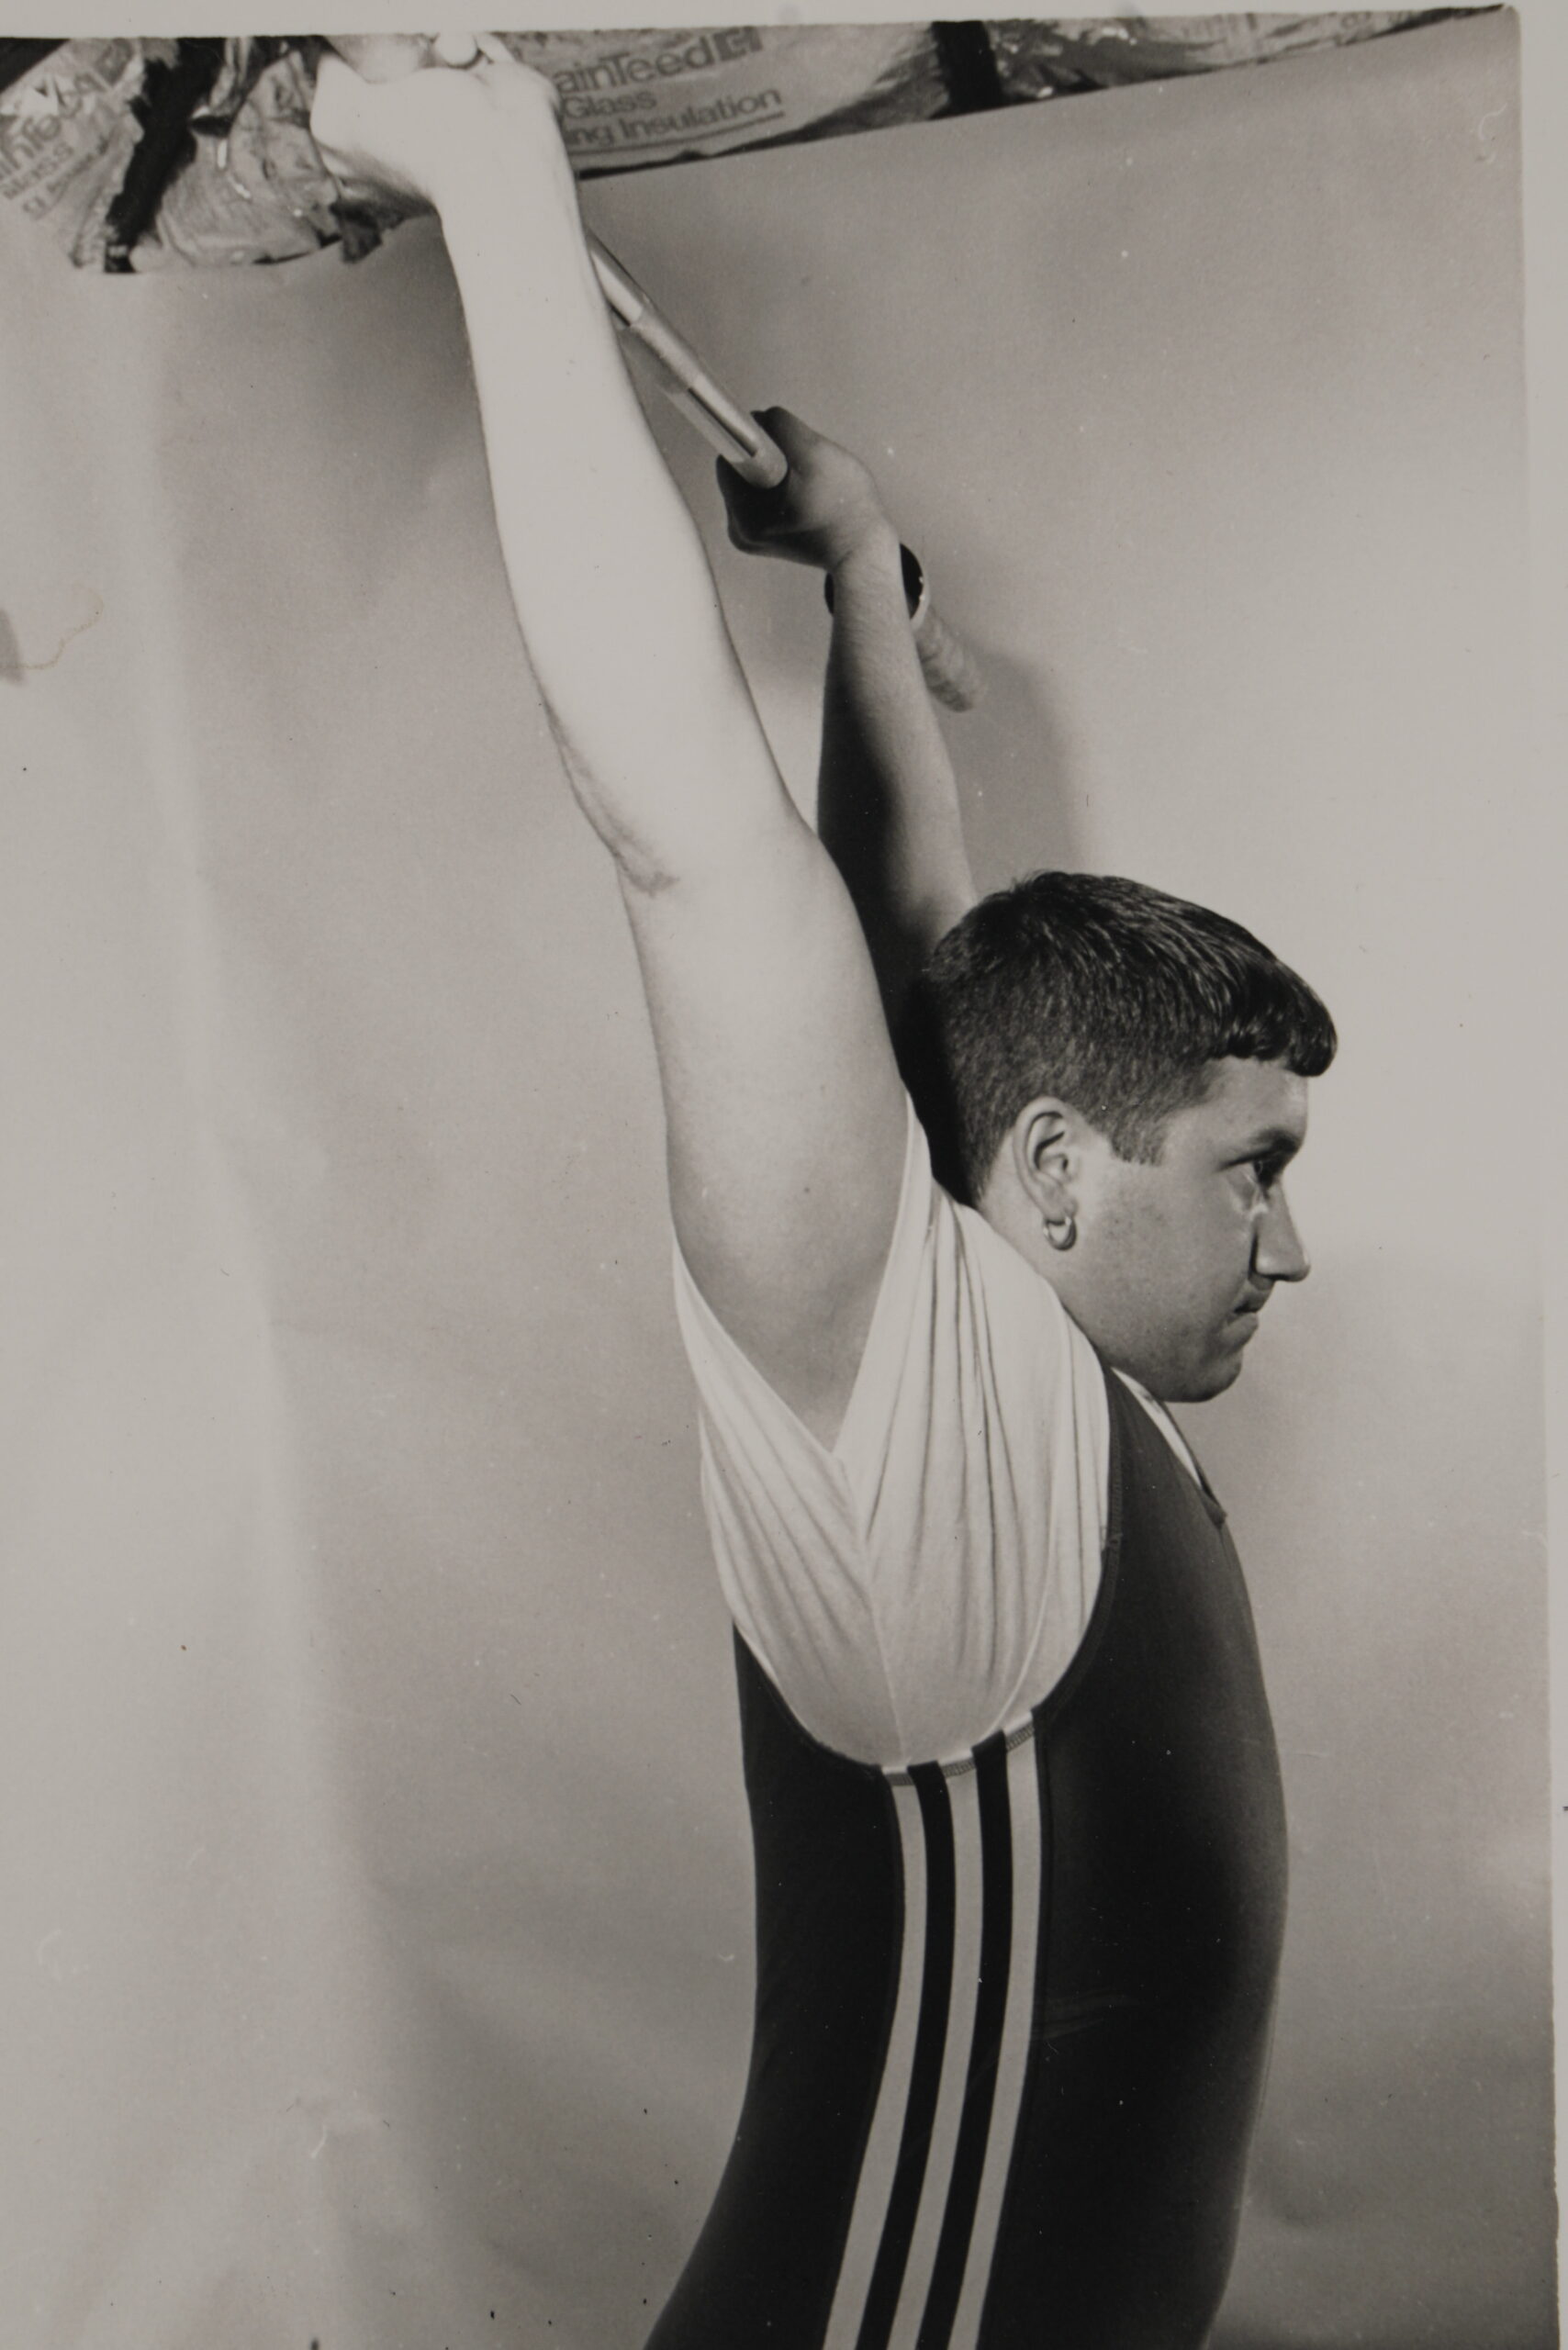

It should be noted that there have been some famous and highly successful practitioners of styles which place the bar toward the front of the head. Bob Bednarski and Yuri Vardanian, both former World Champions and world record holders, jerked very successfully when they positioned the bar near the front of the head. They found this to be a strong and comfortable position and it saved time in getting into position under the bar. This is because the body does not have to travel as far under the bar while moving into the split with the bar forward position as in does when the upper body comes through and ends up under the bar. Most lifters are able to move the upper body under at the same time the rest of the split is taking place and so do not give up much in terms of time (and any loss of time is generally compensated for by having the bar in a safer position). Nevertheless, Bednarski, Vardanian and a number of others have demonstrated that an alternative position can be very effective.The keys to stability in the split position are: turning the feet inward slightly (or at least placing them parallel to one another), placing the feet at least at shoulder width and maintaining proper balance on the feet. Maintaining the feet in a position strictly parallel to one another or turning the feet inward slightly (i.e., to a slightly pigeon-toed position) assists the maintenance of balance and the safety of the split position in several ways. First, while in the split position, there is a tendency for the feet to be pulled in toward the body. Among the various muscles that are contracting in the legs in order to support the body while it is in the split position are those that pull the legs in toward the body (e.g., the adductors). This inward pressure is placed toward the heel of each foot (which is where the legs connect with the feet via the ankles). Consequently, there is a tendency for the heels to be pulled in toward the body while friction keeps the toes where they are. The result is that the feet turn out.
The very act of the feet turning out causes the body to lose its balance and stability, making loss of control of the bar more likely. In addition, any significant turning out of the foot of the front leg places the knee of that leg in a very unstable position, putting great strain on the ligaments of the knee instead of the thigh muscles. When the back leg turns in, force is transmitted to the adductor muscles of the thigh and the ligaments of the knee instead of the quadriceps and hip flexors. The knee ligaments and adductor muscles are far less able to withstand pressure than the quads and hip flexors, so the chance of losing a lift and/or being injured in the process are greatly increased. The lifter is also better able to adjust the position of the body forward and back with the feet turned inward or at least held in a parallel position. A further advantage of assuming a slightly pigeon-toed position, or at least strictly straight foot position, is that the rear leg will tend to be balanced on all of its toes and the entire ball of the foot instead of primarily on the big toe and the portion of the ball of the foot that lies behind that toe. This position provides a much larger base of support and thereby improves the lifter’s stability.
The Recovery from the Low Position in the Split Jerk
The recovery of the lifter from the low split position in the jerk is similar to the process described for the recovery from the low split position in the snatch described earlier; the lifter straightens the front leg while shifting the hips, torso and bar toward the back leg (i.e., the lifter is pushing back as well as up with the front leg). At the end of this motion, when the body has risen nearly as high as possible without moving the feet, the lifter (with the weight shifted toward the rear leg) slides or slightly lifts the front foot back to a position approximating its starting position. The back foot is then brought forward to a position in line with the front foot.
The Power Style of Jerking
The power style of jerking involves lowering the body into a partial squat during the fifth and sixth stages of the jerk (usually accompanied by a small sideways jump of the feet as well). While the split style in the jerk is acknowledged as offering the lifter greater stability and capacity to lower the body in the jerk than does a half squat, users of the power style of jerking have appeared periodically on the international platform over the past several decades. Paul Anderson used a modified push jerk during the 1950s. He merely drove the bar with his legs and then pressed it up quickly with his arms the rest of the way, never bothering to rebend his legs (today the technical rules are interpreted in such a way that a second bend of the legs is required). A. Nemessanyi, an Olympic medalist in the 1960s, V. Sots, a Soviet World Champion and world record holder in the C&J in the early 1980s, and two time Olympic Champions (both in 1992 and 1996) P. Dimas and A. Kakhiashvilis are among the most famous practitioners of the true power jerk style. Figure 10 illustrates the power jerk style as performed by Kakhiashvilis.
In analyzing V. Sots’ technique in the power jerk, the Soviets found that he had a shorter braking phase in the dip, did not bend his knees as much as is normal in the dip and drove the bar a little longer as well. The bar dropped approximately 5 cm when Sots caught it in the half squat. Sots claimed to be better in the power jerk than the split jerk, hence his use of this style in competition. Since the sample of lifters doing the power style jerk in competition is so small, it is not possible to tell whether Sots’ technique is typical of an athlete who would find the power jerk more effective or whether it is peculiar to Sots.
One of the most consistent characteristics of the successful power jerker is shoulder mobility sufficient to permit the athlete to incline the torso forward and lower the hips to a receiving position that requires the power jerker to lift the bar no higher than the typical split jerker
While practicing the power jerk can develop the jerking power of most lifters, it can obviously be used by some lifters as their primary style of jerking. The fledgling lifter would be wise to remember the technical advantages of the split jerk and to master it. The lifters who use the power style successfully will continue to impress audiences with their superior strength. However, most audiences and competitors will be far more impressed by superior ability in the jerk, not by whether a lifter uses the power jerk style or the split style (and the official records of the competition do not indicate which style was used).

The Squat Style of Jerking
He Yingqiang of China registered an historic moment at the 1986 World Weightlifting Championships. He executed a successful jerk by lowering the body into a full squat position during the squat under. After the clean, which was performed with the normal slightly wider than shoulder width grip, He lowered his body into a full squat position to fix the bar overhead and then recovered from that full squat position without difficulty to complete the lift. Analysis of He’s technique showed that he drove the bar only a little less high than the average lifter during his lift and really only needed to lower the body into a half squat position in order to catch the bar. However, when the lifter catches the bar with such a heavy weight and with the knees bent at such an angle, a combination of balance difficulties and mechanical weakness seems to require an extremely long amortization phase. As a result, He Yingqiang traveled all of the way into the full squat before recovering.
He’s lift was interesting for several reasons. First, it proved beyond a shadow of a doubt that a full squat jerk could be successfully performed with top weights. (He finished second overall and third in the jerk that day.) Second, it supported the contention that recovery from a deep squat position is assisted by the fore-aft movement of the shoulders and hips (a degree of movement that is not possible when the bar is resting on the shoulders instead of at arm’s length). This point was made when He made a relatively difficult recovery from the squat clean and seconds later made a far easier recovery from the squat position in the jerk.

The reaction to He’s style was varied. Some viewed the performance as essentially a one-time event, and others saw it as the kind of style that would someday become predominant. He’s performance in the C&J remained at relatively the same level in subsequent years. Since that time a number of other world class athletes have employed the squat style in the jerk (perhaps most notably the 1996 Olympic Champion in the 70 kg. class, Zhan Xugang). Figure 11 depicts Zhan performing the squat style jerk.
However, it generally takes a combination of technical superiority and outright superiority for a lifter’s performance to motivate people to consider changing technique on a grand scale. While it seems very unlikely that the squat style jerk will ever emerge as the dominant style, it is a virtual certainty that before that could ever occur, more lifters will need to achieve a level of clear superiority using that style and it is probable that at least one lifter will have to achieve outright dominance it the jerk for this style to achieve true popularity).
Nevertheless, He and his successors have shown that another style is available in the jerk, at least for lifters who have special needs and abilities. He has offered us a clear demonstration of the point that there is still much room for technique innovation in the sport of weightlifting.
The Trade-Offs In Technique And Their Role In Individualization
Although there are obviously many basic principles that must be followed by all lifters to achieve optimal technique, there are also a number of judgments that every lifter must make about the technique that he or she will employ in the snatch and C&J on the basis of general weightlifting principles and his or her individual characteristics. It is easier to understand the need for these kinds of choices regarding technique if we realize that many aspects of technique involve trade-offs. As an example, consider the trade-offs that exist with respect to selecting the width of you grip for the snatch. The wider the athlete grips the bar in the snatch, the higher the bar is lifted merely by the athlete’s standing erect with the bar in his or her hands. As a result, less effort is needed in order to lift the bar to the required height from the point where the body reaches a straightened position (after which it is not possible to apply any significant amount of additional force to the bar). In addition, a wider grip in the snatch means that the bar does not have to be lifted as high with a narrower grip (the bar is closer to the top of the lifter’s head and the trunk in the overhead position).
The advantages of a wider grip are offset by several disadvantages. First, the athlete will find it harder to lift the bar from the floor with a wider grip (because the torso must lean forward more and/or the legs must be bent to a greater degree to reach the bar). Second, it is generally harder for the athlete to hold onto the bar securely with a wider grip ( unless the lifter’s hand are actually in contact with the inside collars of the bar ). Third, a wider grip can place more strain on the shoulder muscles, while the stress on the shoulder joint itself will be of different nature with a wide as opposed to a narrow grip (e.g., the shoulders are generally twisted more with a narrow grip).
Which grip is better? That depends on the interaction of these various aspects as they present themselves to a specific athlete at a specific stage of that athlete’s development. The athlete must work to find the grip that incorporates the most and most significant advantages while presenting the fewest and least important disadvantages for that athlete. The trade-offs in technique variables must be weighed and properly balanced. To further illustrate this point, consider the issue of selecting a proper grip in the snatch in more detail. We will then examine other areas of technique which involve choices.
Selecting an Optimal Hand Spacing
Hand Spacing for the Snatch
Optimal hand spacing in the snatch is dependent on a number of factors, and, as stated earlier, there are trade-offs in the selection of a grip width. There are often “rules of thumb” given in various weightlifting manuals for selecting the width of the snatch grip. For example, one text suggests that the distance between the hands be equal to the distance between the lifter’s elbows when they are held out to the sides at a position level with the shoulders. Such rules of thumb are of very limited value because they take into account only the length of the lifter’s arms and the width of his or her trunk. They fail to consider an even more important relationship: the relationship between the length of the lifter’s trunk and the length of his or her arms. A more precise measure has been suggested by a number of Eastern European writers. They recommend a grip width in which the angle of the arms in relation to the bar is between 49o and 63o. However, even such a measure does not take into account such factors as the length of the lifter’s torso in relation to the arms.
One simple technique that does take this relationship into account is to have the lifter hold the bar with straight arms while pushing the chest out and pulling the shoulders back but not up. Next the lifter should bend forward slightly at the waist (with the back arched) and bend the thighs several inches. The lifter then adjusts the width of the grip so that the bar contacts the top of the thighs or the crease of the hips (the area where the most solid bar contact will occur during the pull of most lifters). However, even this is just a beginning point for selecting a grip width. The lifter should fine tune the width of the grip by considering and experimenting with the following factors.
1. Shoulder flexibility, strength and joint structure: A lifter with very flexible shoulders will be able to grip the bar comfortably at virtually any width (i.e., from shoulder width to a position in which the outside of the lifter’s hands touch the inside collar of the bar). As a general rule, the narrower the grip in the snatch, the smaller the strain on the shoulder muscles. However, a narrower grip in the snatch tends to place more of a twisting force on the shoulder joint than does a wider one. On the other hand, a grip that is extremely wide places an enormous strain on the shoulder muscles and the shoulder joints when they are supporting the weight. Lifters who have snatch grips that are either very wide or very narrow have tended to have more shoulder problems than lifters with more moderate grip positions. When experimenting with grip width, it is essential that the lifter make any changes very gradually. This is particularly true of more experienced lifters who have been using a particular grip for some time. They are strong enough to lift very heavy weights and are conditioned to handle a certain grip width. Any significant change can result in an injury. I know at least one nationally ranked lifter who virtually ended his career as a result of a shoulder dislocation that occurred when (on the advice of a well known coach) he widened his grip significantly after many years of lifting and tried a near maximum weight shortly thereafter.
2. Elbow joint stability: The majority of lifters have arms that lock in a straight position when they straighten their arms to the greatest extent possible. However, some lifters are able to hyperextend their elbows (i.e., to have an angle between the forearm and upper arm, measured at the crook of the elbow, that is greater than 180o) and others cannot straighten their arms fully. The lifter with the hyperextended elbow will need to exercise care in finding the arm position in which the elbow is most stable when the bar is overhead. If the grip is too narrow and the shoulder is rotated too much, a shearing force can be placed on the ligaments of the elbow, exposing them to injury if the bar becomes mispositioned while it is supported overhead. If, on the other hand, the grip is too wide, the arm can be placed in a position where the ligaments of the elbow joint are put under a great direct strain, and that can expose the elbow joint to injury.
Another factor affecting elbow stability is the position of the elbow in relation to the ground when the bar is overhead. If the crook of the elbow is facing directly up to the ceiling, there is more direct strain placed on the elbow joint than if the crook of the elbow points forward and up. However, if the crook of the elbow is rotated too much (i.e., the crook points only forward, or even down), there can be sufficient shearing force on the elbow to expose it to danger.
Fortunately, few lifters ever have any elbow problems, and it is rare for an elbow to act up without warning (so any such warning should be heeded). Moreover, elbow problems can nearly always be eliminated with appropriate corrections in technique. The only exceptions to this are some lifters who have some anatomical lack of stability in the elbows or shoulders, such as a significant hyperextension of the elbow. Even these lifters are likely to be able to minimize their physical limitations with careful experimentation.
It should be noted that perhaps the greatest risk to elbow and shoulder integrity arises out of the movement of the bar and body as the weight is received in the overhead position rather than the position of the elbow alone. If the bar has a long distance to drop in the unsupported squat under phase, it will pick up more downward speed and will therefore place more of a strain on the elbows, the wrists and the shoulders when it is caught. In contrast, if the distance over which the bar is brought to a stop in the supported squat under is lengthened, there will be less force at any particular point and the strain on the elbows and shoulders will be minimized. Similarly, when the bar and lifter are moving horizontally, in opposite directions as the bar is caught (e.g., the shoulders of the lifter are moving well forward and the bar is moving backward), strain on the arms and shoulders is increased more than when the movements of the lifter’s body and the bar are more vertical. Consequently, a large “swing” of the bar (i.e., a horizontal motion) and/or a significant movement of the torso forward when the lifter is executing the squat under place the lifter at greater risk. Grip width can affect the degree of relative horizontal motion of the body and bar, so the individual lifter will need to experiment to determine the best grip.
3. Thigh contact and pulling strength: In the snatch most lifters make thigh contact with the bar at a point that is approximately one-third to one-half of the way up the thigh from the knee. However, others do not have any contact until the bar is nearly at the top of the thighs. The bar loses contact with the body of some lifters about one-third from the top of the thigh, and others have solid contact until the bar reaches the height of the hips. Different lifters are more efficient with one approach or another (because of differences in the relative strength of their leg and back muscles and because of differences in the lengths of the body links and positions from lifter to lifter). Clearly, if the grip is so wide that the lifter does not contact the bar until it is above the level of the hips or the grip is so narrow that the bar contacts the thighs just above the knees and leaves the thighs before the bar reaches mid-thigh level, the lifter should at least try a more mainstream grip and body position.
4. Achieving a correct starting position in the pull: Some lifters will note that if the grip is too wide, they will have difficulty maintaining an arched back when they take the bar off the floor. Since a correct starting position is important, lifters who find themselves in this situation should either become more flexible or narrow the grip.
5. The height necessary in order to fix the bar: There is no question that the bar will not have to be lifted as high with a wide grip as with a narrower grip. All things being equal, a wider grip places the bar closer to the ground and to the lifter’s body. This lower position also gives the lifter greater stability (a lower center of gravity yields greater stability).
6. Grip strength and hand size: Most lifters will find that the wider their grip, the more difficult it will be to hold onto the bar. With a wide grip the arms exert a horizontal as well as vertical force on the hands (in contrast with the more purely vertical pull against the fingers that occurs when the forearm is in line with the hand, as happens during the clean). This causes the outer fingers of the hand to open slightly and the forearm to be placed in a diagonal position relative to the hand. This position is somewhat less secure for holding the bar in the hand. The lifter with large hands will be less affected by this positioning because his or her fingers can grip the bar effectively even if they are opened slightly. The lifter with a small hands can experience a significant problem if the grip of the outer fingers is affected sufficiently. Naturally grip strength is also a factor, as the lifter with a surplus of grip strength will have little difficulty in holding onto the bar even if the hands are placed at a less favorable angle. Any hand position that results in the lifter losing his or her grip (or loosening it sufficiently to cause the lifter to reduce the explosiveness of his or her pull) is too wide for the lifter at that point in time. The option is either to strengthen the grip or to move it in. The correct solution may be difficult to determine early in a lifting career as almost anyone can hold onto the bar with light weights (although even relative beginners may notice a grip problem stemming from the wide grip when doing reps).
Hand Spacing for the Clean
The common advice given to the beginning lifter with respect to grip width in the clean is that the grip should be “shoulder width.” This generally means a grip that is wide enough to position the inside of the hand just outside the shoulders when the bar is resting on the lifter’s shoulders. Individual grip widths vary from approximately 16″ to 26″ between the insides of the hands (with most lifters being between 17″ and 22”), although there have been some international level lifters who have used grips that were even wider or narrower. Most lifters execute the clean and the jerk with the same grip width, but there have been some very successful lifters who have switched their grip widths after the clean, almost invariably widening the grip after the clean.
As noted earlier, a narrower grip (up to the point of being shoulder width) generally makes it easier for the lifter to start the bar from the floor. In general it also tends to make bar contact with the thighs and body steadier during the lift. Most lifters find it easier to place their elbows in a high position when they receive the weight on the shoulders in the clean with a narrower grip. A wider grip in the clean leads to greater difficulty for the lifter in taking the bar from the floor than does a narrower grip, but the bar is generally more easily lifted to a greater height with a wider grip. A wider grip will also force the lifter to lean forward at the torso during the pull to a greater extent than happens with a narrow grip. This places a greater strain on the muscles of the spine an the hip extensors, with the result that the lifter will have a greater tendency to shift the body further back toward the heels and perhaps to straighten the torso prematurely during the pull than he or she would with a narrow grip. This results in the lifter’s pulling and jumping back. Most lifters find it somewhat more difficult to get the elbows up in the bottom position of the clean with a wide grip (a problem that can be overcome to a certain extent by pushing in as well as up when whipping the elbows (a tip I learned from a very analytical coach and lifter named Mark Gilman).
Hand Spacing for the Jerk
As indicated above, most lifters use the same grip for the clean as for the jerk (i.e., a width between the insides of the hands from 16″ to 26″, with most lifters using a grip in the 17″ to 22″ range). A narrow grip in the jerk places less strain on the muscles of the shoulders than does a wider grip and generally permits the athlete to thrust more forcefully with the arms in the later stages of the jerk. However, with a wider grip, the bar does not need to be lifted quite as high, and many lifters feel that with a wider grip they can both get the bar further behind their head and rotate their shoulders to a greater degree (a position considered to be more stable by many lifters). In addition, a wider grip generally enables the lifter to get his or her chest out while preparing for the jerk and to support the bar more solidly on the shoulders. As with other technique issues, the trade-offs between wider and narrower hand spacings will need to be considered and experimented with.
One final factor to consider in choosing a grip for the jerk is the grip that is used in the clean. While it is possible to move the grip between the clean and the jerk, doing so adds another variable to preparing for the jerk. It is a relatively easy to straighten the torso or to rearrange the position of the bar in relation to the neck after the clean. Rearranging the spacing of the hands is more difficult because each hand may move to a different degree, thereby creating an uneven grip. Therefore, where it is possible to select a grip that is relatively effective for both the clean and the jerk, that should be done.
Selecting an Optimal Foot Spacing
Foot Spacing for the Pull
Athletes will often ask about the correct foot stance for the pull. The answer given by most coaches is that the best stance is the one from which the athlete can jump the highest since, they argue, the final explosion in the pull is like a jump. There is a lot to be said for such advice. The final explosion in the pull is like a jump in many ways, and position that is functional for a jump may well be best for executing the final explosion in the pull. In addition, the jumping position (which is generally with the feet spaced at approximately at shoulders’ width) permits the lifter to assume his or her full height when standing. In contrast, if the lifter stands with the feet wider, he or she will be slightly shorter. This will result in the bar being at a lower position than is usual when the lifter is performing the final explosion or assuming the extended position. Consequently, the bar will need to travel higher in relation to the position of the body with a stance that is wider than shoulders’ width.
Despite the advantages of pulling with the feet in a jumping position, some lifters will find it hard to assume a correct starting position in the pull with the feet so placed. Their flexibility and body proportions may cause them to round their backs, to raise the hips faster than the shoulders, or to make some other important error in the start of the pull If the trade-offs a lifter must make in order to keep his or her feet in a jumping position are too great, any advantages of such a position are overcome by the disadvantages. If a lifter has trouble finding a strong starting position in the pull, widening the stance and/or turning the toes out more than usual will often help. Something may be given up in the explosion, but that may be worth giving up in order to gain a correct and secure position at the start or in any of the first three phases of the pull. Only the coach and lifter can decide this, and it must be done case by case. The main point is that blind obedience to the generalities of technique can result in less than optimal performance for at least some athletes.
An Uncommon Foot Position for the Pull: The Frog-Leg Style
From the 1960’s through the mid 1970’s seven Japanese lifters set a total of 30 world snatch records. Two of those lifters, Yoshinobu Miyake and Masashi Ohuchi, astounded the weightlifting world with their prowess in the snatch: Miyake with eleven world records and Ohuchi by snatching a world record in the 82.5 kg. class weighing only a little above the 75 kg. class limit!. The Japanese lifters of this era used the “frog” style in the pull—the most distinctive characteristic of which is a starting position with the lifter’s heels together and the toes and knees at an angle of approximately 75 degrees or more in relation to one another. In this position the hips are closer to the bar at the start of the pull than in the conventional style. Figure 12 illustrates the frog leg position in the snatch (the angle of the feet is normally greater in the snatch) than the clean).
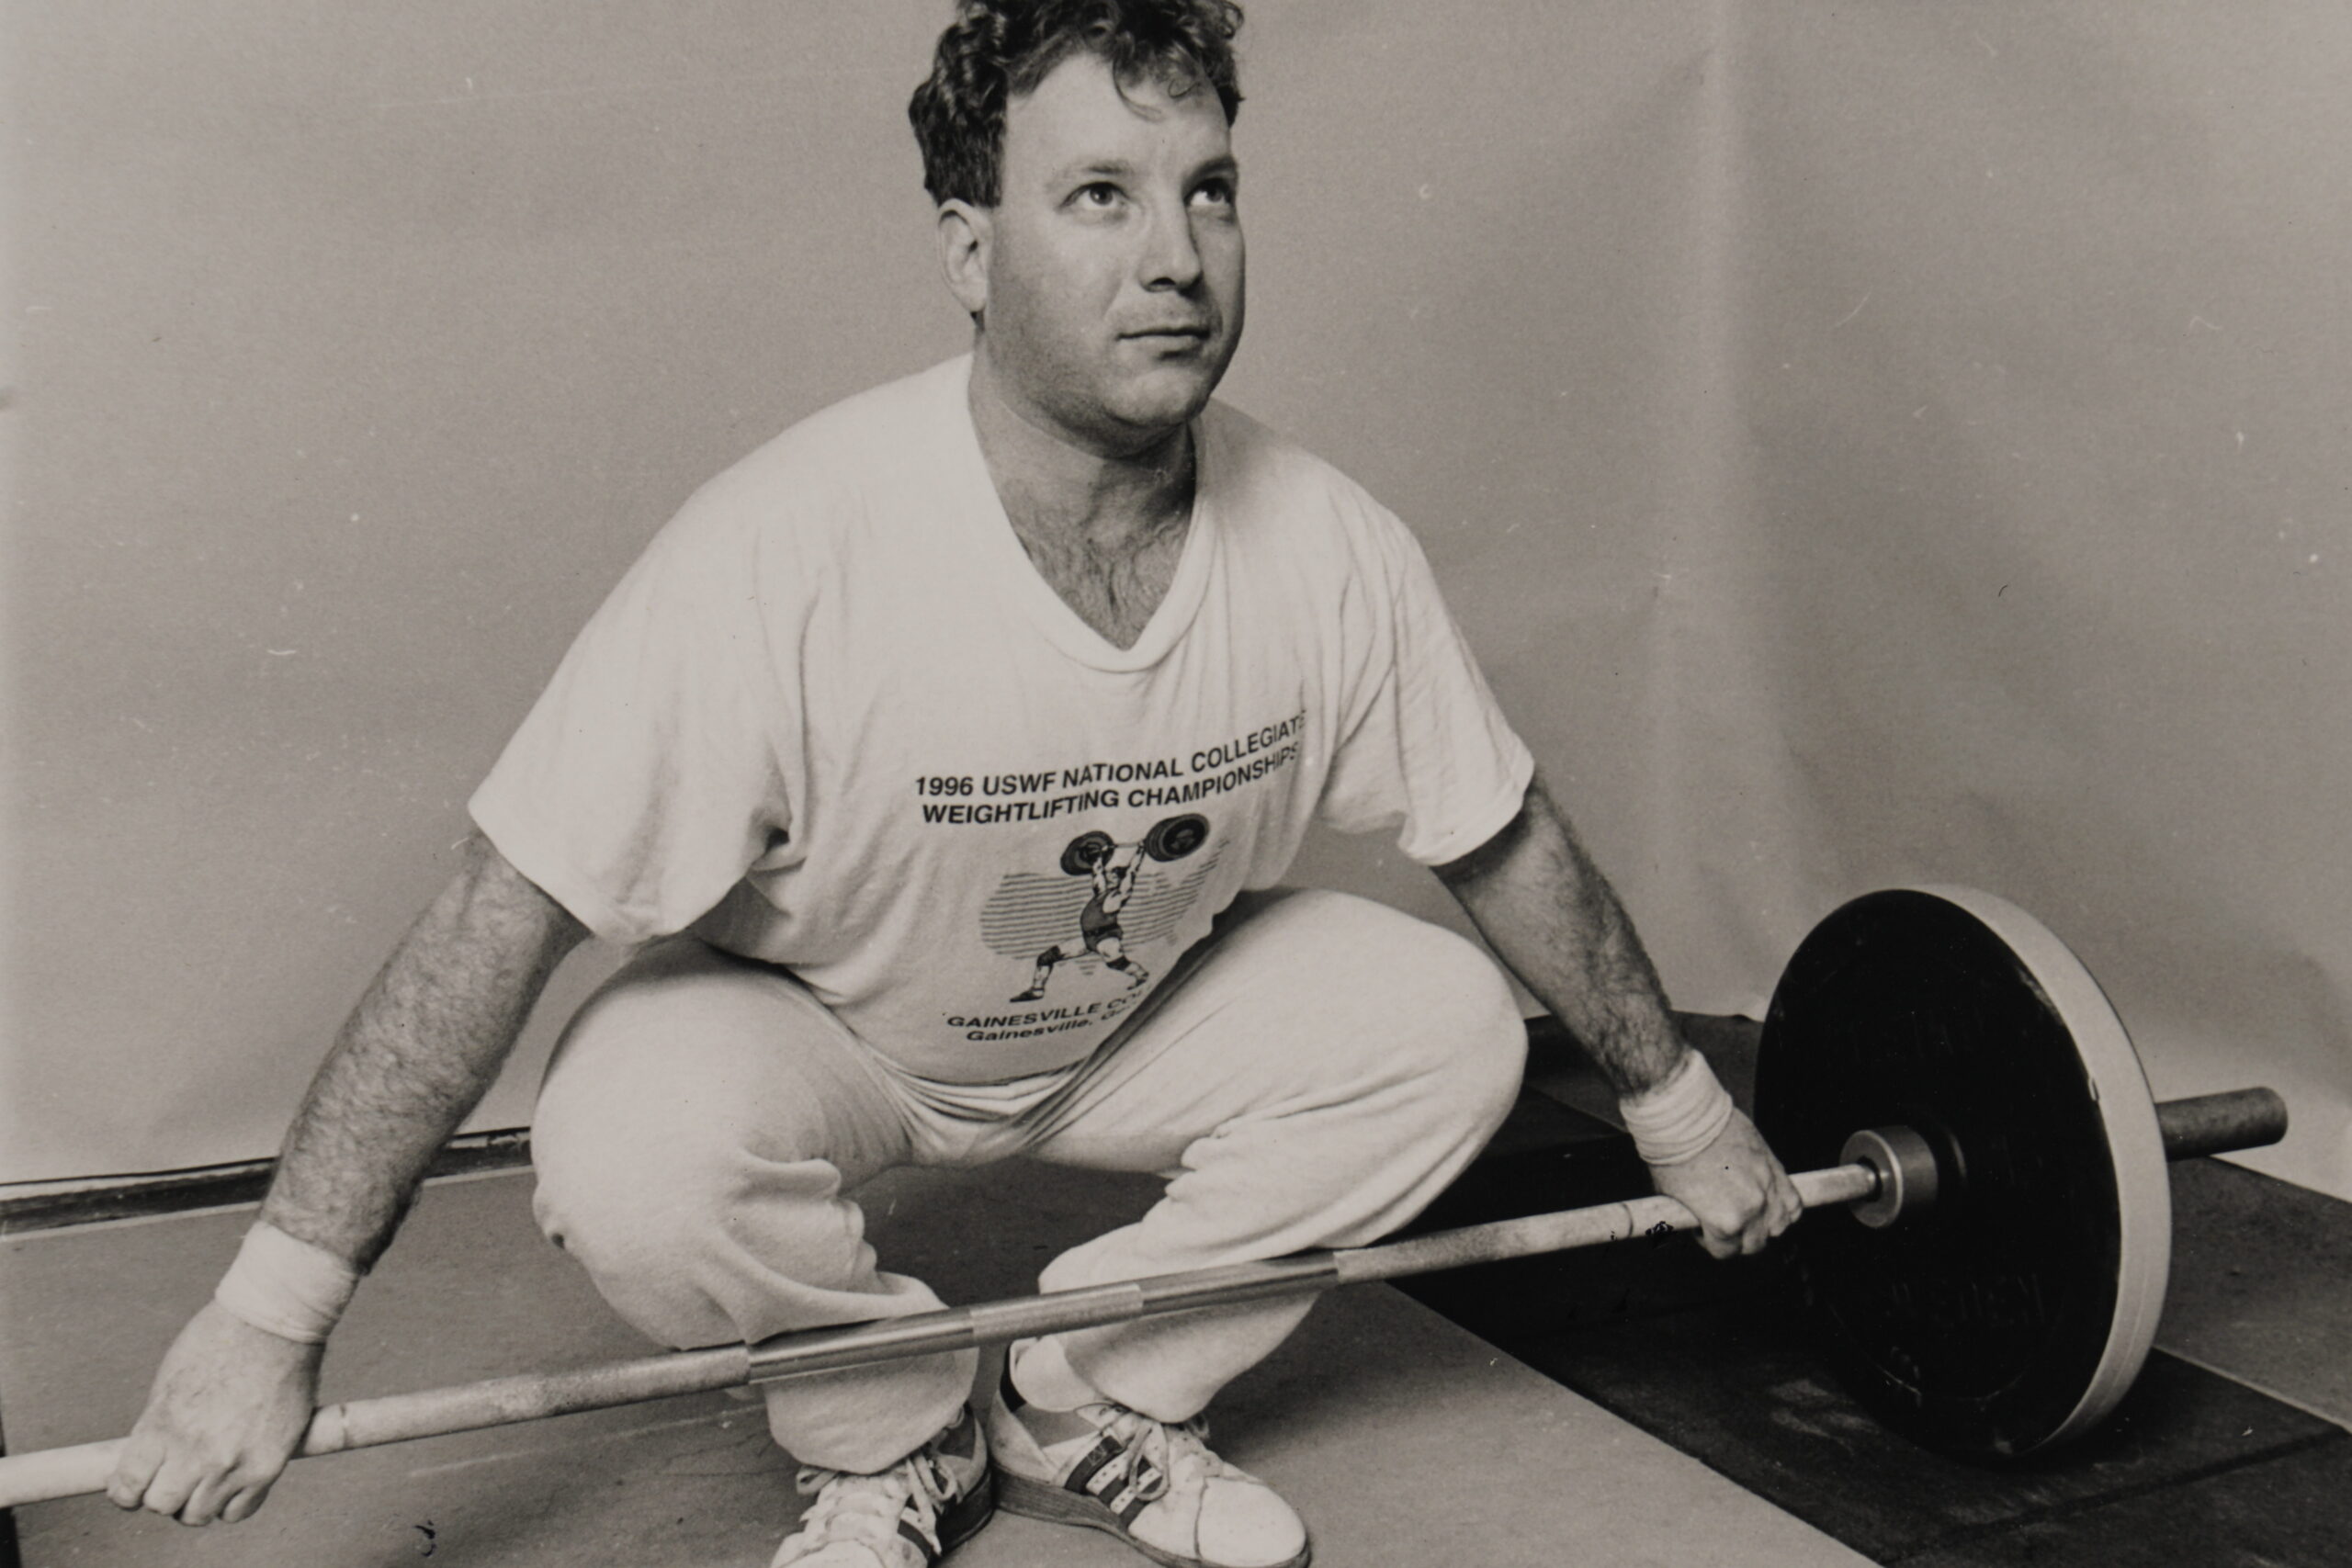
Most of the frog style lifters (Miyake in particular) started their pulls with their hips lower than was typical in their day. (Miyake’s habit of sitting with his hips in a low position in preparation for the pull and then raising them as he applied force to lift the bar from the platform made the starting position of his hips appear to be even lower than it really was.) In addition, they held their torsos at a greater angle to the platform (i.e., in a more upright position) than did their contemporaries, who used a conventional pulling style. It was from this unusual starting position, which has some resemblance to the position in which a frog sits, that the style probably got its name.
From their starting position, most of the frog stylists drop their hips momentarily and then, while rebounding slightly from this low position, begin their pull (many froggers pull as hard as possible from the start, although there are some who pull more slowly). The combined weight of the bar and lifter is felt on the middle of the foot or even slightly forward of the middle. The Japanese frog stylists suggest that the angle of the back should remain the same during the pull from the floor to the knees and that the hips should move upward and not back. Once the bar has passed the knees, the hips are driven forward toward the bar. Advocates of the frog style generally recommend beginning the final explosion of the pull with the bar at or above the height of the middle of the thigh. They recognize that the foot position assumed during the first stage of the pull inhibits the forward drive of the hips during the final explosion but feel that there is an offsetting advantage in that the hips move more directly upward, yielding a straighter final pull. In addition, the froggers feel that because they begin their final explosions in the pull later than most lifters, the chance of “swing” (a horizontal as well as vertical movement of the bar) is reduced.
The Soviets studied the style during the 1970s and concluded that: a) it was suited for the peculiarities of the “oriental physique” more than the occidental; and b) the turned-out feet meant that the anterior/posterior balance point on the foot was smaller than in the conventional style, making the pull less stable and reducing the athlete’s ability to use the back muscles properly during the pull. By the time this analysis was made, the Japanese lifters and their defenders had faded from the international scene, and the long dominance of the Eastern Europeans had begun. Just as the frog may have received too much attention when Miyake, Ohuchi and other Japanese were breaking records, it may have been too quickly dismissed once they departed the competitive platform.
Two criticisms of the Soviet analysis are apparent today. First, the analysis was primitive by today’s standards. Therefore, any conclusions reached at that time bear some re-examination in a more modern era. After all, it was during this same period that many Soviet theorists predicted the “modern” (post-press) lifter would be leaner and more athletic in appearance than the lifters of earlier years. The days of the stocky little man were over, they said. (Fortunately, the great World and Olympic Champion, Naim Suleymanoglu, was either unaware of or unwilling to accept such a hypothesis). The linking of an “oriental” body type to the frog was a crude explanation even then. Any observer could have seen that Miyake’s and Ohuchi’s body types were quite different (as were the bodies of other Japanese lifters). Consequently, the effectiveness of the style was not related to one body “type,” at least as defined by the analysts who made the claim.
Second, the arguments that the frog style is more precarious than the conventional style because of the athlete’s foot position or that the back muscles can be used less while employing the frog style are a classic case of oversimplification. Such oversimplification arises out of the focus on one or two aspects of technique to the exclusion of all others. It is true that the athlete has a smaller base of support when pulling with the frog style, but the frog has advantages that tend to offset that disadvantage. Since the knees are spread wider in the frog style than in the conventional style, partly due to the foot position that is used in the frog style, the bar can pass the knees with less need for the knees to move backward and then forward. The result is that less fore-aft instability is produced during the pull, and the length of the transitional phase of the pull can be shortened. Hence the body is able to balance in a smaller area. In addition, since the back works differently in the frog than in the conventional style, the need for strength in the muscles that straighten the torso is diminished in the frog style.
The success of the Japanese lifters with the frog does not necessarily prove the efficacy of that style. Champion lifters can certainly be wrong about technique, and they often are. However, the frog style does have some special things to recommend it. First is the outstanding ability of the Japanese who mastered it. Beyond the famous ones, there are several reports of even more remarkable feats performed with the frog-leg style by less well known lifters, including cases of Japanese lifters who improved dramatically when they converted to the frog style from the conventional style.
There have been many success stories from American lifters who have tried the frog style as well. Eight-time United States national champion Mike Karchut had significant success with the style, as did Chuck Nootens, a former American record holder in the snatch. Former World Champion Joe Dube, who for many years struggled with a relatively poor snatch, became a multi-time American record holder and world class snatcher when he switched to the frog. On a more personal note, while hardly known as a great snatcher, I used both the frog and various more conventional styles during my career and was more consistent with the frog. Even if I abandoned the frog style for years at a time (which I did several times during my career), I was always able to snatch as much or more with the frog as with the conventional style on my first try (not a wise practice, but it did prove a point to me).
None of this is to say that everyone, or even anyone, should go out and master the frog tomorrow. Today’s conventional style is well proven, likely to be better coached and probably better suited for most lifters. Instead, the evidence regarding the frog style suggests that the style may have been inappropriately dismissed and that at least some new research (focusing on more aspects of the lift than the balance on the feet) should be conducted. It is a style that clearly has value for at least some lifters. In addition, the story of the frog style offers us all a valuable lesson about style. All that can be known about style has not yet been learned, and some of what we have learned along the way may have been forgotten as fashions changed. Alternative techniques that are superior to anything that is used today may still be out there. Neither the coach nor the athlete should assume there is no need to think about or to experiment with new techniques. The science of weightlifting is still young.
Foot Spacing for the Jerk
Most lifters assume a foot position in the jerk that is similar to the one they use in the pull. The most common position is the so called “jumping” position, the same position that the lifter would assume in order to achieve a maximum standing-jump height (usually about the width of the hips with a minor turning out of the toes). This position may promote application of maximum force during the explosion phase of the jerk, but, in the jerk as in the pull, some lifters will find this position ineffective overall.
For example, in the jerk some lifters have a tendency to lean forward at the torso when they are dipping with a jumping stance. This can often be corrected by shortening the lifter’s dip and asking the lifter to focus on a strictly vertical dip. Despite these efforts, the lifter may persist in dipping forward. In such a case, many lifters will find it easier to keep the back in an arched position and to dip straight with a wider and/or more turned-out foot position (particularly if the knees travel over the toes during the dip). If the lifter uses such a position, something may indeed be given up in terms of the power developed in the drive, but improved control over the direction of the drive may well make such a loss acceptable.
Optimizing Various Aspects of the Pull
Executing the Second Stage of the Pull with the Hips Low Versus High
Some lifters perform a portion of the first phase of the pull with their hips in a relatively low position (e.g., with the hips joints at, below or slightly above the level of the knees). Others prepare to lift the bar with their hips significantly higher than the knees. Observers of athletes who begin with their hips low often make the mistake of assuming that the lifter is actually lifting the bar from that position. In fact, the lifter with the low hip preparatory position typically moves his or her hips up considerably as force is applied to the bar, so that at the actual moment of liftoff the hips are well above the bar. In contrast, the lifter who sets his or her body with the hips high typically does not move the hips until the bar moves as well. Therefore, the lifter who executes stage one of the pull with the hips low may actually lift the bar from the platform with his or her hips in a higher position than the athlete who finishes the first stage of the pull with the hips higher; any argument that a lifter is starting with the hips too low is an incorrect one. While this point may obvious, it is often not easy to determine just where a lifter’s hips are as the bar leaves the platform, even if the lifter’s hips are moving slowly. In such a case, a little slow-motion film will prove to be enlightening.
Among lifters with sound technique, differences with respect to starting hip position have to do with anatomical differences. In assuming a correct starting position, different lifters will have their hips in different positions in relation to the bar. These differences are incidental from the standpoint of effective technique as long as the lifter’s balance is over the middle area of the foot, the shoulders are held in a position directly over the bar , the shins are touching the bar, or nearly so, and the proper muscle tensions are maintained (e.g., the back is solidly locked into position).
Actually entering stage two of the pull with the hips low can be a problem if the hips are so low that: a) the weight of the athlete and bar combined are positioned toward the back of the foot as the bar is started from the platform; or b) the back, particularly the lower back, is rounded; or c) the shoulder joints are behind the bar. If one or more of these conditions exists, the bar will almost certainly be directed improperly during some or all of the rest of the lift (e.g., the bar may travel forward from its starting position instead of back during the early phases of the pull, or the bar may be misdirected rearward at later stages in the pull). This is unfortunate, since errors or this type are among the easiest ones for the lifter and coach to correct. The lifter need only be aware of where the weight is distributed on his or her foot to correct the first problem. Immediate feedback from the coach is needed to correct errors in back or shoulder positioning. They tend to arise simply from the athlete having no feedback on his or her position and failing to associate the feelings he or she is experiencing with faulty positioning.
One other issue with regard to hip positioning at the start of the actual liftoff has to do with the trade-off between hip position and torso angle. The lower the hips at the start of the pull, the more upright the torso will tend to be as the bar is lifted from the platform and during the balance of the lift. A more upright torso tends to reduce the strain that is placed on the torso muscles during the pull, but it also reduces the distance over which those muscles can operate to raise the bar.
Different Methods of Executing the First Phase of the Pull
Perhaps the majority of beginning and intermediate lifters begin to exert the force necessary to separate the bar from the platform from a stationary position. That is, these lifters carefully assure their starting positions while holding onto the bar, setting their position and then pausing before beginning to exert the force necessary to separate the bar from the platform. Since there is a high probability that as a will finish as he or she starts, it makes sense to start the bar very carefully.
Although care in positioning the body for the start of the pull is laudable, it is not the only consideration in finding an optimal starting technique. Offsetting the advantages of a start from a stationary position are two well known physiological principles. First, a muscle which is stretched before it is contracted will contract more forcefully than one that is not. Second, as the lifter “sits” in the starting position, the muscles of the hips, legs and back contract isometrically to support the body, which fatigues the muscles somewhat. (It is true that the muscle fibers involved in supporting the body in this position tend not to become easily fatigued and that they are assisted by other more rested fibers in lifting the bar; this phenomenon is explained in Appendix II, which discusses muscle physiology.) In order to minimize muscle fatigue, many lifters attempt to relax the leg, hip and/or back muscles just prior to exerting force against the bar. Some lifters simply sit in a fairly deep squat position with the hands on the bar and then straighten the back and legs to begin the contraction of those muscles, ultimately lifting the bar when the legs and torso have been raised to the position from which the lifter normally begins the liftoff. This style was particularly popular with the Bulgarians of the 1980s and is still used by many lifters today.
Other lifters get their bodies more or less positioned for the start of the pull, except that their hips are higher than their starting position. Then, just before they begin to pull, they lower the hips to the starting position and then start the pull. Some lifters even raise and lower the hips several times in a sort of pumping motion.
A very small number of lifters (including some of very high ability) use what is called a “dive” style. In this style, the lifter slowly lowers the body in a manner that is approximately the reverse of the pulling motion. As soon as the hands are in a position to grip the bar the athlete does so and begins the pull. In using the dive style, the lifter probably gains, in the most effective way possible, some of the advantages available to an athlete who pre-stretches the muscles of the body, but there is a trade-off in that the athlete does not have much time to set his or her grip or to be sure that the body is in just the right position to begin the pull.
Which technique is the best? That will depend on the lifter and the lift. The lifter who relies on a rapid pull from the floor to accelerate the bar will tend to benefit from some form of dynamic start that is between the extremes of the stationary start and dive style, and some may even find the dive style to be useful (this is more likely to be the case in the clean, where the acceleration in the second part of the pull tends to be smaller than in the snatch and the start from the floor more difficult). The dive will be most attractive for the athlete who pulls rapidly from the floor, can time the start of the pull correctly and has no trouble with a fast gripping of the bar.
A lifter who pulls relatively slowly from the floor and has trouble concentrating if the body is moving needs to be stationary before the pull begins; one who has trouble finding the correct starting position may be better served with a stationary position than a more dynamic one. A compromise position for a lifter who has trouble with a dynamic start is a static start that is held as briefly as possible. Whichever style is chosen, the method of the start tends not to be a “make or break” matter since most lifters rely more on the explosion that take place during phase four of the pull than the preliminary acceleration of phase two to get the bar to the necessary height with the required momentum, particularly in the snatch.
A Fast Versus a Slow Pull From the Floor
Lifting circles have probably debated the relative advantages of a slow and fast pull from the floor as long as there have been lifters, and that debate is likely to continue for many years to come. The controversy stems from the failure by each side to see the full arguments of the other side and to acknowledge that individual differences influence the value of each technique and that trade-offs in both styles tend to cancel each other out so that the issue is not one of “night and day.” However, there are some relevant principles that should help each lifter and coach decide what is best for the individual lifter.
Physics tells us that the longer a net force is applied to an object, the greater will be the acceleration imparted to that object. Taken at face value, this principle suggests that a lifter should pull as long and as hard as possible in order to impart maximum acceleration to the bar (i.e., tear the bar off the floor with maximum force and continue to increase the force with each passing split second). However, before you reach such a conclusion, it is important to reexamine precise meaning of force as it applies to acceleration. Acceleration is a change in the speed of an object. Acceleration only occurs when an unbalanced force (a force that is greater than any other counterforces that it encounters, such as friction or an opposing force like gravity) acts on an object. When a force is applied in a way that only involves the movement of a single lever or series of levers in a given direction (such as a vertical jump of the drive in the jerk), the athlete need think only of applying maximum force to the ground throughout the movement . Since the object is traveling in a straight line, the only acceleration arises out of a change in the speed of the object.
In pulling a bar from the floor, the situation is different. The body does not simply straighten; first the legs straighten, then the back straightens and the legs rebend, then both the back and legs straighten. This is, needless to say, a very complex motion. Some lifters who attempt to move too fast, particularly when they are learning the motion, will tend to omit certain parts of necessary movement or to time their movements improperly (e.g., to straighten the torso prematurely). In addition, no matter how much acceleration the lifter achieves during the first part of the pull, a deceleration will occur during the amortization phase of the pull (i.e., the body will apply no net force). Then the application of force will resume during the final explosion. This is not because the lifter is not trying to apply force, but rather because some of that force is being used to reposition the body during the amortization phase of the pull. If a fast second stage of the pull leads to a greater reduction of speed during the adjustment phase, such a style is probably not very efficient for the lifter; the lifter either needs to move faster during the adjustment phase or to perform the second phase of the pull a little more slowly, so that the combined second and third phases of the pull are better coordinated.
One problem that often arises in connection with a fast pull as opposed to a slow pull from the floor (really an 80% to 90% effort versus an all out effort) is that when the lifter exerts maximum force during the first stage of the pull, there is a greater tendency for the athlete to lose the rigidity of his or her body links or the proper positioning of those links (e.g., for the spine to lose its arched position or the shoulders to be pulled forward or to contract the arms or traps prematurely). Another reason for not pulling with 100% effort during the second phase of the pull is that some athletes have a greater tendency to misdirect the movement of the body and the bar or to contract certain muscle groups when maximum force is applied as the bar leaves the platform prematurely than when the effort expended is more moderate during this stage. Still another reason for exerting less than maximum speed off the platform is that such an effort may fatigue the pulling muscles somewhat, thereby making them less able to exert maximum force during the crucial fourth phase of the pull. Finally, the joints of the body are at their most acute angles as the bar comes off the platform and thereby are most vulnerable to injury. Exploding off the platform places great stress on these joints at their weakest positions. Injuries from this kind of effort are rare, but if the explosive technique off the platform is applied over a period of many years, its effects may accumulate and eventually cause overuse injuries to the athlete.
Because a relatively greater weight is used in the clean than in the snatch, the effort that the lifter must exert during the second phase of the pull for the clean is greater than in the snatch. However, this does not necessarily translate into a proportional increase in the difficulties faced by the lifter during the second phase of the pull in the clean. Because the athlete grips the bar with the hands closer together in the clean than in the snatch, the lifter’s torso tends to be in a somewhat more upright position and the legs are a little straighter in the starting position. This is a more favorable mechanical position for the athlete so the effort required is smaller than it would be if the athlete lifted the same weight with the snatch grip. Misdirection of the bar is also a little less of a problem in the clean as a heavier bar is harder to misdirect. However, it is more difficult to accelerate the bar in the clean, due both to the greater weight that is on the bar in the clean and the shorter distance that the lifter has to accomplish any acceleration. ( A lesser degree of acceleration is acceptable because the athlete does not need to raise the bar as high in the clean as in the snatch.)
Given all the aforementioned considerations, it is generally preferable to exert a low to medium degree of force in the snatch during the second phase of the pull and then to exert maximum force during the fourth phase. In the clean, a medium or even greater effort in the second phase of the pull and then a maximum effort in the fourth phase are the most appropriate tempo for most lifters. Nevertheless, it should be noted that certain lifters make every effort to exert maximum force throughout the pull. Many of the Bulgarians appear to be doing this. Certainly there are many World Champions who seem to have pulled with a maximal effort all of the way.
Why are different tempos in the pull effective? One reason may be the bodily proportions of the lifter (e.g., athletes whose proportions enable them to apply force to bar for a longer period of time may be able to increase the force they apply more gradually than athletes who do not have the same ability). Another reason may lie in the trade-off between lifters who have a longer adjustment phase in the pull and those who have a shorter one; the former may lose so much speed during that phase that a rapid second phase of the pull is not very helpful overall. Still another reason may be that lifters have different compositions of muscle (e.g., fast twitch vs. slow twitch) and different abilities to activate those muscles explosively. A lifter who can reach a maximum level of force quickly may be better able to pull smoothly and then accelerate the bar suddenly. The lifter who does not have such a capacity may have to begin applying maximum effort earlier in order to achieve maximum force output at the desired stage in the pull.
All of these issues should be considered in determining the best style for a given lifter, at least at a given stage of his or her career. Often, experimentation is the only way for the lifter to determine what is best for him or her. If such experimentation suggests that a lifter can achieve maximum results with more than one tempo, the one that leads to the greatest consistency in performance and causes least strain on the joints is to be preferred.
Whether the lifter begins the pull slowly or as rapidly as possible, it must be remembered that several things should be occurring during the second phase of the pull. First, the knee joints straighten and go backward, out of the way of the bar. Second, the angle of the torso in relation to the floor should not change significantly during the second phase of the pull (the torso may straighten somewhat during the end of this stage). Third, the shoulders should move forward to a position in front of the bar as the second phase of the pull progresses. Fourth, the bar should move rearward toward the lifter’s body from its initial position on the platform (this process continues during the third phase of the pull).
Degree of Leg Bend During the Adjustment Phase of the Pull
There are two different schools of thought regarding the amount of rebend that a lifter should achieve during the adjustment stage of the pull. Some authors argue that the smaller the rebend, the less time and speed the lifter will lose in the transition from the second to fourth stages of the pull (the two stages during which the greatest force is exerted on the bar). Others argue that deeper the rebend, the greater the lifter’s ability to exert force during the fourth stage of the pull.
Both arguments have merit. Obviously the lifter who achieves significant bar speed during the second stage of the pull and not much greater speed during the fourth will want to maintain as much speed as possible during the adjustment stage (i.e., use a lesser knee bend). On the other hand, the lifter who relies of the fourth stage of the pull to impart most of the force to the bar will want to achieve the most functional position from which to create maximum force (i.e., to achieve a relatively greater knee bend). Some experimentation with both styles is generally useful.
One principle that applies to either style is that the adjustment phase should be conducted as quickly as possible. It is generally desirable to retain as much of the bar speed achieved during the second stage of the pull as possible. A faster adjustment will enable the lifter to move the body as much as possible while the bar is in a relatively weightless stage (i.e., the body can move freely while momentum continues to keep the bar rising) and a rapid rebending of the knees will activate the elastic properties of the leg extensors, fostering a more powerful final explosion in the pull. (See Appendix II for further details.)
There are a number of weightlifting analysts who believe that the degree of leg bend achieved by the lifter during the adjustment stage of the pull cannot be influenced by the coach or athlete. Indeed, it has been argued that the rebending of the knees that occurs during the second stage of the pull cannot be taught at all! I find such a position untenable for several reasons. First, if a rebending of the knees could not be taught, it would follow that any lifter who does not automatically generate such a rebending ought to give up any hope of a weightlifting career. In reality, many lifters who do not rebend their knees when they first begin to lift ultimately learn to do so. Second, I know at least one elite level lifter, Cal Schake, who learned to consciously modify the degree of his knee bend in the pull after having lifted for many years. Moreover, Cal points to that modification (in his case increasing the degree of leg rebending) as one of the key reasons for his becoming the first American ever to snatch double his weight. Third, why would the knee bend during the pull be so unique a movement that it could not taught?
In reality, the coach who says that the knee bend during the adjustment stage cannot be taught or the lifter who says that it cannot be learned simply does not know how to make the knee bend happen. In fairness to such coaches and lifters, that knee bend can be quite difficult to learn and to teach. A lifter who consciously focuses on rebending the legs faces two difficult challenges: achieving the correct rebent position and doing so quickly enough so that the overall rhythm of the pull is not broken. While the lifter can learn to do both these things on a conscious level and then automate the process with enough practice, there is an easier way for most lifters to achieve the same end. That method is related to the modification of other aspects of the lifter’s technique that are likely to be causing the lack of or the improper rebending of the knees.
The failure of a lifter to achieve a proper second bending of the knees most often stems from one or more of several causes. One of the most common is improper balance on the foot before and during the adjustment stage. Another common cause of a less than optimal knee bend is the improper positioning of the lifter’s torso relative to the legs during the second and third phases of the pull. For example, if the lifter begins to straighten his or her torso prematurely during the pull and shifts his or her weight too far rearward, that lifter will be unlikely to drive the knees forward and under the bar properly during the adjustment phase. Similarly, the more upright the lifter’s torso during the second stage of the pull, the smaller the displacement of the torso when it is straightened and the smaller the rebending of the knees.
One final common cause of a failure to properly rebend the knees during the third stage of the pull is improper timing during that stage. If the lifter attempts to slow or stop the pull in order to reposition the knees, the bar will tend to stop or even to fall. This is illegal; the rules of weightlifting do not permit the lifter to stop the upward progress or to lower the bar during the execution of the pull. It is also inefficient, as any upward momentum of the bar is lost during such a transition. The lifter is much better served if the movement of the knees under the bar is a part of the overall flow of the pulling movement.
If a lifter corrects these flaws, the knee bend is likely to be improved. To summarize, the keys to a proper knee bend are: a) proper positioning of the shoulders relative to the bar at the completion of the second stage of the pull (shoulders forward of the bar and shins nearly vertical and proper balance on the feet); and b) a well timed and explosive effort to straighten the torso. Some lifters achieve the best result in the latter respect by thinking about raising the torso upward and, somewhat backward. Others achieve a better result by thinking of driving the hips toward the bar. Whatever the case, the focus on straightening the torso and bringing the hips closer to the bar causes the legs to bend and the knee to move forward and under the bar, because the same muscles that extend the hip joint also cause the legs to bend. (See the section on two joint muscles in Appendix II for a further explanation of this concept.) By applying these methods and without a conscious effort to bend the knees in a certain way, the proper bending of the knees can be “learned.” Nevertheless, some lifters who are having difficulty in this area may need to think consciously of rebending the knees, at least for a time, in order to achieve the optimal motion in this aspect of the pull. They should not be discouraged by those who say that the second knee bend cannot be learned. Every lifter can learn it; it is merely a question of selecting the proper means for the learning process to occur.
Other Common Style Variations in the Early Phases of Pulling
Lifters vary significantly with respect to certain fundamental aspects of their starting position other than those already mentioned. For example, most lifters begin the pull with the bar over the juncture of the toes and the ball of the foot. However, many athletes place the bar in front of the base of the toes at the start of the pull (though never altogether in front of the toes), and others place the bar over the ball of the foot, behind the toes.
When the bar is placed further away from the body than the base of the metatarsals, it will travel toward the lifter to greater extent during the early stages of the pull than when the bar begins directly over the metatarsals. The distance of this additional movement toward the lifter approximates the added distance between the lifter and the bar at the start of the pull (e.g., if the bar is 1” in front of the base of the metatarsals at the beginning of the pull, the bar will travel an additional inch toward the lifter during the second stage of the pull). Its movement during the later phases of the pull will be similar to the pattern of movement that occurs when the bar starts in a more conventional position.
When the bar is placed behind the base of the toes at the start, it will tend to shift toward the athlete to a lesser extent, by an amount approximately twice the distance that the athlete’s feet are placed forward of the conventional position in the start; e.g., if the base of the metatarsals is 1” forward of the bar, and the bar would normally have traveled 4” toward the lifter during the early stages of the pull, it will now travel only 2” toward the lifter. If the bar is brought still closer to the lifter, it may actually travel away from the lifter during the early stages of the pull. Placing the bar too close to the lifter at the start will also require the lifter to lean back more than is usual during the explosion phase of the pull in order to keep the bar moving in a vertical path. If the placement of the bar is very extreme in terms of placement behind the base of the metatarsals, the bar may actually travel forward at the end of the pull.
Another common variation in pulling style among lifters involves differences in the angles assumed by the major joints of the body at various phases in the pull. What are the reasons for these differences? The Eastern Europeans often refer to three basic body types in their literature, and they have identified certain technique characteristics which they feel are correlated with those physique types. The mesomorphic type is considered “normal.” An athlete with longer limbs and a shorter torso is generally referred to as the dolichomorphic type. The third type is the brachimorphic, characterized by shorter than average limbs and a longer than average torso.
An example of the kinds of technical differences that exist among lifters with different body types occurs in the starting position. In this position, lifters with shorter legs and longer torsos tend to hold their torsos more upright and to bend the legs more at the start. However, when starting positions vary because of physical characteristics (as compared with technical mistakes), the differences among the positions athletes assume tend to be minimized during the middle stages of the pull (there are differences in the squat position, just as there are in the starting position). Differences that are created by technical errors are not ironed out during the middle stages of the pull. In some cases, the differences grow smaller but in others they grow even larger than they were at the outset.
Naturally, there are an infinite number of variations that extend within and across these fundamental types. All of these major differences in technique and body proportions and many smaller ones can lead to variation in the overall pattern of movement that lifters generate during the lifts.
Some analysts have argued that lifters who are mechanically better suited than the average lifter to use the back in the pull (this could be the result of stronger back and hip muscles, a shorter back or both) will tend to have a greater than normal incline in the torso (i.e., a smaller angle relative to the platform) during much of the pull. As a result, the bar will be lower in relation to the platform than is normal, at least through the second phase of the pull and perhaps later. This results in the lifter being able to exert force over a longer distance in subsequent stages of the pull. However, this is only an advantage if the lifter is not too fatigued to exert force over the entire distance or is not in a mechanical position that lessens the amount of force that can actually be applied, an unlikely set of conditions.
Similarly, some analysts have argued that lifters who have legs that are mechanically better suited than average to lift the bar tend to begin the pull with the torso more upright than normal and to straighten it earlier during the pull than is normal. This results in the height of the bar being greater in relation to the platform than is normal prior to the final acceleration so that the lifter can exert the force during the final acceleration over a shorter distance than is normal. There is also an tendency for the lifter with a more upright torso to straighten the torso faster than the legs during the explosion phase and therefore to generate excessive lean-back at the finish of the pull, with the result that the bar is pulled backward from its starting point on the platform. Roman has suggested that when the bar travels up to 3 cm forward or 5 cm behind the base of the metatarsals after the final explosion has been executed, the bar will end up in an area that is controllable by the athlete. (These distances are guidelines for the athlete of average height; taller athletes have larger tolerances and shorter athletes have smaller ones.) Horizontal movement beyond that point will make it difficult for the athlete to control the bar during the squat under. While this would seem to be a disadvantage, there are some very good lifters who lift in this manner. Therefore, there may be some compensating mechanisms that overcome, at least to some extent, the disadvantage of a shorter distance to accelerate the bar. (For example, since the bar is already higher, it needs to be accelerated less to reach its ultimate height, or the body is in a stronger mechanical position for the shorter explosion than it is for a longer one so that the shorter duration is compensated for by a greater force generation over that shorter distance.)
Jumping Forward or Backward When Receiving the Bar
For many years there has been discussion in weightlifting literature about whether the lifter should jump forward, jump back or simply jump down when performing the squat under in the squat style. Most lifters simply place the feet sideways relative to their position or jump them back slightly during the pull when they perform the squat under. However, some great champions have either jumped forward an inch or two or backward to even a greater extent while the feet are being replaced. A few lifters have even placed the feet closer in the squat position than during the pull (though this is extremely rare and is generally a mistake). The Soviet analysts tend to encourage only moderate forward or backward motion of the feet during the unsupported phase of the squat under, while some Bulgarian theorists believe that a significant backward displacement of the feet is appropriate because they believe that the bar is displaced rearward during a proper execution of the pull.
As a general rule, the less the degree of forward or backward floor movement, the better. Most lifters will experience inconsistency if they move the feet too far forward or backward during the squat under. Moreover, the perceived need to jump forward or backward generally results from a fault during the pull, a fault which causes the weight of the body to be shifted too far towards the front or rear. Every effort should be made to correct such errors. However, in the end, if proper pulling mechanics are employed, the need to place the feet forward or backward relative to their initial position is an individual matter. The key, as Dave Sheppard told me many years ago, is to “go wherever the bar is.” If the lifter needs to jump forward or back somewhat in order to receive the bar in a balanced position, then that is what must be done and done appropriately and consistently.
Optimizing Various Aspects of the Jerk
A Long Versus a Short Dip In The Jerk
The dip for the jerk is essentially a preparatory motion for imparting maximum vertical velocity to the bar. It is much like the bend in the knees that an athlete makes when he or she prepares to make a vertical jump, and therefore the same essential principles apply to both motions. The preparatory bending of the legs accomplishes a number of things. First, it lowers the center of gravity of the jumper’s body (or the combined center of gravity of the lifter and the bar). This creates a distance over which the jumper or lifter can apply force and achieve acceleration. All things being equal, the longer the jumper/lifter can generate force, the greater the velocity achieved by the time the jumper or lifter loses contact with the ground.
In addition to the benefit of achieving a longer distance for and time of acceleration, a longer dip of the legs tends to increase the activation of the elastic properties of muscle tissue. When a muscle is made to contract in an eccentric manner immediately before it contracts concentrically, that muscle will contract with greater force than if it had not received the preliminary external force. Up to a point, a greater external force will elicit a greater eccentric contraction and hence greater subsequent concentric contractile force. Therefore, the preparatory bending of the legs both positions the legs so that a maximum duration of acceleration can take place and “charges” the muscles with elastic energy so that the upward thrust will be greater than if the athlete had started from a dead stop.
Taken to their ultimate extreme, the preceding formulations imply that the greatest possible jumping height can be generated by dropping into a full squat position with maximum force and then jumping up. Clearly a drop into a full squat can both provide maximum stimulation of the downward force against the muscles that will subsequently contract and give the legs an opportunity to accelerate the body and bar over the greatest distance. Not surprisingly, the deep squat position is not the best method of achieving a maximum jumping height (or thrusting height in the jerk). This is because offsetting factors begin to overcome the advantages of a longer period of thrust and a greater elastic muscle “charge.”
One problem with too long a dip is that while muscles can only achieve maximal contractile force if they are given sufficient time to do so; after a certain period of time the force of muscle contraction begins to diminish as a result of fatigue. Therefore, there is an optimum time of muscle contraction, and after that period force diminishes rather than grows. Another problem is that as the legs bend ever further in preparation for a jump or jerk drive, the amount of force required to straighten the legs increases, placing the muscles at a disadvantage. Still another problem is that as the depth of the bend grows, the extent of the movement of various joints increases, which tends to destabilize the pattern of movement and make it more difficult to maintain balance and control as the upward thrust is performed. Finally, greater downward force generated in the dip also means greater effort is required to reverse the direction of the bar.
Given these considerations, the depth of the dip will vary somewhat with the strength of a lifter’s muscles, his or her body proportions and the style he or she uses to perform the drive (e.g., the speed of the dip and the speed with which the downward force is reversed). A faster dip and reversal can elicit the elastic properties of the leg muscles as much as a slower but deeper dip and reversal of the downward motion of the dip. For most lifters this depth will range from 8% to 12% of the lifter’s height.
Unlocking the Knees in Preparation for the Dip
The rules of weightlifting generally require that the athlete straighten his or her legs fully at the conclusion of the clean. Many lifters begin the dip from this position (i.e., with the legs straight). Other lifters and coaches believe that the knees should be unlocked slightly before the dip for the jerk commences. They argue that doing this makes the dip smoother and straighter that when the lifter first unlocks the knees while dipping.
The advantage of the locked leg position is that it minimizes the development of fatigue in the quadriceps while the lifter is preparing for the dip. For a lifter who takes some time in preparation for the dip, maintaining a straight leg position can be very important (at least until just before the lifter begins the dip proper). For most lifters this is a minor issue, and either approach will work. For those lifters who are having trouble controlling their dips, it is probably a good idea to experiment with both styles and to adopt the one that is most successful.
A Fast Versus A Slow Dip in the Jerk
The speed of the dip in the jerk is another area of variation among lifters. As noted above in the discussion of the dip, a faster dip will create a greater elastic contraction in the leg muscles and therefore facilitate the generation of a greater upward force. However, it is also true that, carried beyond a certain point, a fast dip will create so much downward acceleration that the muscles will actually become fatigued from the effort of stopping the downward motion of the bar, lessening the ability of the legs to generate an upward thrust. Carried to an extreme, the lifter may actually lose control of the bar if the downward speed used in the dip is too great. This can result from inadequate muscle strength, n inability to effectively coordinate the motion or loss of balance. In addition, if the lifter dips too fast, he or she can lose contact with the bar by opening a gap between the body and the bar. As a result, the bar and body will collide at some point; because the body and bar are not in contact, the collision can result in the lifter and bar traveling in different directions after contact is made. There will also be a loss of upward thrust energy; these are not desirable effects, to say the least. Even if there is no deflection of the bar and body during a collision, timing and the process of developing maximum thrust can be thrown off. Therefore, the correct balance, in terms of the depth of the dip, must be found so that the elastic properties of the muscles are activated to their maximum extent while the lifter maintains control.
One additional factor that affects the determination of the optimal speed of the dip is the elastic properties of the bar itself. When a lifter dips his or her legs, he or she is effectively removing the support of the legs from the upper part of the body and the bar, allowing both objects to fall. When the lifter applies leg force once again to stop the fall, the upper body stops almost immediately, causing it, in effect, to collide with the bar. The collision occurs at the center of the bar, a point some distance from the bulk of the weight of that bar. Since the bar is constructed of a material with elastic properties (steel), the plates will continue to travel downward after the bar collides with the body, and the bar will convert the kinetic energy expended by the plates during their fall into elastic energy in the bar. Once the kinetic energy of the plates has been absorbed, the bar will release elastic energy in order to return to a straight position, driving the plates upward (and ultimately imparting more elastic energy to the bar, which is released as the bar begins to slow somewhat in its vertical rise). If this upward rebound of the plates is timed correctly and occurs at the correct position in the drive, it can help the lifter to raise the center of gravity of the bar to a height sufficient for the lifter to fix the bar overhead. If the rebound is permitted to occur too early, the bar will have a chance to spring back down on the lifter before he or she has assumed a strong position in which to catch the bar. All other things aside, a shorter stopping time will therefore elicit the greatest elastic properties of both the bar and the muscles of the leg.
Consequently, the optimal depth of the dip, the optimal speed of the dip and the speed with which the downward motion of the bar is reversed are all interrelated. If two dips are executed with the same downward acceleration, the longer dip will have a greater terminal speed. This will generate a greater elastic response in the muscles and the bar. Of course, it will also place a greater force on the muscles that must stop the descent of the bar and place the joints of the leg in a weaker mechanical position from which to stop the downward acceleration of the bar and to reverse that direction. Therefore, the faster the dip, the less depth is required to activate the same elastic properties of the legs and bar and the stronger position the legs will be in order to overcome the downward force of the bar. (A faster switchover from the dip to the explosion will also more vigorously activate the elastic properties of the leg muscles.) However, a shorter dip will give the leg muscles a shorter period in which to accelerate the bar upward. A deeper dip will give the lifter a longer period during which upward acceleration can be accomplished.
Therefore, the lifter is always better off dipping as long and as fast as is possible and reversing the direction of the dip as rapidly as possible. However, all three things cannot be achieved at once. The lifter dipping deeper will need to dip more slowly and will not be able to reverse direction as quickly, but will be able to exert muscular force on the bar over a longer period of time. The shallower dipper will be able to dip more quickly and stop more rapidly, but will not be able to exert muscular force on the bar for as long a period of time. The lifter should also be aware that regardless of the length and speed of the dip, it must be straight up and down, and the lifter’s body must not sag or give in any other way as he or she reverses direction from the dip to the drive upward.
Each lifter must find his or her own balance of speed, depth and amount of time reversing the downward direction of the bar in the jerk. Regardless of the speed, depth and reversal time of the dip, the lifter must be careful to remain on the flat foot until the latter stages of the final explosion (i.e., from the start of the dip to the point where the lifter has nearly straightened the legs once again). Going on the toes too early can preclude a thrust of maximum power and make the lifter subject to a loss of balance arising out of a smaller base of support. Using the arms prematurely can cause the bar to separate from the shoulders during the dip or thrust or to push the lifter down against the platform before a full split position has been assumed. With respect to what the lifter thinks about during the dip, Roman advises that a slight resistance by the leg muscles during the dip will provide a correct downward speed for most lifters, while Vorobyev suggests that the lifter attempt to apply no resistance at all and simply let the bar fall to the appropriate depth. While these are starting points t may be helpful for the majority of lifters, the process must be individualized for each lifter.
When to Terminate the Jerk Drive
There are a number of issues to consider when determining when the active thrusting of the lifter against the bar should be completed and when the movement into the squat under should begin in the jerk. All things (e.g., launching speed) being equal, the higher the bar is when force ceases to be applied to it, the greater height the bar will ultimately achieve. Therefore, if the lifter could achieve an identical launching speed with the legs bent at an angle of 150o or standing on the toes, it would be to the lifter’s advantage to release the bar while on the toes. The bar would then travel higher, and the lifter would not have to lower the body as much to catch the bar in the jerk. As a practical matter, this is simply not the case, since the lifter applies maximum force with the thigh extensors and not the gastrocnemius muscle (the muscle that is primarily responsible for extending the foot when the body rises on the toes).
Offsetting the consideration of the height of the bar is the consideration of how quickly the lifter can move from the extended position in the final explosion to the necessary split or squat position. If the position on toes leads to the lifter’s taking longer to get into the split, it might offset any advantages that could accrue from a higher absolute drive. A longer time getting into the split leads to a greater bar drop. This means both that some of the added height advantage could be lost because the bar will descend from the highest point it has reached before it can be caught and that the bar will take longer to control because it will have had time to build up a greater downward speed than if its descent had been arrested earlier. Therefore, the decision about where to terminate the drive must be balanced on three considerations: a) the means by which maximum bar speed can be achieved; , b) the height of the bar at release; and c) the time it takes to get into position to catch the bar from the position at which the drive has been completed. Most lifters stay with the drive too long. Significant additional force cannot be applied once the thighs have reached a nearly straightened position. Lifters who extend the body much further than this are wasting valuable time which could be better used to move under the bar. The telltale sign of this is the lifter driving the bar to a relatively high position but then catching the bar on bent arms with the feet positioned in a relatively narrow split. This has occurred because the lifter has wasted valuable time in the drive, time that contributed little to the upward progress of the bar and that could have been used to reposition the feet and body under the bar.
The Depth of the Split Position
The depth of the squat or split position should be based on several considerations. There are at least two advantages to assuming a lower position. First, the lower the split, the less height the lifter will need to achieve in the drive in order to get the bar overhead. Second, a lower position is actually more stable than a higher one (see Appendix 2 for an explanation of this concept). Offsetting the stability and efficiency of a lower center of gravity is the fact that a lower split generally places the body in a weaker anatomical position than a higher split position and can make it more difficult for the body to stop the downward progress of the bar. In addition, a lower position takes longer to assume. This gives the bar more time to accelerate in a downward direction, placing more stress on the joints (and making it more difficult to stop the downward movement of the bar). Some analysts have argued that placing the front foot further out in the split it indicates that the lifter is using the legs more energetically and so is indicative of better technique. While this argument is worth considering, there are other reasons for the front foot being placed well forward of its starting position (e.g., as compensation for a forward dip), reasons which suggest that it cannot be used in isolation as in indicator of effective technique. One final point for the lifter to keep in mind is that he or she should distribute more of his or her weight on the front foot than ton he back in the split. The back foot offers considerable support and stability to the overall position but is clearly subservient to the front foot in terms of supporting the bar and body.
Summary
In this chapter, I have spent a great deal of time explaining weightlifting technique and its importance. An analysis of technique, guides to good technique and explanations of many of the trade-offs that exist with regard to technique have been presented. If you have studied the chapter carefully, you now have a better conceptual understanding of technique than do many athletes and coaches who have been involved with the sport for many years. But reading about technique does not substitute for practical knowledge. That can come only from practicing it and teaching it: the focus of the next chapter.